Configure Admittance Control
Many robotics manipulation applications require operating through contact. Some examples include:
- Pushing objects, such as buttons or latches
- Executing trajectories, such as opening or closing doors
- Inserting objects into slots (“peg-in-hole problems”)
MoveIt Pro contains standard Behaviors and tools to help you configure ros2_control admittance controllers. In this tutorial, you will learn how to set up an admittance controller and tune its parameters.
Creating an Admittance Controller
All ros2_control controllers can be configured in your MoveIt Pro configuration package, as described here.
Admittance controllers are implemented as chainable controllers.
This means that an admittance controller cannot be used standalone, but rather modifies the commands provided by an upstream controller through its internal admittance rule.
Typically, admittance control is implemented by chaining a JointTrajectoryController and an AdmittanceController.
Additionally, admittance control requires a force/torque sensor, and an associated ForceTorqueSensorBroadcaster in ros2_control.
A minimal configuration file for admittance control may look as follows:
controller_manager:
  ros__parameters:
    update_rate: 200  # Hz
    force_torque_sensor_broadcaster:
      type: force_torque_sensor_broadcaster/ForceTorqueSensorBroadcaster
    joint_trajectory_controller_chained:
      type: joint_trajectory_controller/JointTrajectoryController
    admittance_controller:
      type: admittance_controller/AdmittanceController

  force_torque_sensor_broadcaster:
    ros__parameters:
      sensor_name: tcp_fts_sensor
      state_interface_names:
        - force.x
        - force.y
        - force.z
        - torque.x
        - torque.y
        - torque.z
      frame_id: tool0
      topic_name: ft_data

  joint_trajectory_controller_chained:
    ros__parameters:
      joints:
        - shoulder_pan_joint
        - shoulder_lift_joint
        - elbow_joint
        - wrist_1_joint
        - wrist_2_joint
        - wrist_3_joint
      command_interfaces:
        - position
        - velocity
      state_interfaces:
        - position
        - velocity
      command_joints:
        - admittance_controller/shoulder_pan_joint
        - admittance_controller/shoulder_lift_joint
        - admittance_controller/elbow_joint
        - admittance_controller/wrist_1_joint
        - admittance_controller/wrist_2_joint
        - admittance_controller/wrist_3_joint
      state_publish_rate: 100.0
      action_monitor_rate: 20.0
      # NOTE: Increasing goal and trajectory following tolerances can be important,
      # since the admittance controller can cause the robot to deviate from its trajectory.
      constraints:
        shoulder_pan_joint:
          goal: 0.1
          trajectory: 0.05
        shoulder_lift_joint:
          goal: 0.1
          trajectory: 0.05
        elbow_joint:
          goal: 0.1
          trajectory: 0.05
        wrist_1_joint:
          goal: 0.1
          trajectory: 0.05
        wrist_2_joint:
          goal: 0.1
          trajectory: 0.05
        wrist_3_joint:
          goal: 0.1
          trajectory: 0.05

  admittance_controller_open_door:
    ros__parameters:
      joints:
        - shoulder_pan_joint
        - shoulder_lift_joint
        - elbow_joint
        - wrist_1_joint
        - wrist_2_joint
        - wrist_3_joint
      command_interfaces:
        - position
      state_interfaces:
        - position
        - velocity
      chainable_command_interfaces:
        - position
        - velocity
      kinematics:
        plugin_name: kinematics_interface_kdl/KinematicsInterfaceKDL
        plugin_package: kinematics_interface
        base: base_link  # Assumed to be stationary
        tip: grasp_link  # The end effector frame
        alpha: 0.05
      ft_sensor:
        name: tcp_fts_sensor
        frame:
          id: wrist_3_link  # Wrench measurements are in this frame
        filter_coefficient: 0.1
      control:
        frame:
          id: grasp_link  # Admittance calcs (displacement etc) are done in this frame. Usually the tool or end-effector
      fixed_world_frame:
        frame:            # Gravity points down (neg. Z) in this frame (Usually: world or base_link)
          id: base_link   # Admittance calcs (displacement etc) are done in this frame. Usually the tool or end-effector
      gravity_compensation:
        frame:
          id: wrist_3_link
        CoG:  # specifies the center of gravity of the end effector
          pos:
            - 0.1  # x
            - 0.0  # y
            - 0.0  # z
          force: 0.0  # mass * 9.81
      admittance:
        selected_axes:
          - true  # x
          - true  # y
          - true  # z
          - true  # rx
          - true  # ry
          - true  # rz
        # Having ".0" at the end is MUST, otherwise there is a loading error
        # F = M*a + D*v + S*(x - x_d)
        mass:
          - 10.0  # x
          - 10.0  # y
          - 10.0  # z
          - 5.0  # rx
          - 5.0  # ry
          - 5.0  # rz
        damping_ratio:  # damping can be used instead: zeta = D / (2 * sqrt( M * S ))
          - 5.0  # x
          - 5.0  # y
          - 5.0  # z
          - 5.0  # rx
          - 5.0  # ry
          - 5.0  # rz
        stiffness:
          - 500.0  # x
          - 500.0  # y
          - 500.0  # z
          - 100.0  # rx
          - 100.0  # ry
          - 100.0  # rz
      # general settings
      enable_parameter_update_without_reactivation: true
Note
The enable_parameter_update_without_reactivation option of your admittance controller must be set to true.
Otherwise, the parameter updates performed at runtime by MoveIt Pro Behaviors will not take effect.
Intuition Behind Admittance Control Parameters
Suppose you have a robot that must be compliant in one direction, but remain stiff (to effectively track motion trajectories) in other directions. The following image, credited to Prof. Alessandro de Luca, Sapienza University of Rome (2020), motivates the need for per-degree-of-freedom compliant control.
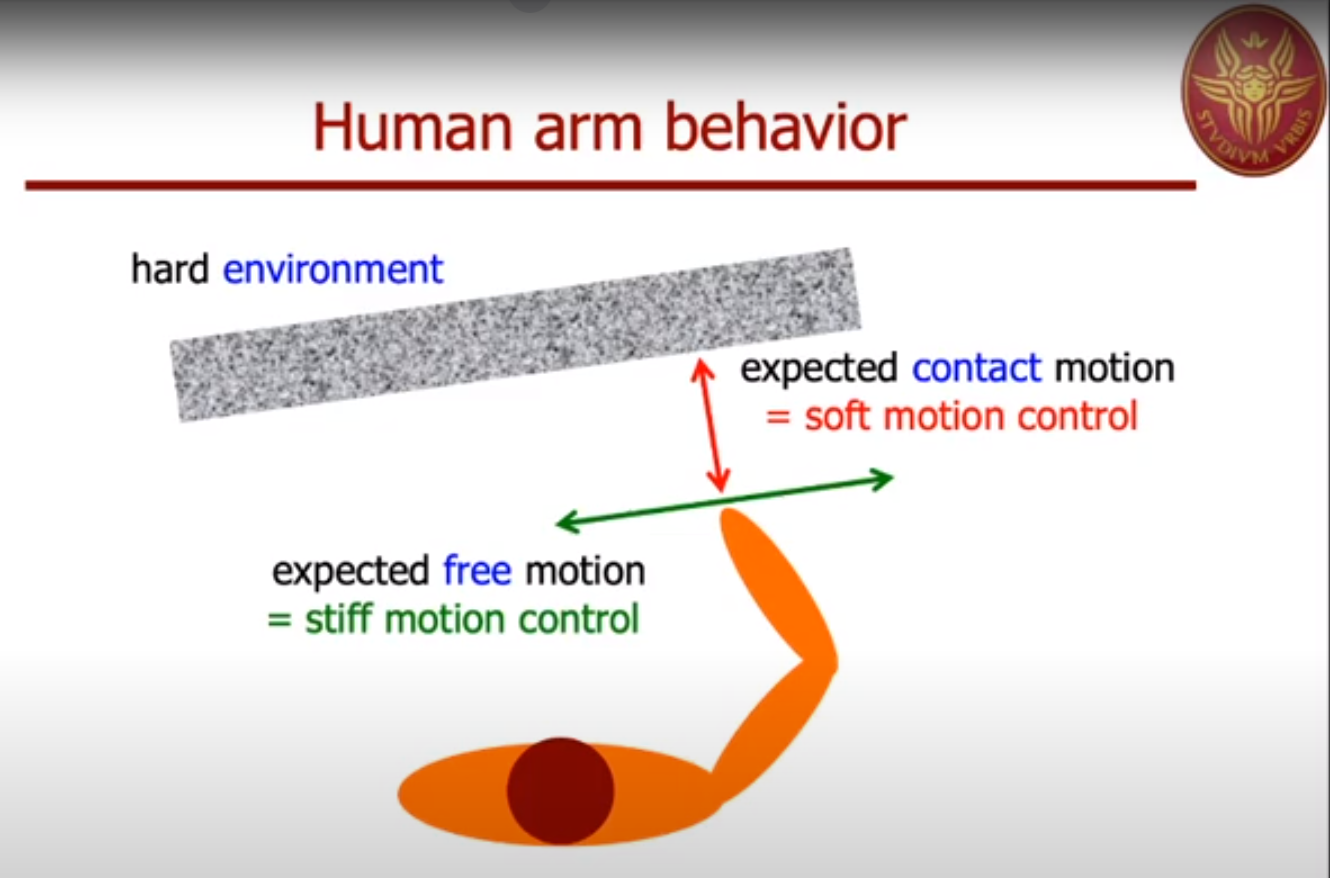
Admittance control changes the effective dynamics of a closed-loop system by modeling each of the (6) degrees of freedom (X, Y, and Z translation and rotation) as a linear spring-mass-damper system. These controllers are tuned by modifying the mass, stiffness, and damping (or damping ratio) for each degree of freedom. Intuitively,
- Large mass and small stiffness leads to more responsiveness to contact force, or “softer” control.
- Small mass and large stiffness leads to good trajectory tracking, or “stiffer” control.
- Damping coefficients can shape the transient behavior, offering a balance between response time (low damping) and smooth transient behavior (high damping).
It is worth noting that the ros2_control admittance controller uses the unitless damping ratio for its damping values.
This means that a damping ratio of exactly 1.0 describes a critically damped system, anything smaller is underdamped, and anything larger is overdamped.
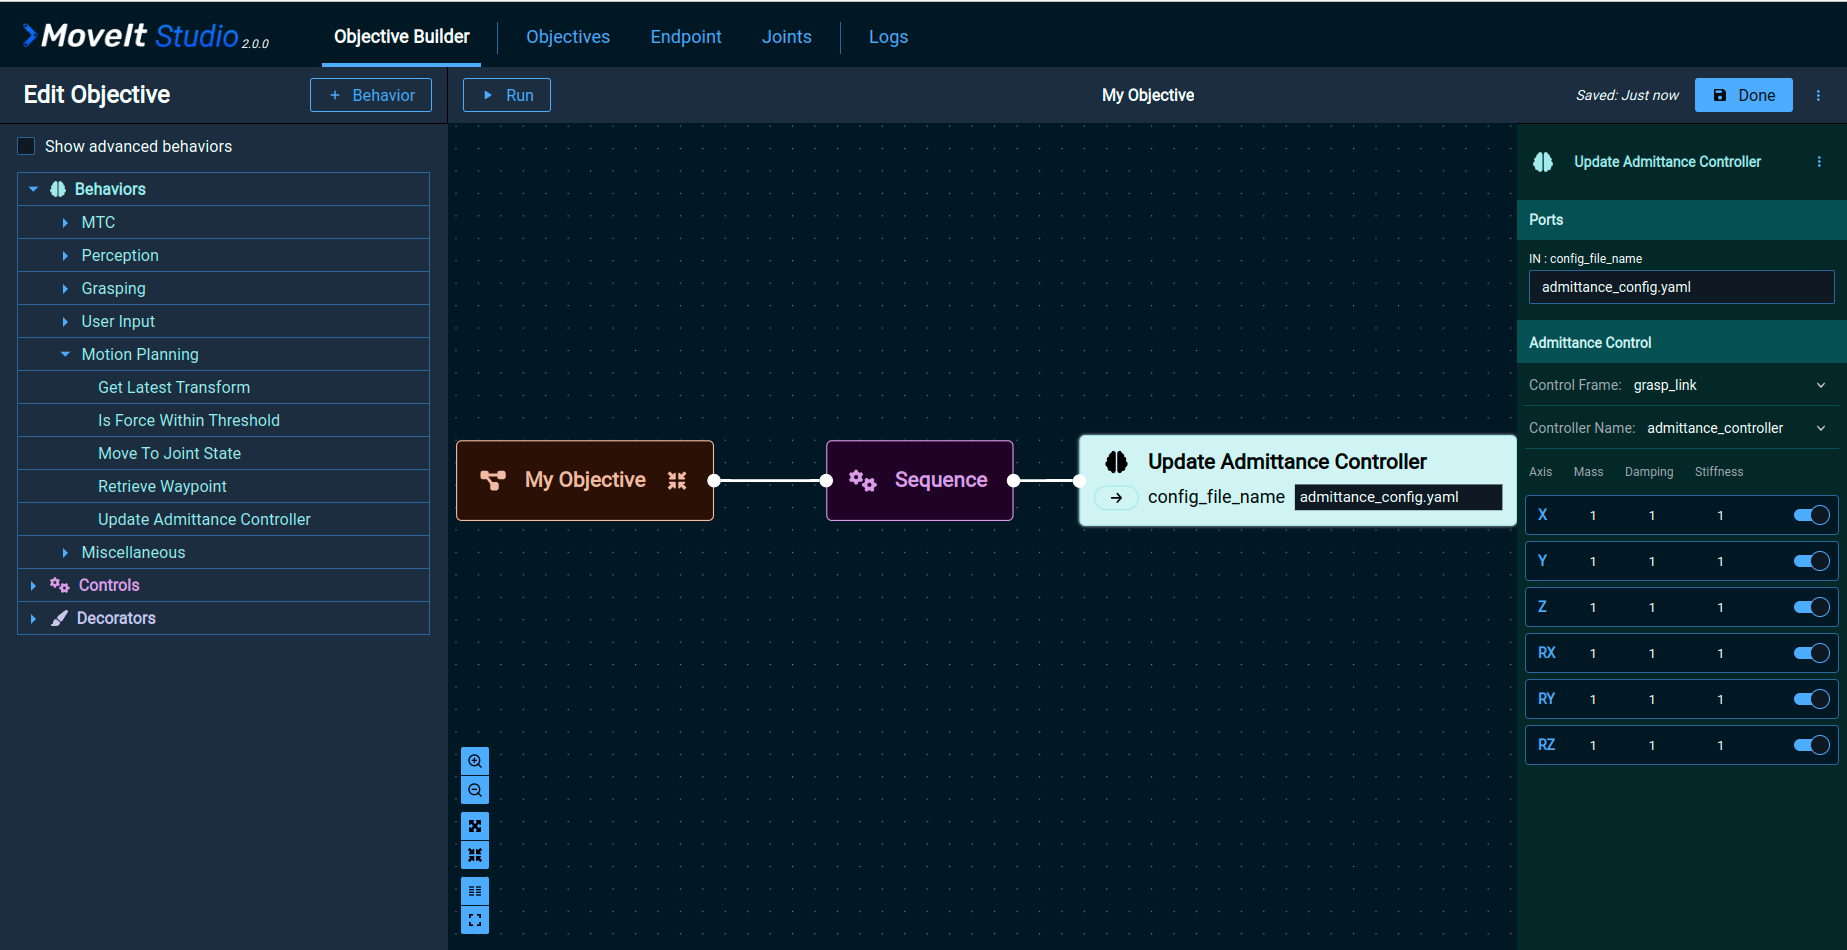
Configuring Admittance Control Using the Web App
MoveIt Pro provides an “Update Admittance Controller” Behavior to tune your admittance controller parameters as part of an Objective. To get started:
- Create a new Objective.
- Add a new “Update Admittance Controller” Behavior.
- Set the
config_file_nameport to a file name of your choice, for exampleadmittance_config.yaml.
This will create a file at $HOME/.config/moveit_pro/objectives/admittance_config.yaml.
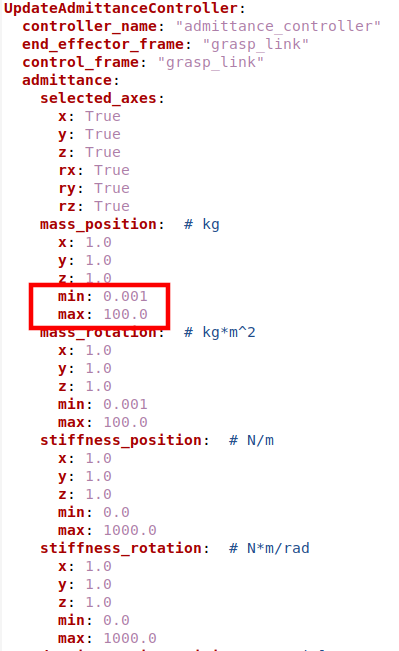
While most of these parameters can be edited in the web app, the min and max parameters for the sliders must be edited manually if you want to change them.
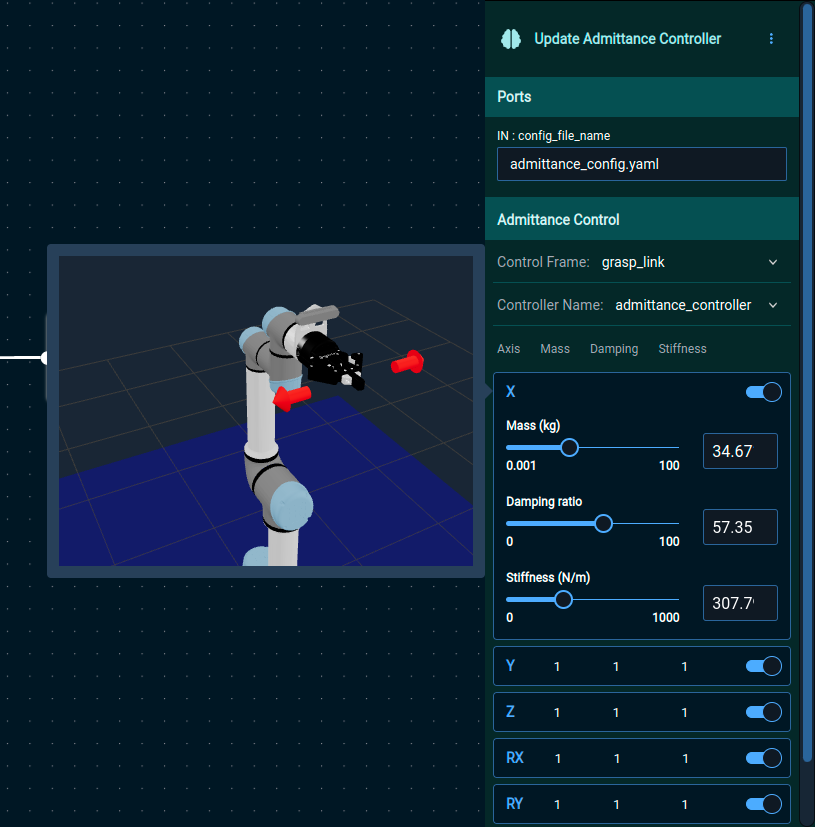
You can use the web app to modify admittance control parameters such as the control frame and controller name. For each degree of freedom, you can individually enable or disable admittance control, tune admittance gains, and visualize the direction of motion on the robot model.
Using Admittance Control in your Objective
You can add any number of “Update Admittance Controller” Behaviors to your Objective.
For example, the following Objective configured the admittance_controller controller, and uses our chained controllers (joint_trajectory_controller_chained and admittance_controller) to execute a task.
When this Objective is executed, the “Update Admittance Controller” will tick until it can successfully set the admittance controller parameters, or else the Objective will fail. This can happen for several reasons, including the controller not being available, the parameters being invalid, or other issues with ROS. This ensures that the rest of your Objective will execute only if the admittance controller has been correctly configured.
You can verify that your controller parameters were changed correctly by going into a MoveIt Pro container and using the ros2_control command-line interface.
For example, to view some of the admittance parameters of your admittance_controller controller:
# On the host system (change to your install folder)
cd ~/moveit_pro
./moveit_pro shell

# Once inside the container
source /opt/overlay_ws/install/setup.bash
ros2 param get /admittance_controller admittance.mass
ros2 param get /admittance_controller admittance.selected_axes