Automatic Object Segmentation
In robotics, segmenting objects in a scene so they can be used for classification or point cloud masking is a fundamental challenge. Approaches often require manual annotation, text-based prompts, or prior knowledge about specific objects. If instead you prefer to segment as many objects in the scene as you can and process them later, this is where automatic segmentation or "automasking" comes in.
Rather than asking to segment a specific object, i.e. "where is the red bottle?" (text-based) or "segment what I click on" (point-based), automatic segmentation asks "what are all the objects here?" It discovers everything in the scene without any human input which makes it ideal for unstructured environments, cluttered bins, or any task where you need to find all graspable objects.
The GetMasks2DAutomask behavior uses SAM2 (Segment Anything Model 2) to mask all object in a scene. This gives zero-shot automatic segmentation by just giving it an image of a scene and it returns instance masks for everything the model detects.
Launch MoveIt Pro
We assume you have already installed MoveIt Pro to the default install location. Launch the application using:
moveit_pro run -c factory_sim
Building Your First Automasking Objective
Let's start simple and build up from there. We'll create an Objective that captures an image from a camera and automatically segments all objects.
You can see the complete version of this in the "Automask from Camera" Objective in factory_sim
The Behavior Tree for this Objective consists of three nodes in sequence:
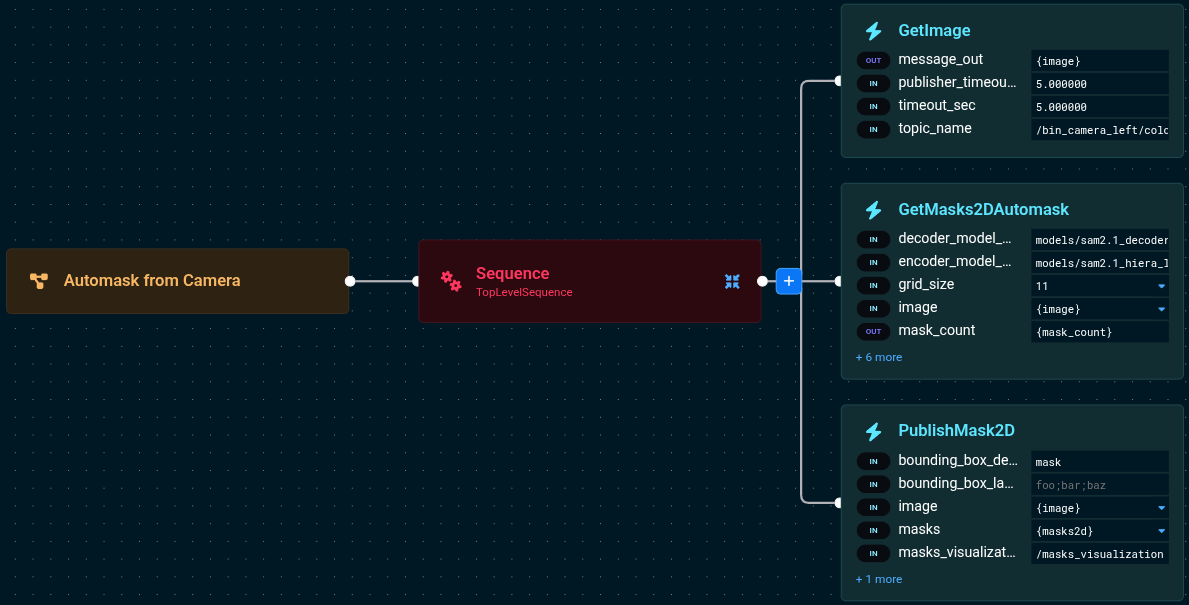
Get an Image
First, we need an image to work with. Let's capture one from the bin camera using the GetImage behavior.
The port values are:
GetImage:
- message_out={image}
- publisher_timeout_sec=5.0
- timeout_sec=5.0
- topic_name=/bin_camera_left/color
Run Automasking
Now let's add the GetMasks2DAutomask behavior to automatically segment everything in the image.
The port values are:
GetMasks2DAutomask:
- image={image}
- grid_size=11
- score_threshold=0.8
- nms_threshold=0.2
- min_component_area=2000
- masks2d={masks2d}
- mask_count={mask_count}
- encoder_model_path=models/sam2.1_hiera_l_image_encoder.onnx
- prompt_encoder_model_path=models/sam2.1_prompt_encoder.onnx
- decoder_model_path=models/sam2.1_decoder.onnx
- model_package=factory_sim
Visualize the Results
Finally, let's visualize the detected masks using the PublishMask2D behavior.
The port values are:
PublishMask2D:
- masks={masks2d}
- masks_visualization_topic=/masks_visualization
- image={image}
- opacity=0.5
- bounding_box_detection_class=mask
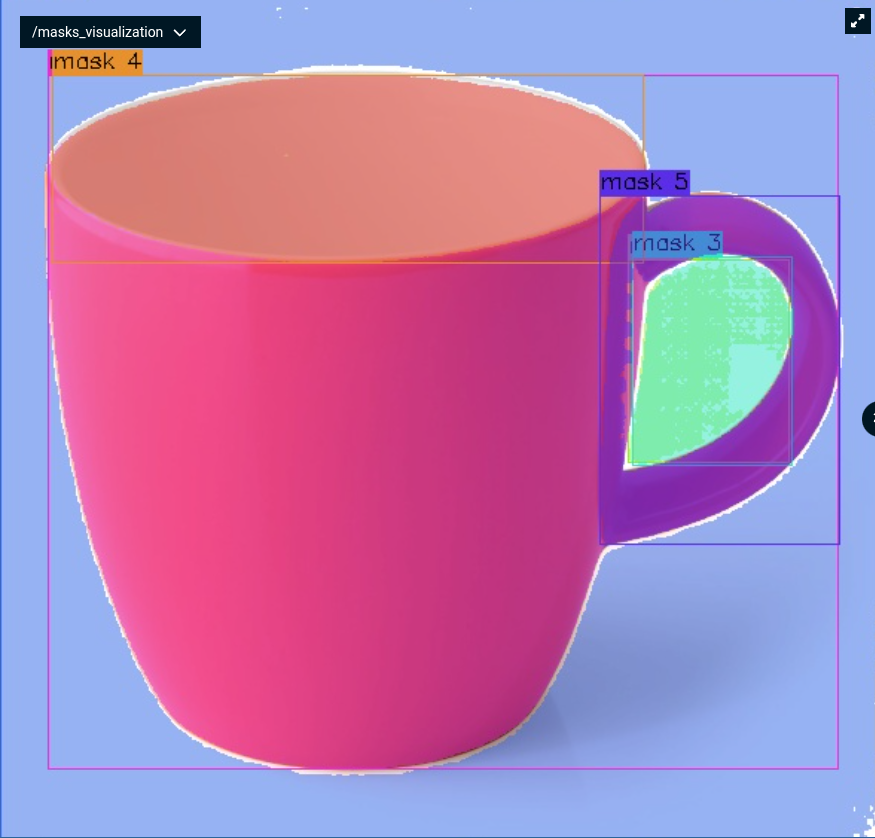
When you run this Objective, you should see all detected objects highlighted in the UI panel under /masks_visualization:
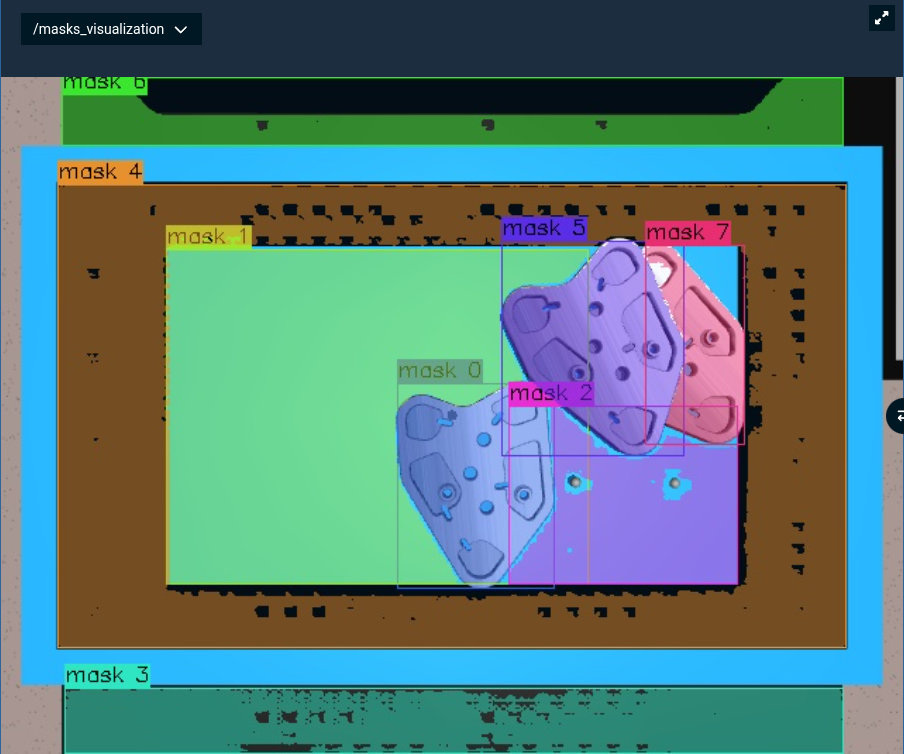
Notice the aggressive filtering here:
score_threshold=0.8: Only high-confidence masksnms_threshold=0.2: Remove heavily overlapping masksmin_component_area=2000: Filter out small regions
This gives clean, high-quality masks of the major objects in the scene.
Iterating and Tuning Parameters
Now that we've got basic automasking working, let's talk about tuning. The Behavior has several parameters that control what gets detected and what gets filtered out. Finding the right values depends on your scene, but let's walk through how to experiment.
Using Breakpoints to Inspect Masks
The "Automask Camera Iterate Masks" Objective shows a useful technique: loop through each detected mask and pause with a breakpoint so you can inspect the quality.
Complete Behavior Tree Structure
The Behavior Tree has a simple structure: capture an image, run automasking, then iterate through each mask with a breakpoint:
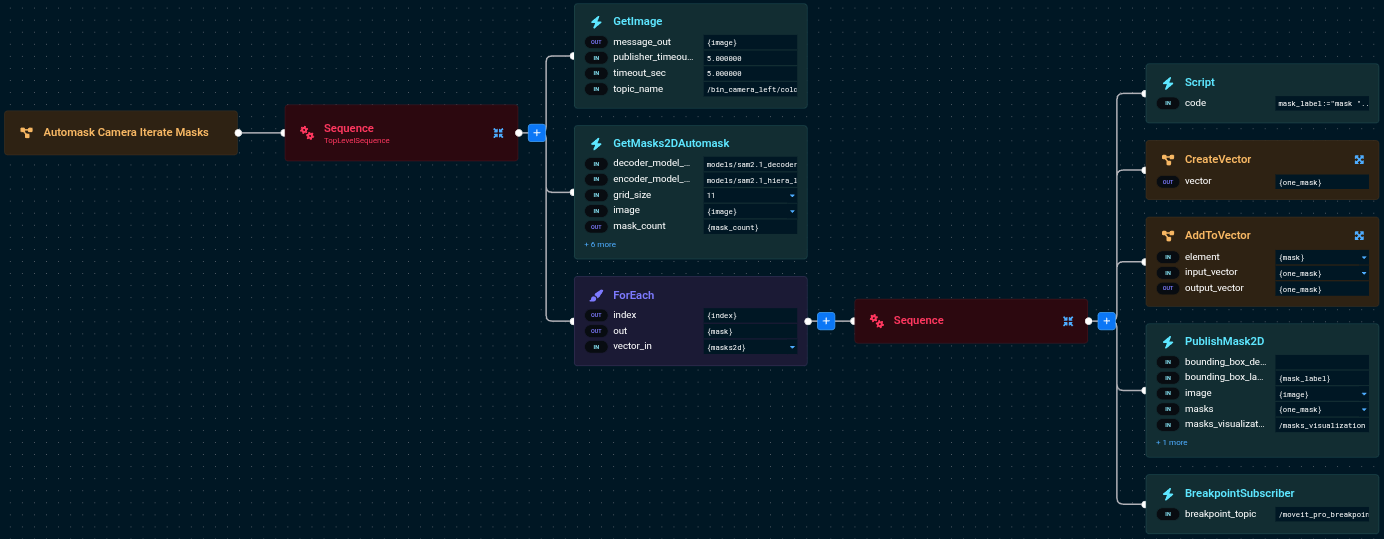
The Behavior Tree flow:
GetImage- Captures an image from the cameraGetMasks2DAutomask- Runs automasking to detect all objectsForEach- Iterates through the detected masks, and for each mask:Script- Creates a numbered label for the current mask (e.g., "mask 0", "mask 1")CreateVectorandAddToVector- Wraps the single mask into a vector format for visualizationPublishMask2D- Displays the current mask with its numberBreakpointSubscriber- Pauses execution so you can inspect this mask
How It Works
Here's the core pattern from the Objective file:
<GetMasks2DAutomask
image="{image}"
masks2d="{masks2d}"
... />
<ForEach vector_in="{masks2d}" out="{mask}" index="{index}">
<Sequence>
<Script code="mask_label:="mask "..index" />
<CreateVector vector="{one_mask}" />
<AddToVector
element="{mask}"
input_vector="{one_mask}"
output_vector="{one_mask}" />
<PublishMask2D
masks="{one_mask}"
masks_visualization_topic="/masks_visualization"
image="{image}"
bounding_box_labels="{mask_label}" />
<BreakpointSubscriber />
</Sequence>
</ForEach>
The port values are:
ForEach:
- vector_in={masks2d}
- out={mask}
- index={index}

Script:
- code=mask_label:="mask "..index

PublishMask2D:
- masks={one_mask}
- masks_visualization_topic=/masks_visualization
- image={image}
- opacity=0.5
- bounding_box_labels={mask_label}

BreakpointSubscriber:
- breakpoint_topic=/moveit_pro_breakpoint
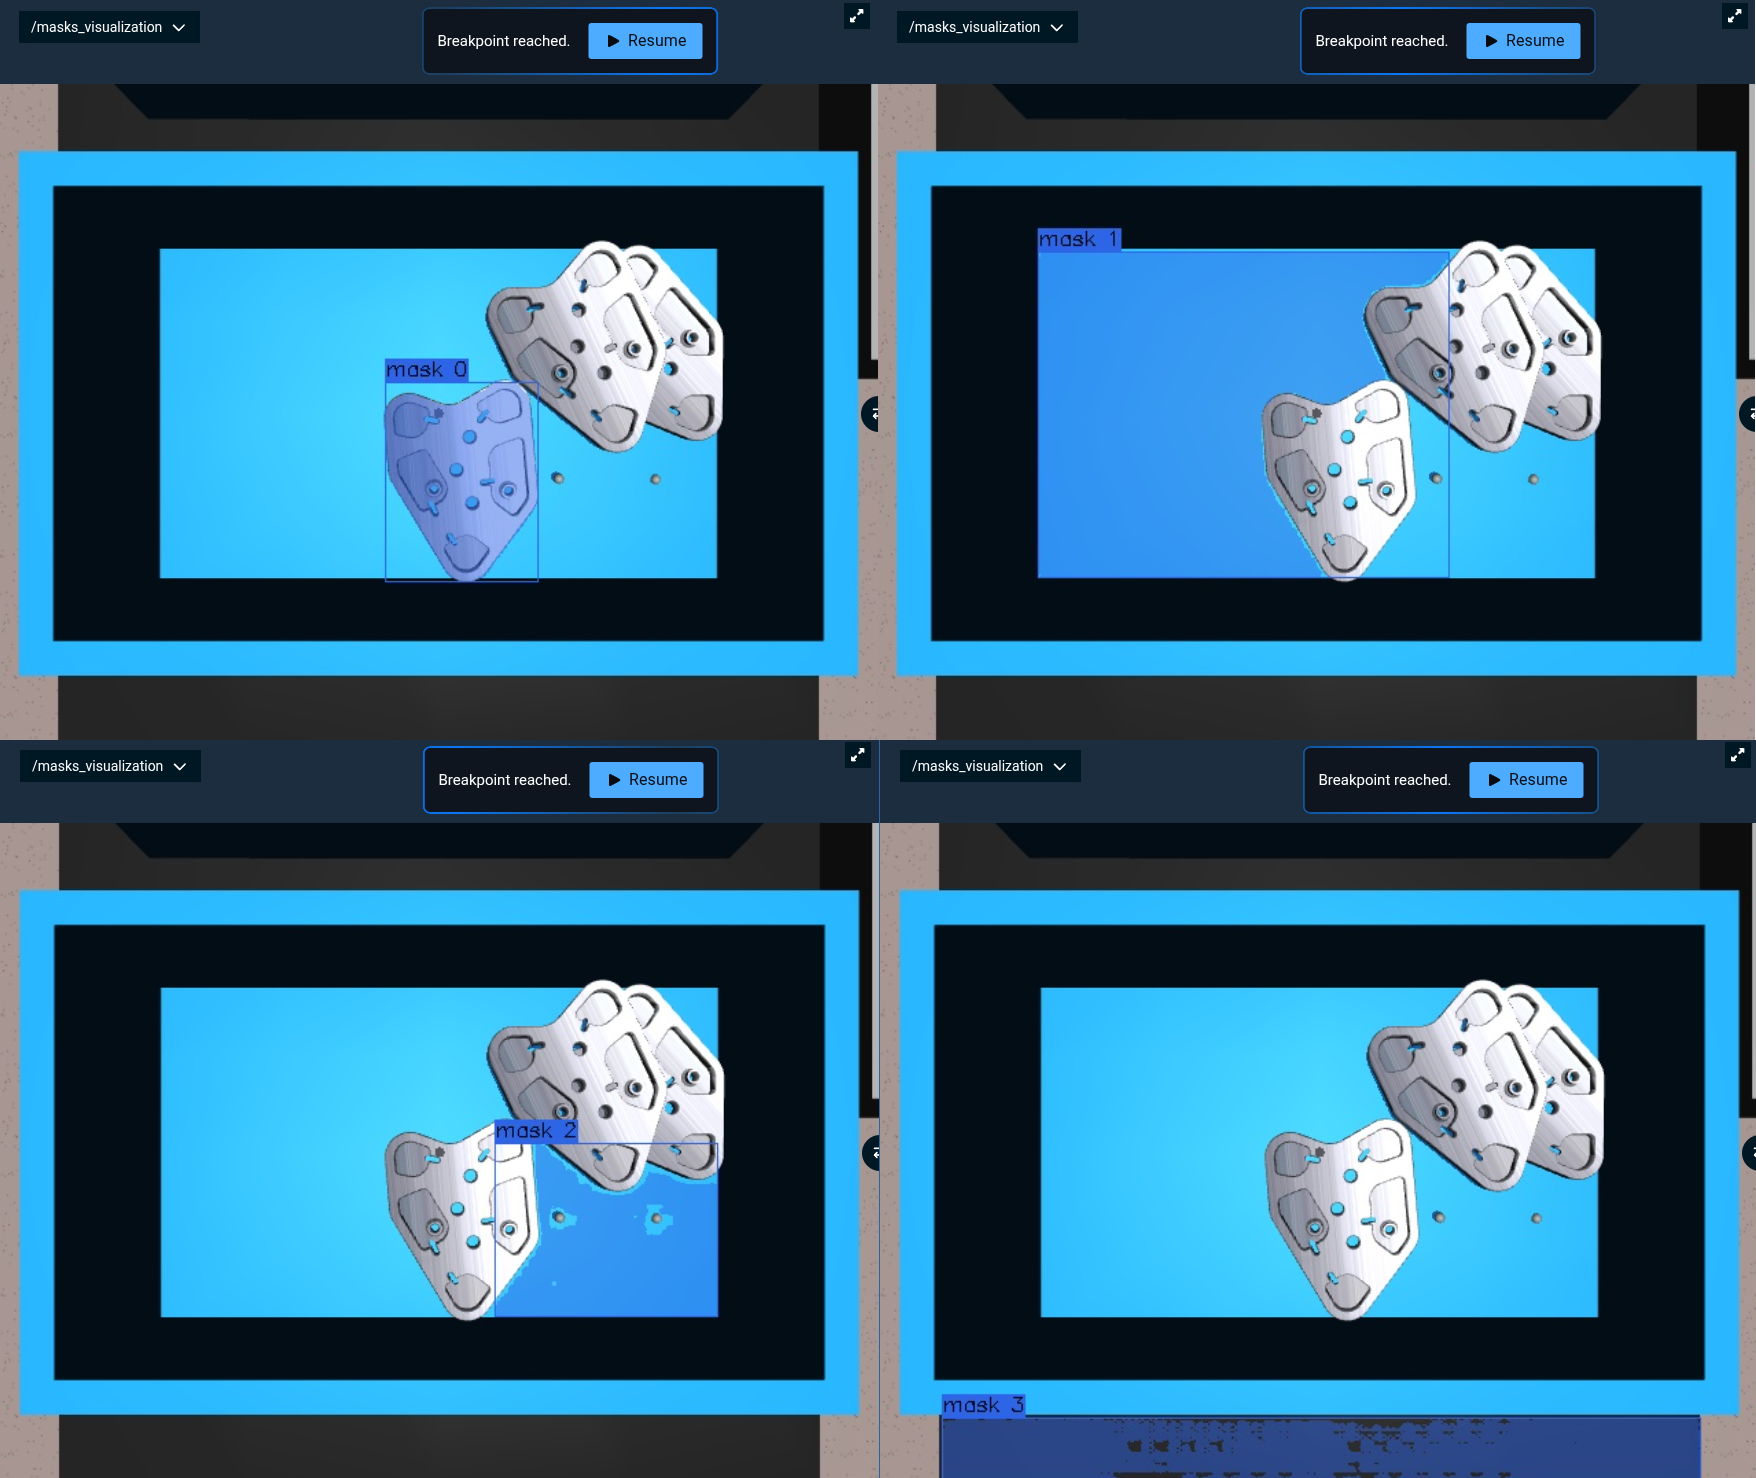
When you run this, the Objective will pause at each mask. The mask number appears in the bounding box label, making it easy to track which mask you're inspecting. Step through them one by one to see if you're getting too many small regions, missing objects, or detecting duplicates.
What Each Parameter Does
Grid Size (grid_size):
Controls how many point prompts are generated across the image. An 11x11 grid creates 121 evenly distributed points.
11(default): Good balance of speed and coverage15or20: Catches smaller objects but slower7or9: Faster but might miss small items
Score Threshold (score_threshold):
SAM2 assigns each mask a confidence score. This parameter filters out low-quality predictions.
0.8: Only high-confidence detections (fewer false positives)0.5or0.3: More masks, including uncertain ones0.9: Very strict, only the best masks
NMS Threshold (nms_threshold):
Non-Maximum Suppression removes overlapping masks. Lower values remove more aggressively.
0.2: Heavily overlapping masks removed (cleaner results)0.5or0.7: Keep masks with more overlap0.1: Very strict, remove almost any overlap
Min Component Area (min_component_area):
Filters out regions smaller than this pixel count.
2000: Focus on major objects100or500: Keep small details5000: Only large objects, filter aggressive noise
Testing Without Hardware
You can load a static image from a file to test parameter combinations without running the robot. The "Automask from File" Objective demonstrates this approach.
Complete Behavior Tree Structure
The Behavior Tree loads an image from disk, runs automasking, and visualizes the results:
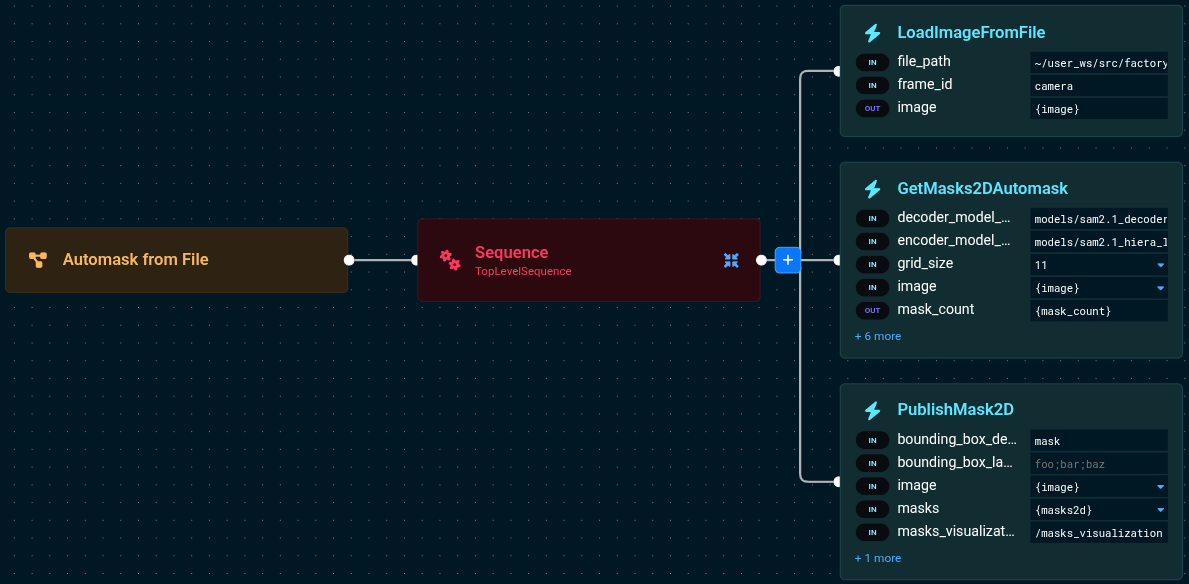
The Behavior Tree flow:
LoadImageFromFile- Loads a static image from the filesystemGetMasks2DAutomask- Runs automasking on the loaded imagePublishMask2D- Displays the detected masks for visualization
How It Works
The port values are:
LoadImageFromFile:
- file_path=~/user_ws/src/factory_sim/objectives/coffee_cup1.png
- frame_id=camera
- image={image}

GetMasks2DAutomask:
- image={image}
- grid_size=11
- score_threshold=0.5
- nms_threshold=0.3
- min_component_area=200
- masks2d={masks2d}
- mask_count={mask_count}
- encoder_model_path=models/sam2.1_hiera_l_image_encoder.onnx
- prompt_encoder_model_path=models/sam2.1_prompt_encoder.onnx
- decoder_model_path=models/sam2.1_decoder.onnx
- model_package=factory_sim

PublishMask2D:
- masks={masks2d}
- masks_visualization_topic=/masks_visualization
- image={image}
- opacity=0.5
- bounding_box_detection_class=mask
Notice the more permissive thresholds—we're trying to catch more objects and smaller details when testing with static images.
Next Steps
Automasking provides automatic object discovery. Now you can build complete manipulation pipelines:
3D Reconstruction and Geometric Analysis
The ML Image Segmentation tutorial shows how to turn 2D masks into actionable 3D data:
- Convert masks to point clouds with depth information
- Extract geometric properties (bounding boxes, centroids, dimensions)
- Filter objects by size, shape, or position
- Generate collision geometry for motion planning
All techniques in that tutorial work with automasking—just swap GetMasks2DFromTextQuery with GetMasks2DAutomask.
Learning-Based Grasp Planning
Once you have segmented objects, use ML to automatically find grasp poses. The ML Grasping tutorial shows:
- Generate grasp candidates from point clouds
- Rank grasps by predicted success
- Build bin-picking workflows that iterate through all detected objects
- Combine segmentation with manipulation planning
Troubleshooting
"I'm getting hundreds of tiny masks"
Your thresholds are too permissive. Try:
- Increase
score_thresholdto 0.7 or 0.8 (only high-confidence masks) - Decrease
nms_thresholdto 0.3 or 0.2 (more aggressive duplicate removal) - Increase
min_component_areato 1000 or 2000 (filter small noise)
Use the iteration technique with breakpoints to inspect which masks are problematic.
"Some objects aren't being detected"
The grid might not be dense enough, or the model isn't confident. Try:
- Increase
grid_sizeto 15 or 20 (denser coverage) - Decrease
score_thresholdto 0.5 or 0.3 (include uncertain detections) - Check image quality: lighting, contrast, focus
- Verify objects have clear visual boundaries
"It's too slow for my real-time application"
Options to speed up processing:
- Reduce grid size to 7x7 or 9x9 (fewer points = faster)
- Process smaller regions of interest instead of the full image
- Cache results if the scene doesn't change often
- Downsample input images before processing
Technical Reference
The automasking pipeline consists of three stages:
Grid Generation The Behavior generates a uniform grid of points across your image. An 11x11 grid creates 121 evenly spaced points. Each point becomes a prompt for SAM2.
SAM2 Inference For each grid point, SAM2 runs inference:
- Image Encoder: Processes the entire image once (most expensive step)
- Prompt Encoder: Encodes each point prompt
- Decoder: Generates a binary mask for the object at that point
SAM2 assigns each mask a quality score (0.0 to 1.0) indicating confidence.
Post-Processing The raw masks get cleaned up:
- Score Filtering: Remove masks below the threshold
- Non-Maximum Suppression (NMS): Remove overlapping duplicates
- Component Splitting: Separate disconnected regions
- Area Filtering: Remove tiny regions
- Upscaling: Resize to original resolution (parallelized for speed)
Memory Requirements
SAM2 automasking requires:
- ONNX Models: ~880 MB (loaded once, shared across calls)
- Image Embeddings: ~256 MB per image
- Mask Storage: ~1 MB per mask at full resolution
For memory-constrained systems, downsample input images or process smaller regions of interest.
ONNX Model Files:
sam2.1_hiera_l_image_encoder.onnx(~813 MB) - Image encodingsam2.1_prompt_encoder.onnx(~36 KB) - Point prompt encodingsam2.1_decoder.onnx(~32 MB) - Mask decoding