Tutorial 1 - Intro & Basic Usage
🕒 Duration: 1-2 hours
💪 Level: Beginner
Four Course Overview
Welcome to MoveIt Pro's four part tutorial series for teaching you how to use MoveIt Pro. Each tutorial is intended to be completed within two hours. We recommend taking these in our monthly live training courses, where two PickNik engineers are available to answer questions and help you get unstuck if anything comes up.
Training Goals
The tutorials all build on top of each other, and assume you have completed the previous tutorial:
- Tutorial 1 gives you a general beginner's overview of the platform using our optional, yet comprehensive, user interface.
- Tutorial 2 covers how to use MoveIt Pro without its frontend, diving into the runtime SDK, Python integrations, and how to build Behavior plugins / extensions.
- Tutorial 3 teaches more advanced Behavior Tree concepts with Subtrees and using more computer vision and machine learning.
- Tutorial 4 teaches advanced motion planning and control concepts, including the many types of dynamic trajectory generation, collision checking, and Cartesian control.
Tutorial 1 Basic Usage - Overview
This tutorial is designed to be your first hands-on introduction to the platform, giving you a general overview of MoveIt Pro, including how to:
- Run and edit robot applications (Objectives) built with Behavior Trees
- Use teleoperation to manually control the robot and create waypoints
- Build your own Objective from scratch
- Set up keep-out zones for motion planning
- Use AprilTag-based perception for object detection and grasping
An Objective is basically an application in MoveIt Pro, though it can also be a lower level function (a Subtree) that is then combined into a higher level Objective. Objectives are created using Behavior Trees, which are similar to state machines. Behavior Trees are composed of Behaviors, which are the low-level nodes or skills. An example of a Behavior is opening a gripper or moving to a pose. To learn more about Behaviors, see the Behaviors Concepts Page.
Pre-reqs
We assume you have already installed MoveIt Pro and have some familiarity with robotic arms.
Start MoveIt Pro
Launch the application if you haven't already, using:
moveit_pro run -c lab_sim
If you are using MoveIt Pro Cloud, no launch command is necessary — the application is already running and accessible from your browser.
Once MoveIt Pro is loaded, you should see a UI similar to the following, though the exact view pane layout may vary as it is customizable:
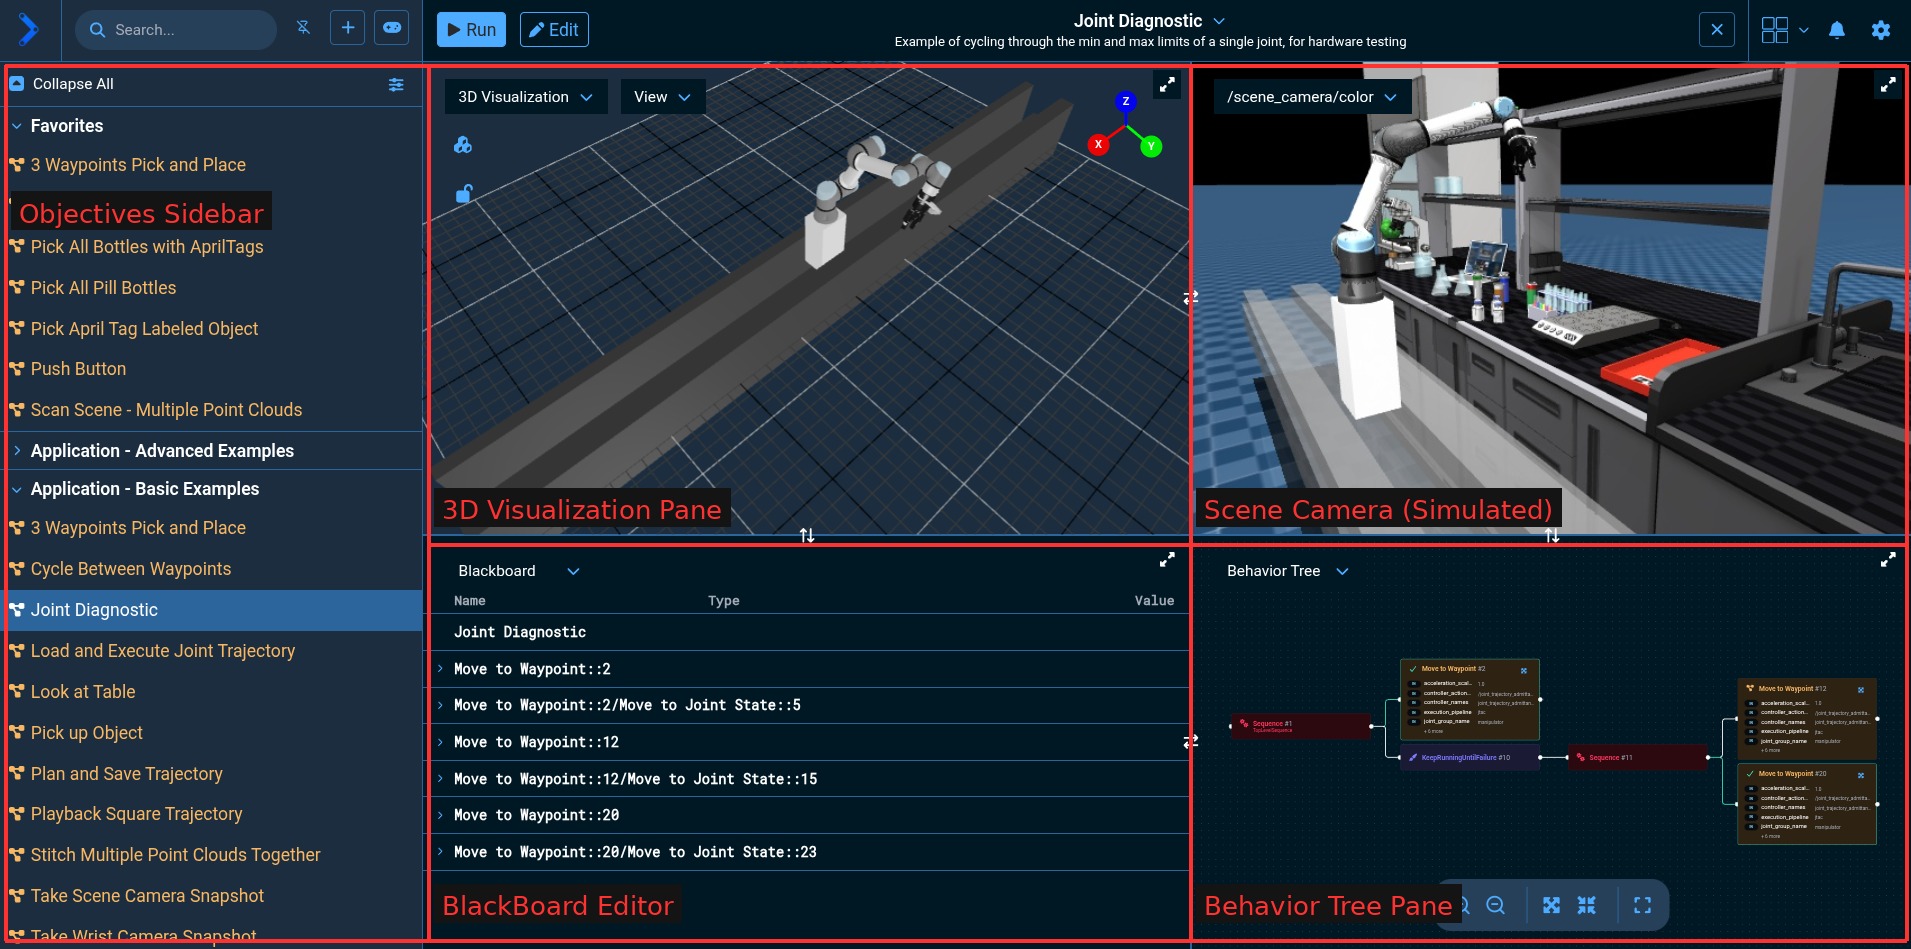
In this beginner tutorial we are showing you how to do everything from the UI. However, MoveIt Pro ships with a powerful API that allows you to start, stop, and monitor Objectives in a headless mode, without the UI.
Exploring the User Interface
Customizing the Panes
The following diagram highlights some of the ways to customize your view panes:
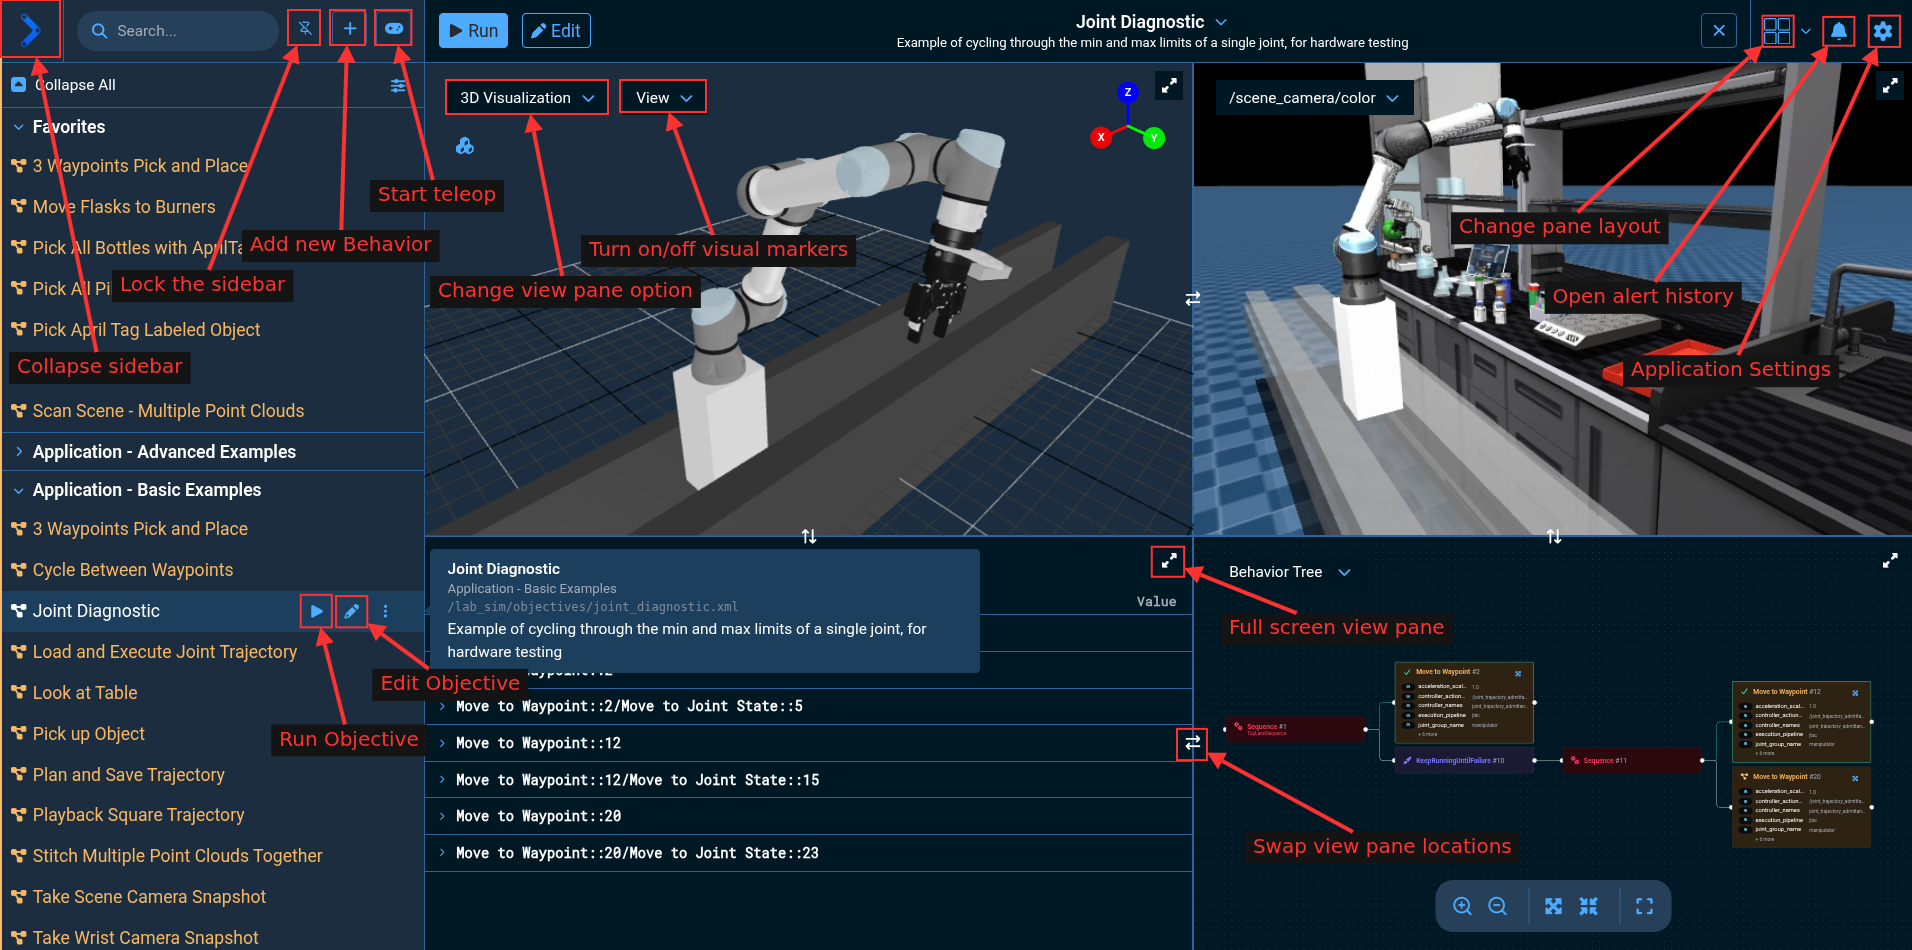
Try it yourself:
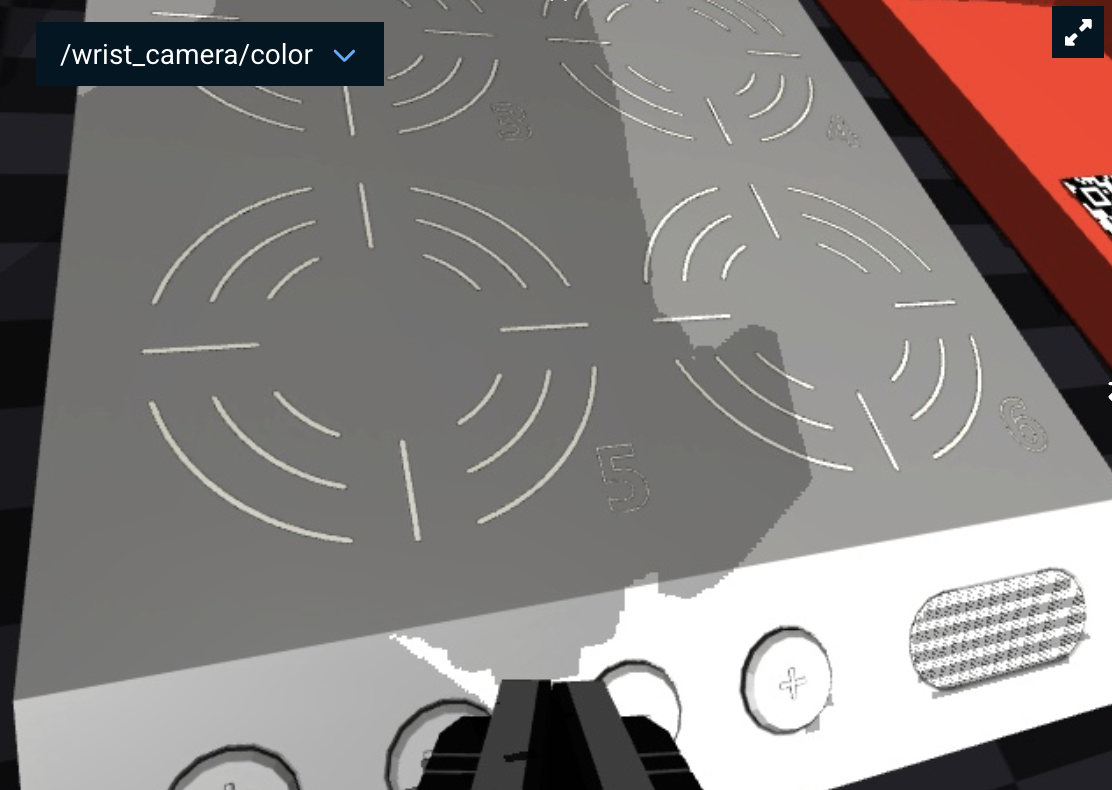
- Use "Change view pane option" to change the bottom right pane to
/wrist_camera/color. This will allow you to see the camera view of the camera mounted on the robot's wrist.
Next: Change the number of panes available by clicking on the Pane Selection menu in the top right. Select the 3 pane view option.

To learn more about each pane, check out the About the User Interface page.
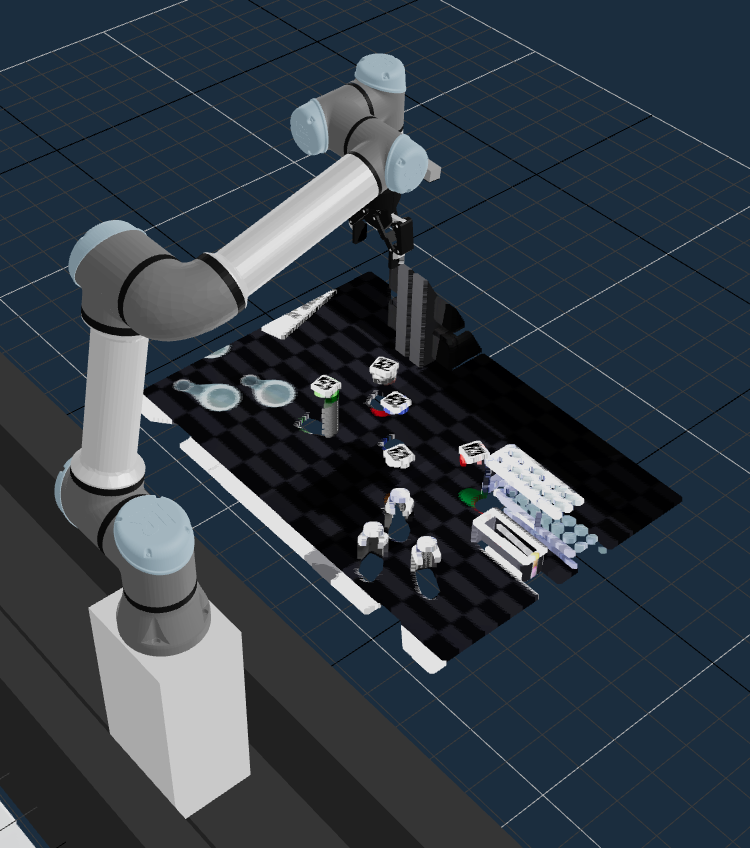
Run your first Objective: Scanning the Environment
You might notice our virtual world in the 3D Visualization pane is a bit empty - let's scan in the entire environment by running the Scan Scene - Multiple Point Clouds Objective. We can find it in two different ways:
- Using the sidebar, click the play icon next to
Scan Scene - Multiple Point Cloudsto run the Objective, and you should see:
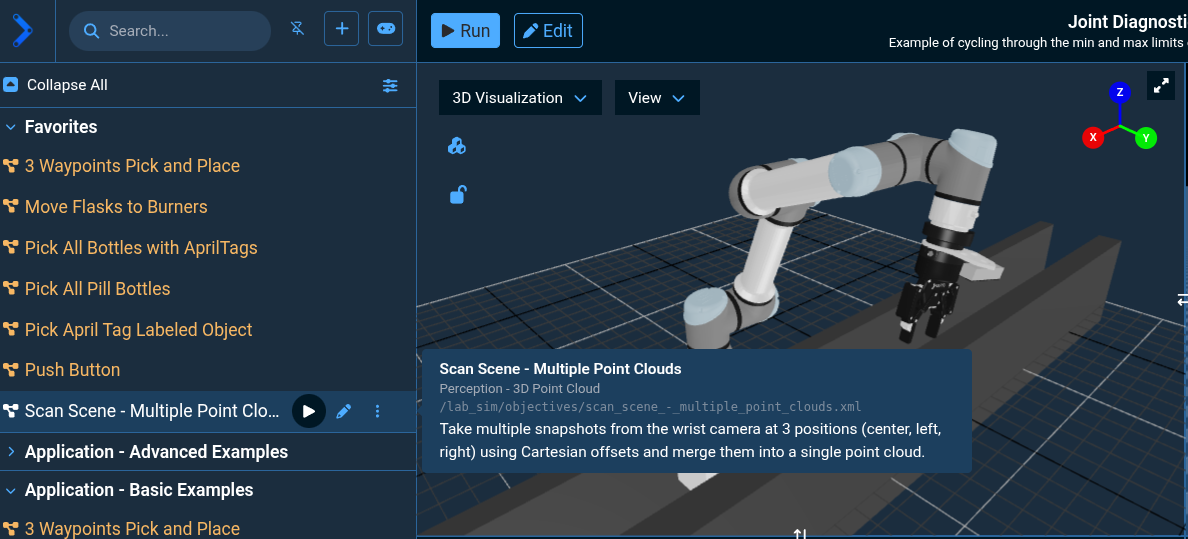
- Or by searching in the top Search bar for the Objective name.
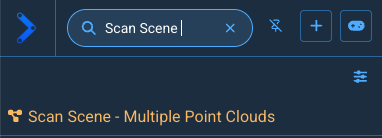
Once you find it, click the play icon next to Scan Scene - Multiple Point Clouds to run the Objective, and you should see:
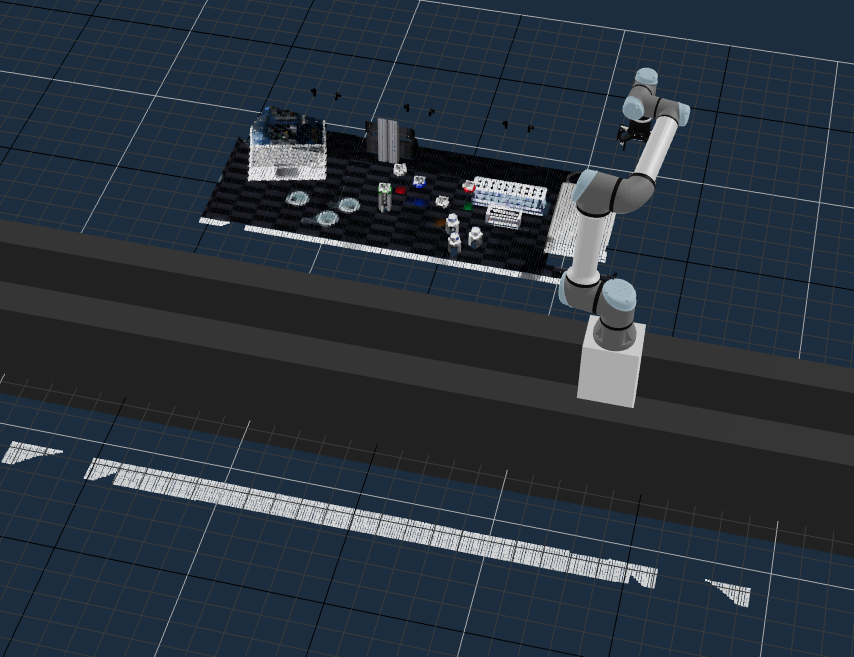
The planning scene is a representation of the robot's environment, including the robot itself, obstacles, and other objects. It is used by motion planners to determine valid paths and trajectories for the robot.
Obstacles can be added manually from the UI (keep-out zones), in Behavior Trees via planning scene manipulation Behaviors, or automatically from perception data by configuring the perception pipeline.
Running an example lab application
Navigate and choose to Run the Move Flasks to Burners Objective. You can use the search bar at the top of the sidebar to find this Objective quickly.
Open the left Objectives sidebar again if it's not already open, then find the Move Flasks to Burners Objective.
The Objectives sidebar can be pinned open or closed based on your preference and screen size using the pin icon.

Click its play icon to run the Objective. You should see the robot arm pick up both flasks on the left side of the workspace and move them to the burner on the right.
Clearing the Planning Scene
Our point cloud is now out of date, because we'e moved the flasks to a new location.
You can now run the Clear Snapshot Objective to reset the point cloud in the 3D Visualization pane, since the robot has not 'perceived' the reset objects yet. Try that now.
To update the view of the planning scene, run Scan Scene - Multiple Point Clouds again.
Stop looping Objectives
Some applications will run forever, until you tell it to stop. The 3 Waypoints Pick and Place Objective is a simple example like that - Run it now.
You should see it pick a small object using hard-coded waypoints, on loop forever.
Use the Stop Objective button on the top left to stop the loop once we've seen it through once and put the block back where it started.

If you stopped the Objective after the robot had already grasped a flask, simply run the Open Gripper Objective to release it.
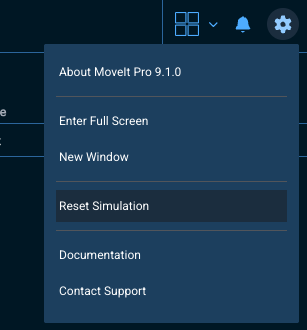
Resetting the Simulation
What if we want to run this Objective again? The robot is now in a different pose, and the flasks are on the burners instead of their original positions. This is a common situation during development when you want to iterate on an Objective multiple times.
Simulation reset is built into MoveIt Pro - simply click the gear icon menu in the top right and select Reset Simulation. This will restore all objects to their original positions.
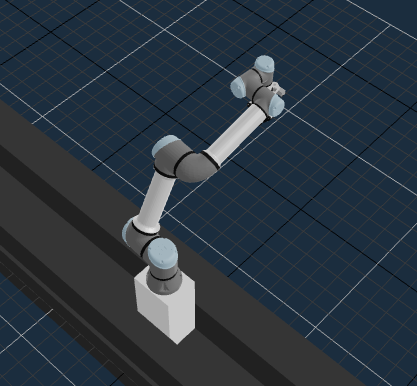
To move the robot back to its original pose without resetting the entire simulation, you could instead run the Look at Table Objective.
This is an example of a very simple Behavior Tree that commands the robot to a named waypoint.
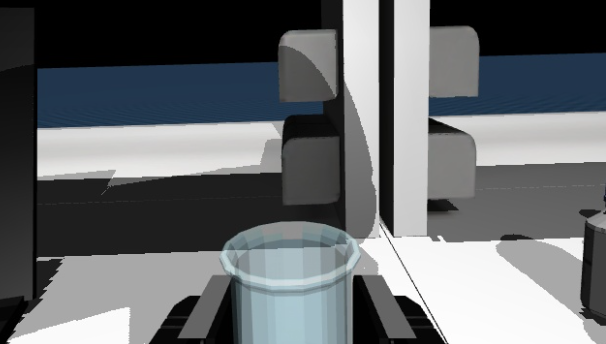
Using the Wrist Depth Camera
Many robots have multiple cameras, and MoveIt Pro can visualize all of them. The camera feed from the wrist camera can be used for close up manipulation tasks, and is a common tool used in many Objectives.
Let's take a pointcloud snapshot from this wrist camera.
Run Take Wrist Camera Snapshot Objective and you should see a much smaller area show up as a point cloud.

Adding Keep-out Zones
Let's make it harder, or maybe impossible, for the robot to plan an automatic trajectory between waypoints. We can do that by adding collision objects, or keep-out zones.
In motion planning, a collision object represents a physical item in the environment that the robot must avoid during motion. These objects are typically defined by their shape, size, and position in the planning scene and can include things like tables, walls, tools, or even other robots. Collision objects are used by the motion planner to ensure that generated paths are free of collisions, allowing the robot to move safely and efficiently through its workspace.
A keep-out zone is a virtual collision object you add to the planning scene through the UI. The motion planner treats it as a real obstacle, even though nothing physical is there. They're great for forcing failures in tutorials, defining no-go regions around the robot, or modeling fixtures the robot doesn't have a sensor for. See the Keep-Out Zones guide for the full reference.
To add a keep-out zone, find the upper left side of the 3D Visualization pane and you should see a 3 stacked cube symbol.

Click on the 3 cube icon to open the sidebar:
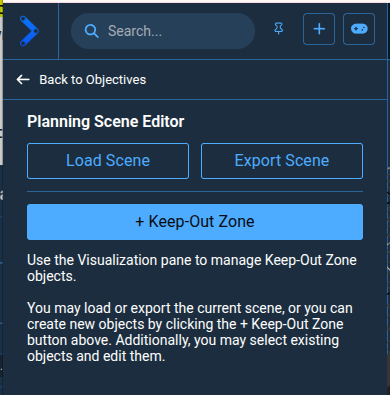
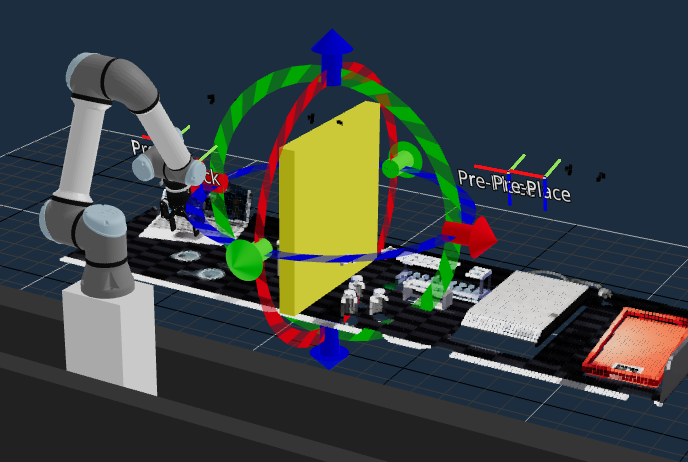
Click the + Keep-Out Zone button in the sidebar. You'll see a yellow wall appear in front of the robot with its interactive marker active. The wall is yellow because it is currently selected — click anywhere outside the wall in the 3D Visualization pane to deselect it and the wall will turn green.
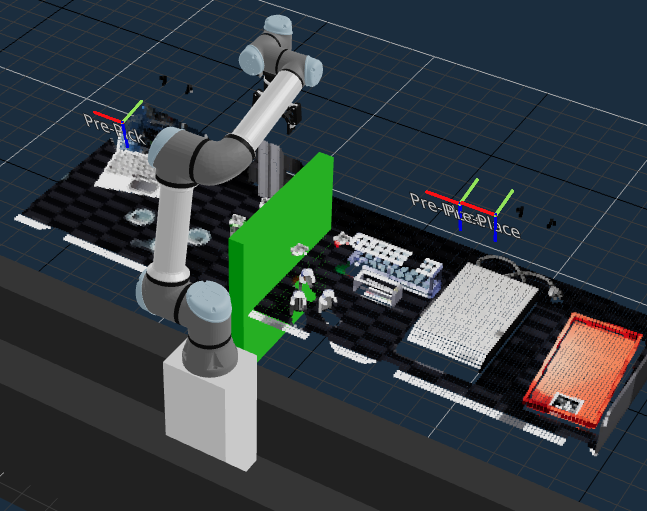
Re-run the Move Flasks to Burners Objective and observe the robot planning around the green wall. This is collision-aware motion planning! The robot automatically finds a collision-free path to reach its goal while avoiding the keep-out zone.
Next, let's make it even harder for the motion planners by moving the wall upwards. To do this, click on the wall and an "Interactive Marker" should appear (if its not already selected):
Move the wall to a new adversarial position by dragging the arrows of the interactive marker upwards, and then re-run the Objective again to see how the robot plans around the new position of the wall.
To deselect the keep out zone and hide the interactive marker, click anywhere outside the wall in the visualization pane.
When you're done experimenting, reselect the wall and remove it by pressing Delete on your keyboard.
Alerts & Error Handling
While the Move Flasks to Burners Objective is running with the keep-out zone in the way, it may throw errors as the motion planner might not be able to find a collision-free solution.
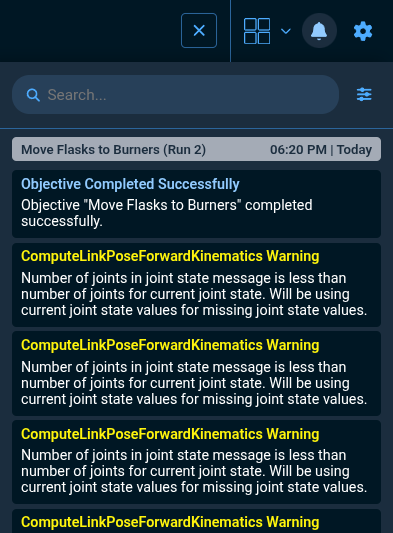
When errors occur, MoveIt Pro logs them to the Alert Sidebar. You can open it by clicking the bell icon in the top right of the toolbar:

This opens a sidebar showing a history of all Objective runs, including successes and failures with timestamps:
You can also filter alerts by severity (Errors, Warnings, Info) and source (Runtime, Editor) using the filter icon in the top right of the sidebar:
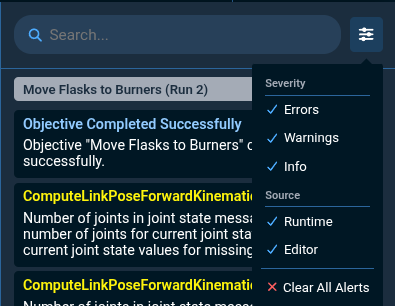
The Alert Sidebar is a useful tool for monitoring the status of your Objectives and diagnosing issues during development.
Going Back to Original Pose
To reset the robot pose back to its original pose, without using the simulation reset option, you can instead run the Look at Table Objective.
This Objective is an example of a very simple Behavior Tree that simply commands the robot to a named waypoint.
Editing the lab application
Adding a Breakpoint
Now let's learn how to pause an Objective at a specific point in its Behavior Tree using a breakpoint. This is useful for debugging or stepping through an Objective one Behavior at a time.
First, we need to open the Move Flasks to Burners Objective in edit mode.
Open the left Objectives sidebar if it's not already open, then select the Objective and click the Edit button on the top left of the menu bar.

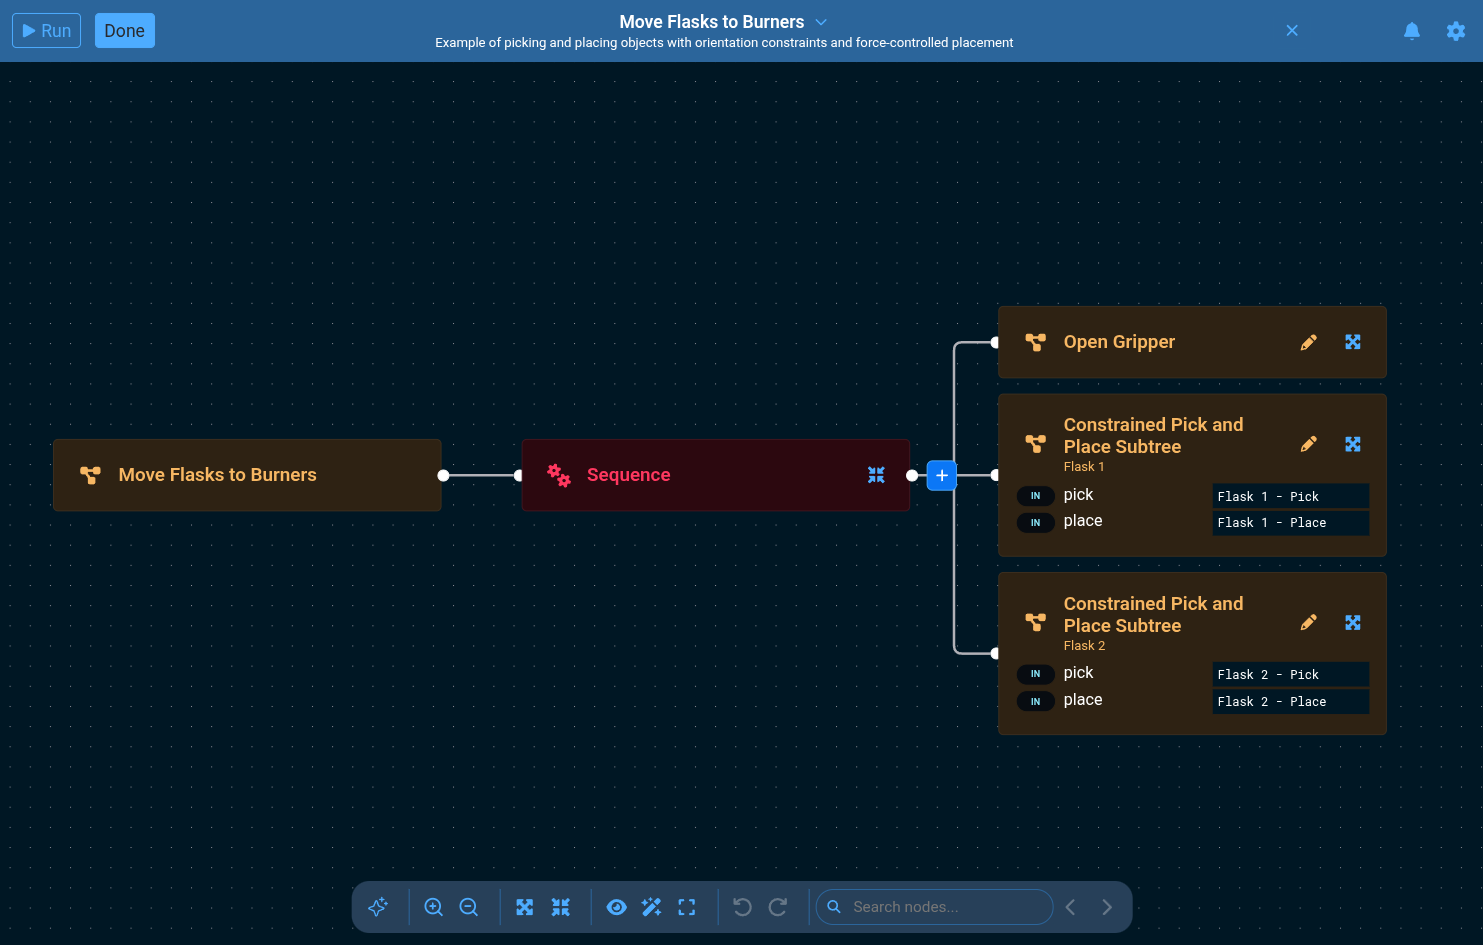
You are now in edit mode, indicated by the blue bar at the top of the screen showing the Objective name.
You should see the full Behavior Tree for Move Flasks to Burners:
Our breakpoint feature is represented as a Behavior, so next we will learn what a Behavior is, and how to add one to the tree.
In the Behavior Tree concept, a Behavior, also known as a node in other domains, is the fundamental building block of a Behavior Tree. Each Behavior represents a single unit of a robot skill or control logic. It always returns a status — SUCCESS, FAILURE, or RUNNING—when ticked (i.e., executed). Behaviors can perform actions, evaluate conditions, manage flow between other nodes, or modify Behaviors. They fall into categories such as Action, Condition, Control, Decorator, and Subtree nodes. By combining and organizing Behaviors hierarchically, developers can create complex and reusable robot applications in a modular and maintainable way.
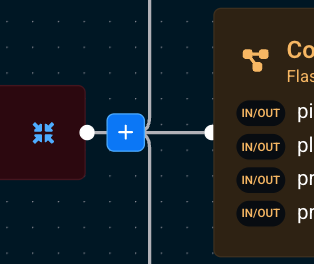
In MoveIt Pro, the recommended way to add Behaviors is using the blue plus button next to nodes in the Behavior Tree. Clicking it opens a search dialog where you can quickly find and add any Behavior.
You can also scroll through the full library of Behaviors on the left sidebar, or use the search bar at the top. However, the blue plus button is the fastest and most common workflow.
Click the blue plus button next to the Sequence node:
Search for "BreakpointSubscriber" and press ENTER to add it.
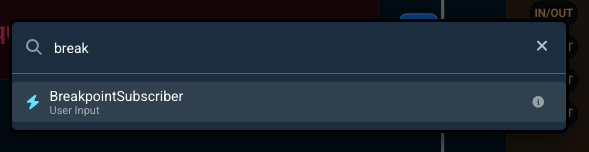
The BreakpointSubscriber will be added to the end of the Sequence, but we actually want to pause after picking the first flask.
Drag it so that it is placed right after the first Constrained Pick and Place node (Flask 1).
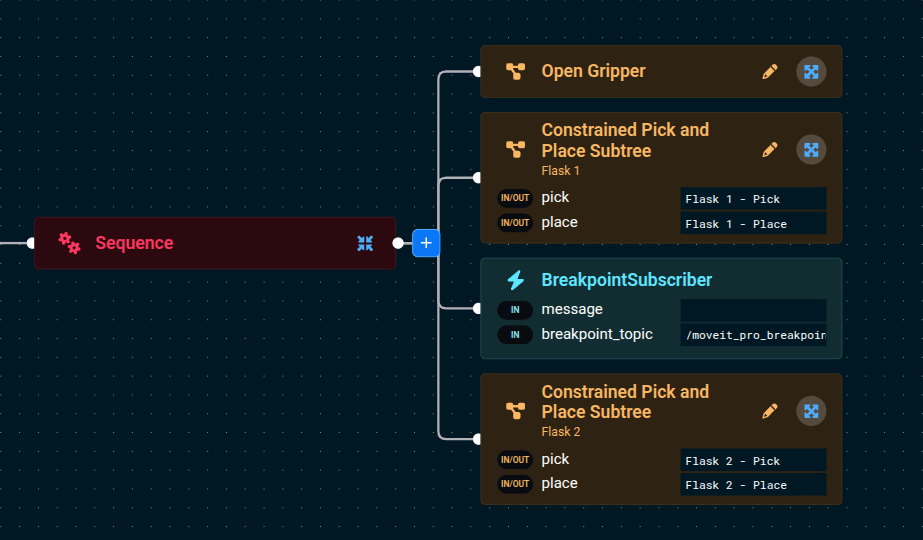
Next, run the Objective and observe it pause and request your input before continuing.
When you run the Objective, it will pause execution right before that Behavior, allowing you to inspect the state of the robot and the Behavior Tree before continuing.
Turning on the Burner
Now let's build towards a full lab automation application. After moving the flasks to the burners, we also want to turn on the burner. Rather than building everything from scratch, we can reuse existing Objectives as Subtrees within our Behavior Tree.
Subtrees are modular components within a larger Behavior Tree that encapsulate a set of actions or decision logic. By allowing one Behavior Tree to reference another, Subtrees enable greater reusability, organization, and maintainability in complex robotic applications. They help abstract away lower-level details, reduce duplication of nodes, and make it easier to manage common sequences or Behaviors across different Objectives. In MoveIt Pro, Subtrees are especially useful for structuring sophisticated task plans in a clean and scalable way.
From the left Objective sidebar, run the Push Button Objective to see the robot attempt to push the button on the burner.
This Objective uses admittance/force control to push the button with an exact force.
Now let's add this Push Button Objective as a Subtree into our flasks application.
Go back to editing the Move Flasks to Burners Objective, click the blue plus button at the end of the Sequence, and search for Push Button to add it.
Congratulations — you've just built a longer, more capable lab automation application that moves flasks and turns on the burner!
Disabling/Skipping Behaviors
As you iterate on an application, you often want to skip parts that are slow or unrelated to what you're currently testing. MoveIt Pro lets you disable nodes in your Behavior Tree so they're skipped at runtime, without deleting them.
The Push Button Subtree we just added uses admittance control to press the burner with a precise force — accurate, but slow to watch on every run.
Let's skip it while we iterate on the rest of the application:
- Make sure you are still editing the
Move Flasks to BurnersObjective. - Click on the
Push ButtonSubtree node and find the icons that appear on top of the box. - Click on the Comment out (skip execution) icon.
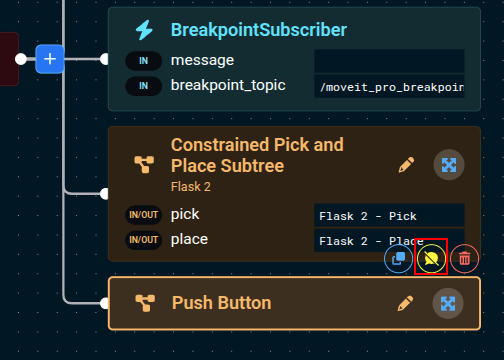
You should see the node change colors to indicate it's disabled.
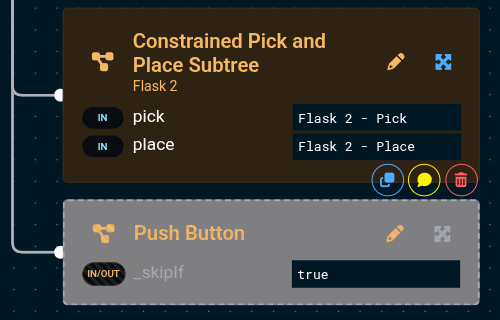
Now run the Objective — the flasks still move to the burners, but the button-push step is skipped, letting you iterate on the flasks portion much faster.
Renaming the Objective
Now that we've customized our lab application, let's rename it to something more personal:
- Open the
Move Flasks to BurnersObjective in edit mode. - Click on the Objective name in the blue bar at the top.
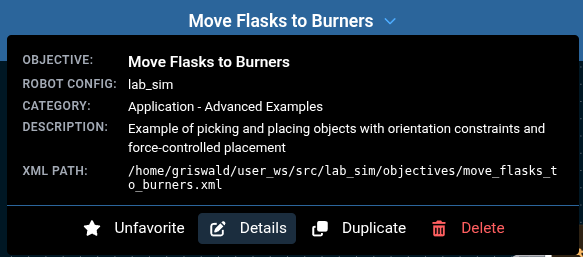
- Select Details and rename it to something like
My Lab Automation. - Click Save.

Editing the Multi-Threaded Push Button Subtree
One of the powerful features of MoveIt Pro's Behavior Tree engine is its support for multi-threaded parallel execution. This means multiple Behaviors can run simultaneously, which is essential for real-world robotics where you often need to perform an action while monitoring safety conditions at the same time.
Let's explore the Push Button Subtree we added earlier and modify how hard it pushes the burner button by changing the force threshold parameter.
To start, click on the pencil icon on the Push Button Subtree node.
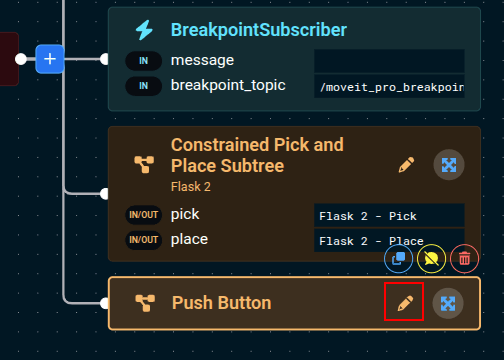
You should see a Parallel node near the core of the tree.
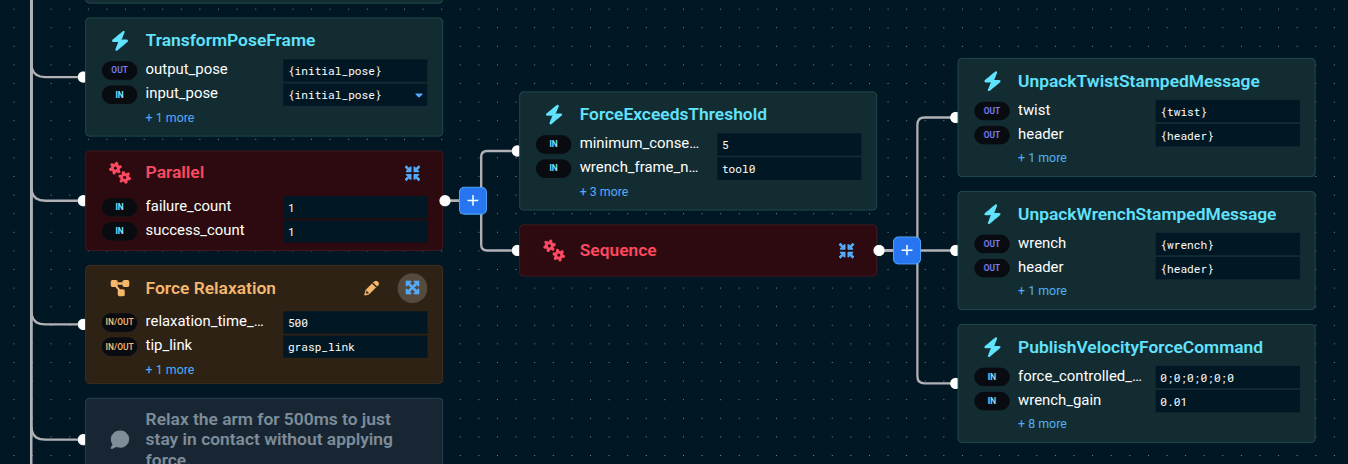
The Parallel node ticks all of its children concurrently. It can be configured with different success/failure policies — for example, succeeding when all children succeed, or stopping when any child fails. This is different from a Sequence, which runs children one at a time.
In this example, the Parallel node is running two things simultaneously:
- A velocity command that pushes the robot's end effector forward along the z-axis toward the burner button.
- A force monitor that continuously checks the force sensor and stops the motion if the detected force exceeds a threshold (20 N by default).
This pattern is common in contact-rich tasks like pushing buttons, inserting pegs, or polishing surfaces — anywhere you need the robot to move while respecting force limits. Without parallelism, you would have to alternate between moving and checking, which is slower and less safe.
Try it yourself:
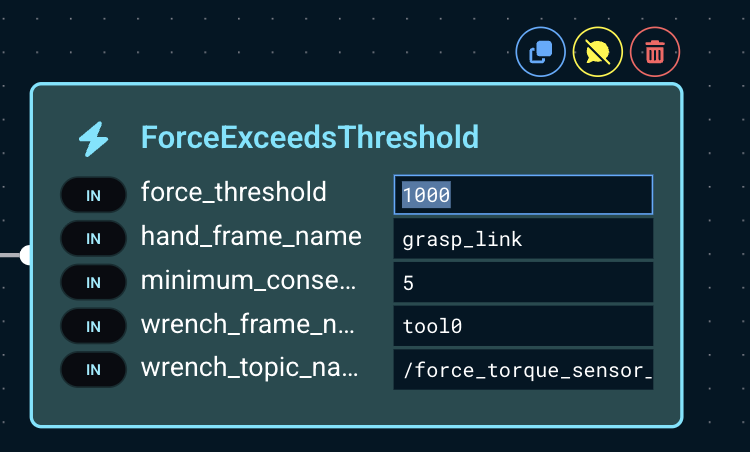
- Find the
force_thresholdparameter in theForceExceedsThresholdBehavior and increase it to 1000 N.
- Run the
Push ButtonObjective again and observe how the robot pushes harder before stopping. - The burner should start moving when it's being pushed, which means you're probably pushing with too much force.
- Reset the value back to 20 N.
MoveIt Pro's entire runtime is built to support multi-threading, so you can safely use Parallel nodes throughout your Objectives without worrying about thread safety issues in the built-in Behaviors.
There are different schools of thought on how to structure Behavior Trees. In this tutorial, we use many small, atomic Behaviors — each performing a single action like opening a gripper or moving to a waypoint. This granular approach makes it easy to learn, debug, and reuse individual skills. However, MoveIt Pro also supports building larger, self-contained subsystems with fewer nodes overall, which can be more practical for production applications. Both approaches are valid, and you can mix them as needed.
Perception-Based Picking with AprilTags
MoveIt Pro supports multiple perception approaches for autonomous manipulation. In this section, we'll use AprilTag fiducial markers for precise 6-DOF pose estimation to autonomously pick medicine bottles from the workspace.
What are AprilTags?
AprilTags are a type of visual fiducial marker — small, printed patterns that can be detected by a camera to estimate the precise 3D position and orientation (6 degrees of freedom) of a tagged object. They are widely used in robotics because they are fast to detect, robust to lighting changes, and provide accurate pose estimates.
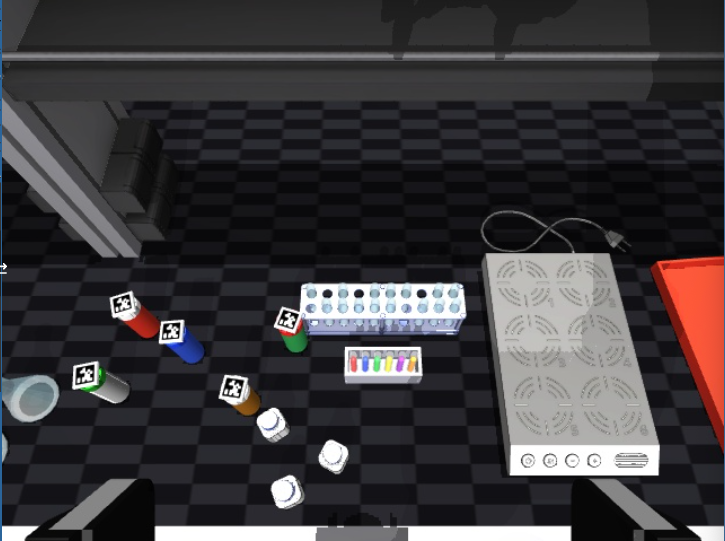
In our lab simulation, each medicine bottle has an AprilTag attached to its cap. The robot uses its wrist camera to detect these tags, compute a grasp pose, and pick up the bottles.
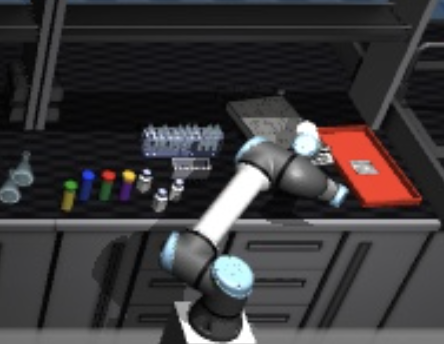
Run the Pick All Bottles with AprilTags Objective
Open the left Objectives sidebar and search for Pick All Bottles with AprilTags. Click the play icon to run it.
This Objective continuously loops, detecting and picking one bottle per cycle until no more AprilTags are found in the workspace.
How It Works
Open the Objective in edit mode to see its Behavior Tree structure. The picking loop is wrapped in a KeepRunningUntilFailure decorator, which means it will keep looping until an AprilTag detection fails (i.e., no more bottles remain). Each pick-and-place cycle is composed of these main steps:
Pick April Tag Labeled ObjectSubtree — Opens the gripper, moves to a top-down view of the table, captures a wrist camera image, detects the AprilTag, computes a grasp pose, and uses MoveIt Task Constructor (MTC) to plan and execute the approach and close the gripper.- Retract — Plans and executes a Cartesian retract path away from the grasp location.
- Place in Tray — Moves to a precomputed drop-off pose above the tray, then uses velocity/force control to lower until contact.
- Release and Retract — Opens the gripper and retracts upward before the next cycle.
Open this Objective in edit mode and click through each Subtree to see exactly which Behaviors are used. This is a great example of combining perception with dynamic motion planning, rather than relying on hard-coded waypoints.
View Parameters on the Blackboard
Now that you are editing parameters within Behavior Trees, we should mention that MoveIt Pro uses a blackboard to store and share data between Behaviors and Behavior Trees.
To view the state of the blackboard, choose Blackboard from the drop down menu in any view pane.
Then expand the arrow buttons to see the variables within each Subtree, and you should see a list of variables that are currently on the blackboard.
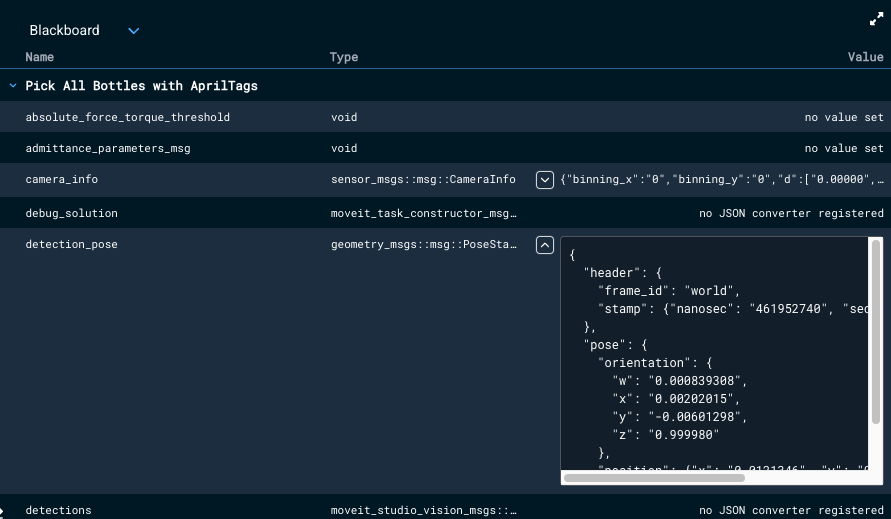
Open the Pick April Tag Labeled Object Subtree and find variables like detection_pose and offset_pose to see the pose data flowing between Behaviors as the robot detects and picks each bottle.
This tool is useful for debugging complex data flows within a Behavior Tree.
Building your own Objective
Create New Objective
Now we're ready to build our own custom Objective.
We're going to build a simple pick demo using a custom waypoint we'll create called Pick right bottle, along with some existing waypoints that ship with lab_sim.
To begin, select the + button to the left and click New Objective. This opens the New Objective dialog.
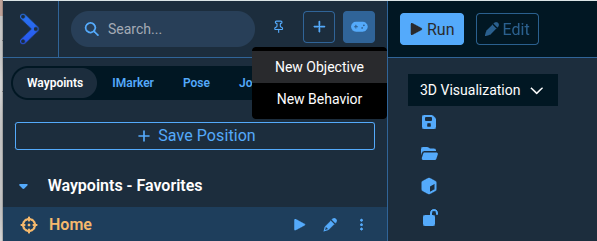
You'll also notice a New Behavior option in this menu. That will be covered in Tutorial 2, where you'll learn how to write custom C++ code that runs as a node in your Behavior Tree.
Enter My Pick and Place as the name.
For the category, create a new one using your company or organization's name. This can be your first custom category.
You can also provide an optional description, which we recommend. Try A simple pick demo using hardcoded waypoints.
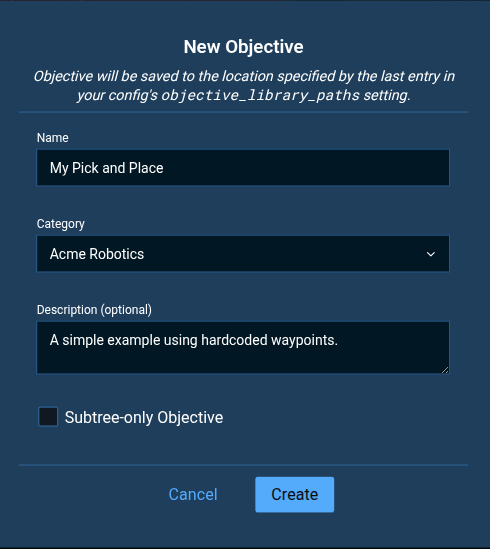
Leave the checkbox Subtree-only Objective unchecked. It specifies if an Objective can be executed. If an Objective is marked for usage as a Subtree only, then it is non-runnable, but can instead be used inside another Objective in the same way we use Behaviors.
Click the Create button. You should see a new, mostly empty Objective.
Adding Behaviors
New Objectives are instantiated with a simple Behavior Tree using the AlwaysSuccess Behavior. Without this AlwaysSuccess Behavior, it would be considered an invalid / malformed tree and would throw warnings.

Delete the AlwaysSuccess Behavior by clicking on it and either selecting the popup delete icon, or by pressing the Delete button on your keyboard.
Checkout our full Summary of Keyboard Shortcuts in MoveIt Pro.
The MoveIt Pro Behavior Tree editor includes an Undo/Redo button that can protect you from accidental deletions or other mistakes. You can find it on a bottom bar; on the bottom right of the editor screen. Try using this feature to undo and redo the deletion.
Now we are going to add our first Behavior.
Using the blue plus button, add the Move To Waypoint Behavior to our new tree.
Click on the Behavior and scroll to the bottom of the parameter sidebar to find the waypoint_name port dropdown selector.
Use the dropdown list to set the waypoint name to Look at Table.
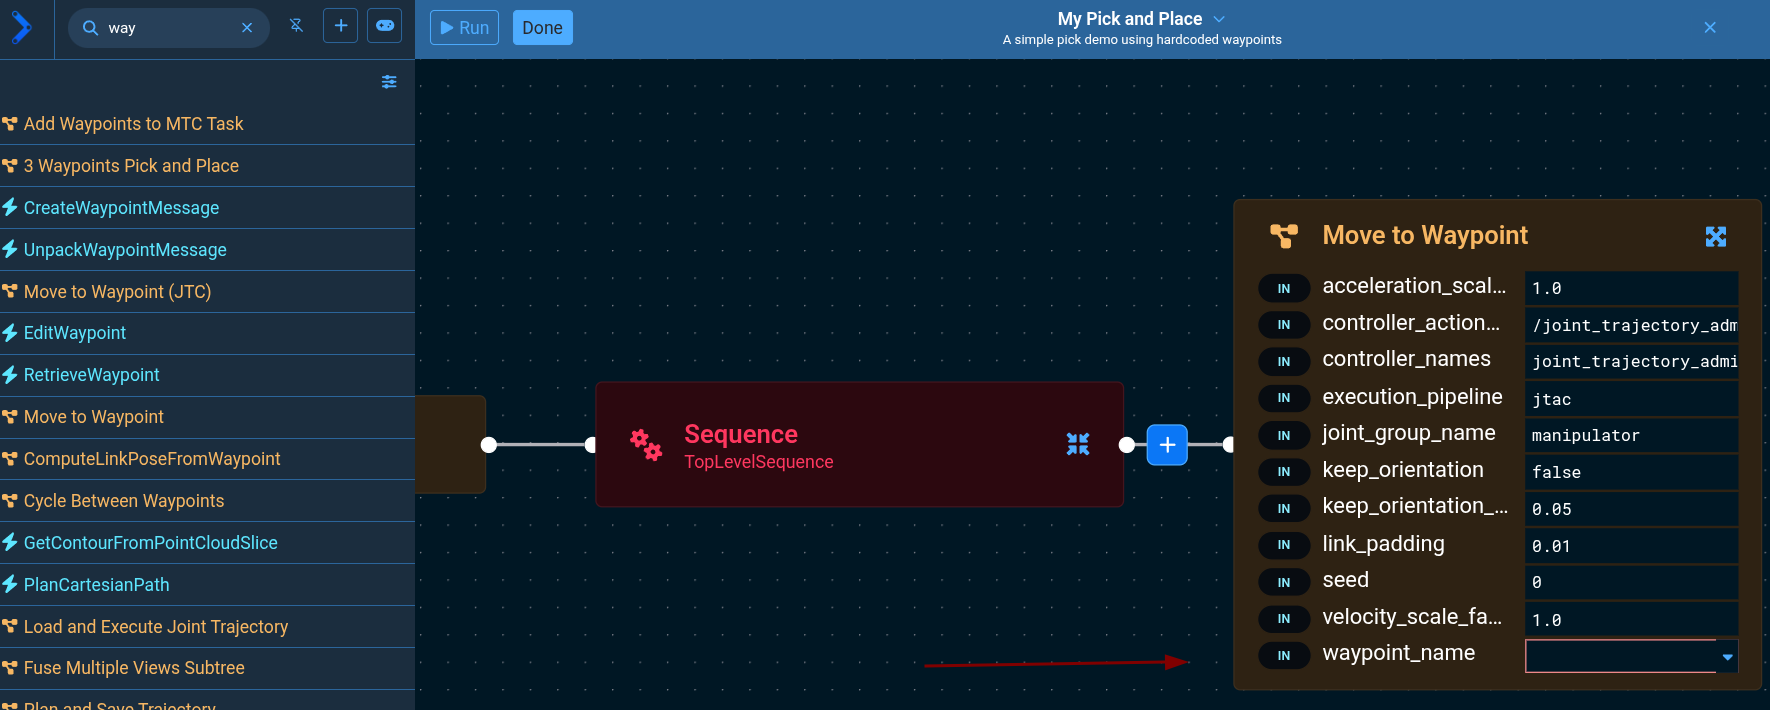
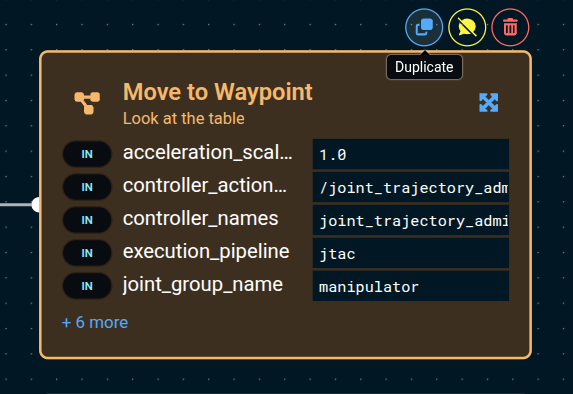
Each Behavior in an Objective has a name attribute that can be useful for identification. Let's set this Behavior's name to Look at Table.
By default, the Behavior Tree editor only displays a subset of all ports, to keep nodes compact. The screenshot above shows the Behavior with all of its ports visible. You can toggle full port visibility with the  button in the bottom icon bar.
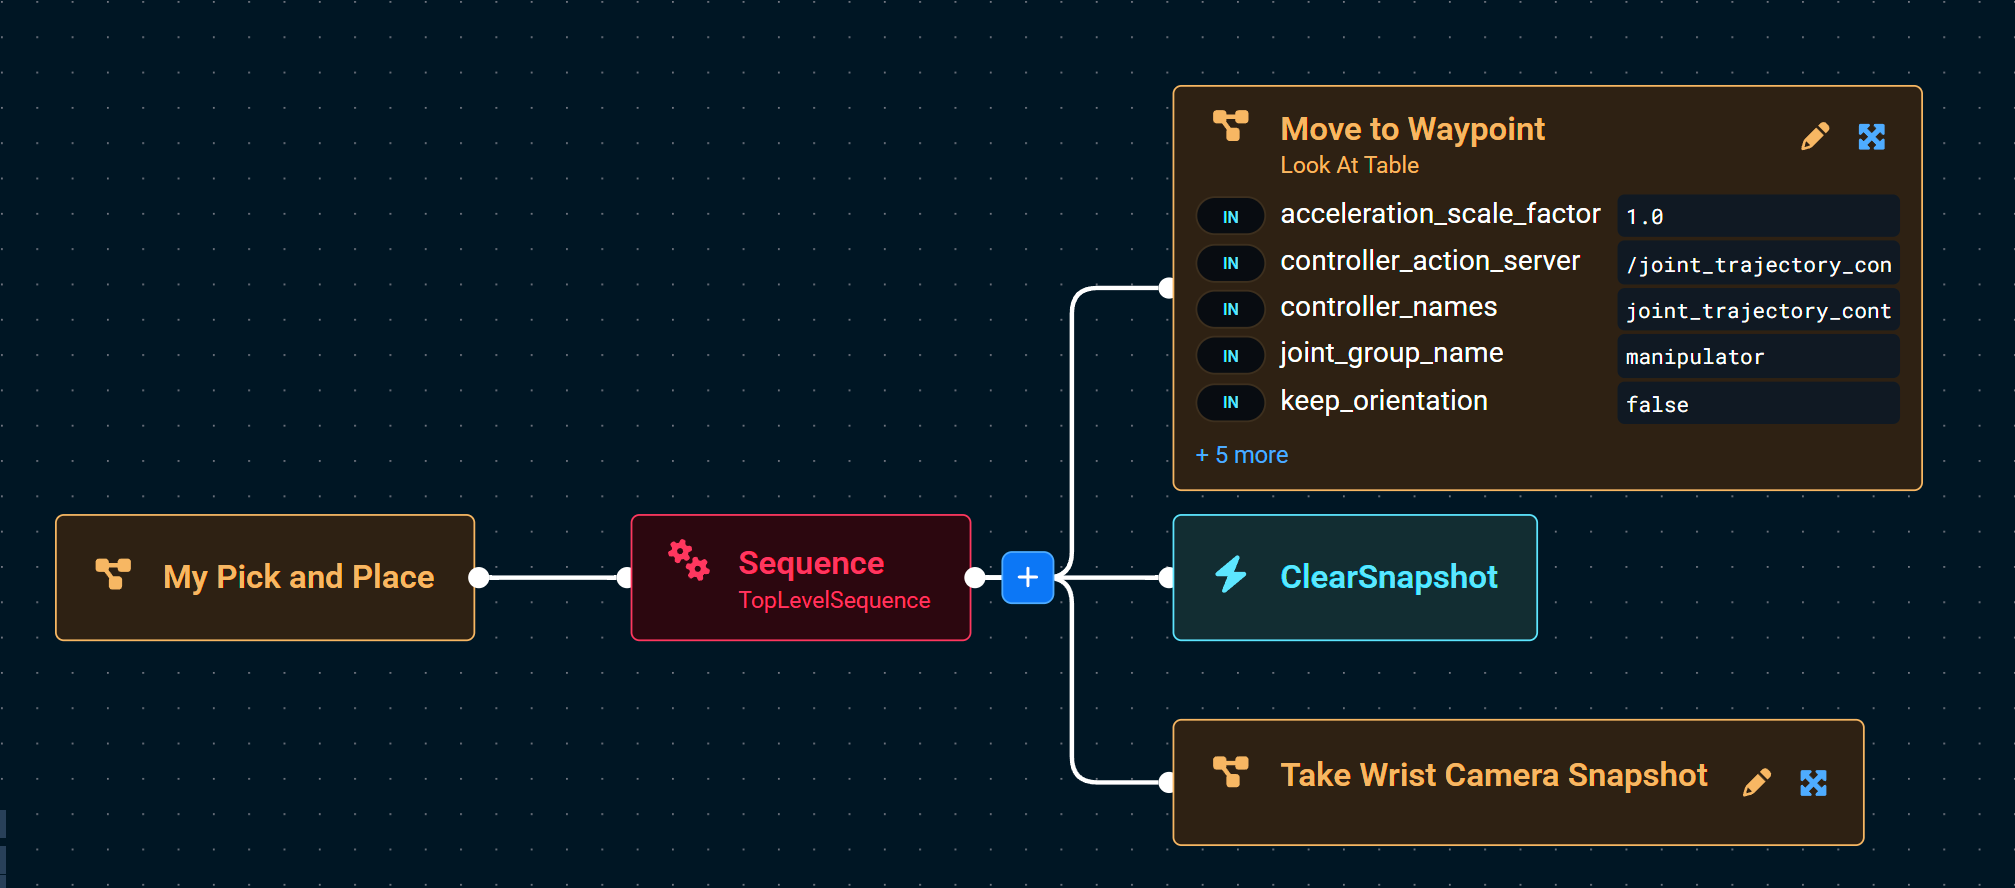
Next, add a Clear Snapshot Behavior, then add a Take Wrist Camera Snapshot Behavior to the tree.
This will add a fresh point cloud to the visualization pane when you run the Objective.
MoveIt Pro ships with 200+ Behaviors from the Behaviors Hub for all domains of robotics: motion planning, machine learning, inverse kinematics, Cartesian planning, real-time control, grasping, task planning, human in the loop teleop, and more. You are also encouraged to build your own custom Behaviors and plugins, which allows you to incorporate other ROS packages or third party capabilities with MoveIt Pro for unlimited potential.
We are going to add a few more Behaviors to complete the Objective. Below is a complete list of steps, including the ones we've already added in the above.
Full Behavior Sequence
Full sequence — each top-level bullet is a Behavior, with the port values to set indented below it:
Move To Waypointwaypoint_name:Look at Table
Clear SnapshotTake Wrist Camera SnapshotOpen Gripper- Make sure the gripper is open before we pick.
Move To Waypointwaypoint_name:Pick right bottle— a custom waypoint we will create below.
Close GripperMove To Waypointwaypoint_name:Home— returns the robot to a safe home position while holding the medicine bottle.
Creating a Waypoint with Teleoperation
To complete our Objective, we need a waypoint for where the robot should pick up the medicine bottle. We'll create this using MoveIt Pro's teleoperation — manual control of the robot through the UI.
MoveIt Pro provides many types of manual control for when a robot needs to be set up, diagnosed, or recovered. Teleoperation is also a key tool for AI data collection — by recording human demonstrations, you can generate training data for machine learning models.
| Method | Best For | Precision | Setup Required |
|---|---|---|---|
| Interactive Marker | Visual positioning, trajectory preview | Medium | None |
| Pose Teleop | Cartesian movements, end-effector positioning | High | None |
| Joint Teleop | Joint-specific movements, singularity avoidance | High | None |
| Game Controllers | Familiar interface to many users | Medium | Plug in USB |
| Haply Haptic | Force-sensitive tasks, delicate manipulation | Very High | Setup Guide |
| Meta Quest VR | Intuitive hardware-based teleop | Medium | Setup Guide |
For more details on each mode, see the UI-Based Teleoperation Guide. For hardware-based teleop (game controllers, Haply, Meta Quest), see the Hardware Teleoperation Guide.
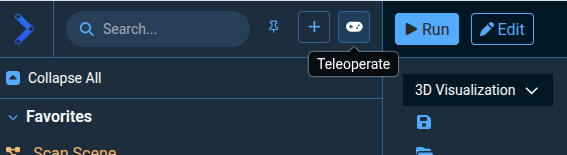
Click on the Teleoperate button on the top left of the toolbar.
At the top of the left sidebar you should see four available teleoperation modes — click through them to explore how the user interface changes for each mode.

Waypoints are saved joint states that can be reused later in Objectives or standalone.
Now let's drive the robot to a grasp position and save it as a waypoint:
- Set the largest view pane to the
/wrist_camera/colorcamera view. - Open the gripper using the bottom buttons.
- Use various teleop modes to drive the robot arm to a grasp position that envelopes the medicine bottle on the right side of the table. We recommend using Pose teleoperation as the easiest mode for driving the arm around the medicine bottle.
Once you are happy with your robot's grasp position, save the robot's state by creating a waypoint:
- Press the Create Waypoint button.

The dialog will open.
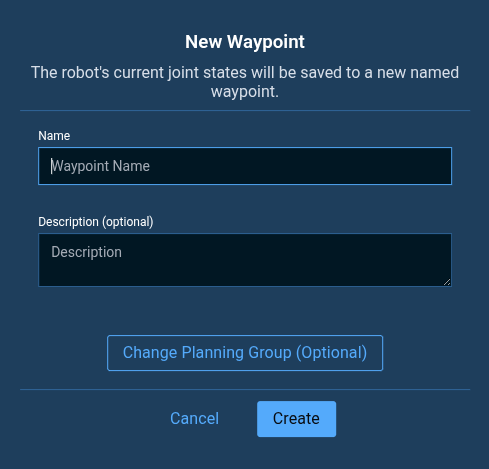
-
Name your new waypoint
Pick right bottle.tipYou can adjust which parts of the robot to save as a waypoint, by clicking the Change Planning Group button when adding a new waypoint. However, this is an advanced feature you do not need to worry about for now.
-
Click Create to finish creating your new waypoint.
-
Exit teleoperation mode by clicking the Stop and Exit button on the left.
Finishing the Objective
Now go back to editing your My Pick and Place Objective and finish adding the remaining Behaviors from the sequence above.
Make sure to set the waypoint_name for each Move To Waypoint Behavior, including your newly created Pick right bottle waypoint.
To save time, you can use the blue Duplicate icon on the top right side of any Behavior to make a copy of it.
Take advantage of the build navigation buttons located on the bottom of the pane. To keep your tree clean and organized, try the Auto Layout button!
Your completed Objective should look similar to this:
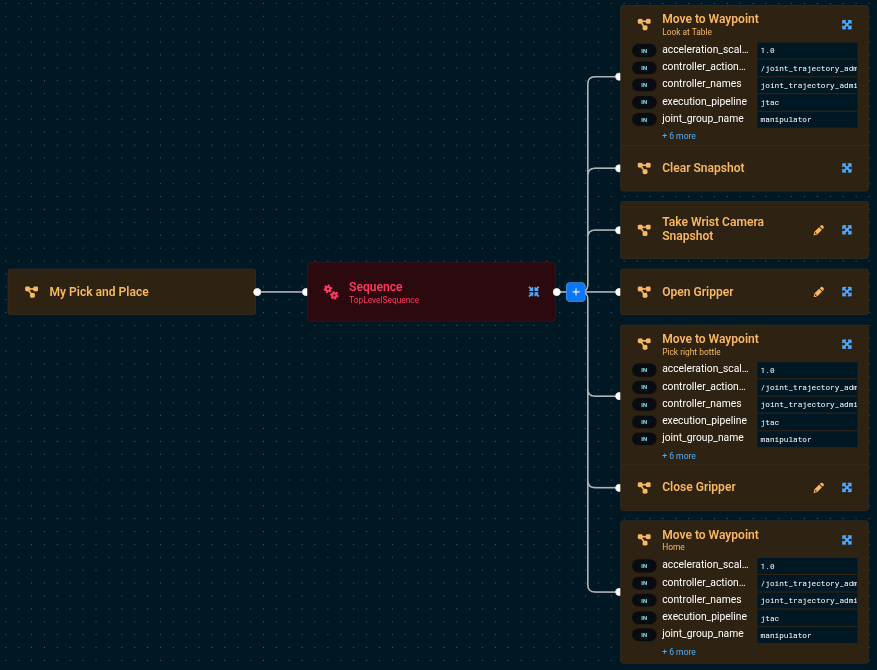
Run the Objective to make sure it works.
We should see the robot pick up the right medicine bottle! We realize this is a very basic example, but this is our intro tutorial. MoveIt Pro can do much more advanced applications that involve computer vision, reasoning, and machine learning.
You can also edit Objectives using your favorite IDE / code editor, as all Behavior Trees are saved to file in plain text XML format.
The Behavior Tree you just created can be found on your filesystem, and you can run the following command in terminal to see all available Objectives in lab_sim:
ls -1 ~/moveit_pro/moveit_pro_example_ws/src/lab_sim/objectives
Example contents of objectives folder
3_waypoint_pick_and_place.xml
add_point_cloud_to_vector.xml
add_poses_to_mtc_task.xml
add_waypoints_to_mtc_task.xml
apriltag_pick_object.xml
classical_pick_and_place.xml
clear_previous_obstacles.xml
close_gripper.xml
constrained_pick_and_place_subtree.xml
constrained_pick_place.xml
create_pose_vector.xml
cycle_between_waypoints.xml
force_relaxation.xml
fuse_multiple_views_subtree.xml
And many more.
Great job on creating your first Objective! Before moving on to perception and machine learning, let's dive a little deeper into some Behavior Tree theory.
Behavior Tree Theory
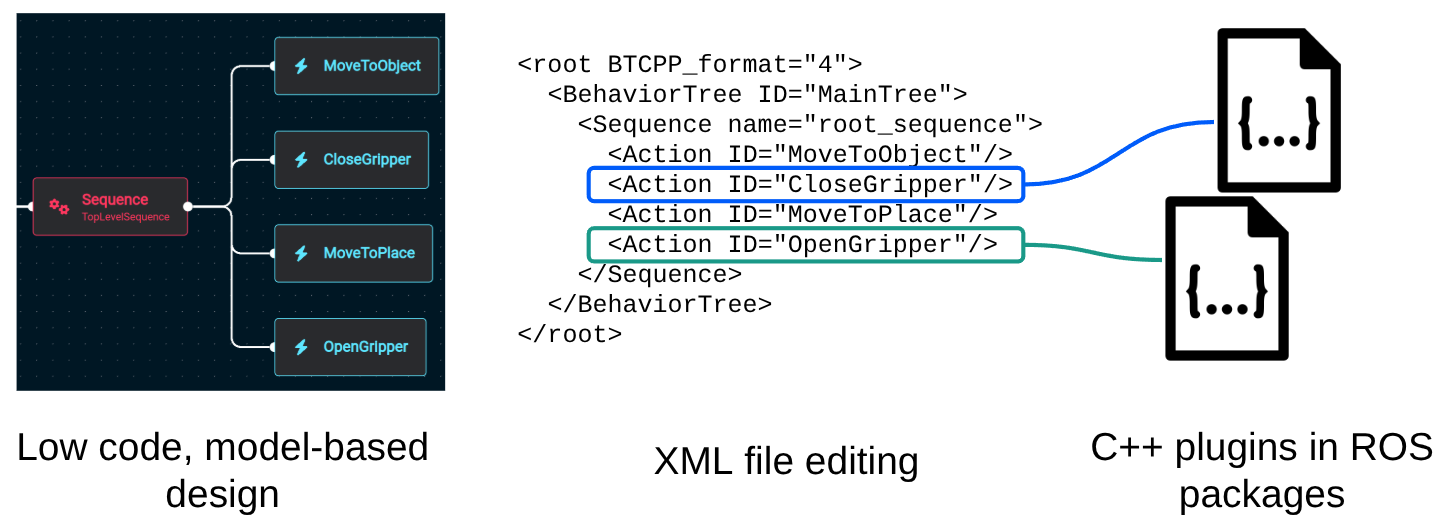
A Behavior Tree is a hierarchical, modular way to model decision-making logic. It is implemented in MoveIt Pro in a visual node-based, block-diagram-style workflow. At the highest level, the MoveIt Pro UI offers an accessible and intuitive low-code development environment. The underlying Behaviors are implemented as customizable C++ plugins via ROS packages.
Nodes
Behavior Trees are built from nodes, and there are two broad families: internal nodes that decide how their children run, and leaf nodes that do the actual work.
Internal nodes have one or more children and control how those children run:
- Control nodes run their children in a set pattern. A Sequence runs them one after another, while a Parallel runs several of them at the same time.
- Decorator nodes have exactly one child and change how it behaves. For example, an Inverter flips its child's result (turning SUCCESS into FAILURE and FAILURE into SUCCESS), and a Delay waits a set amount of time before running its child.
Leaf nodes sit at the bottom of the tree and do the actual work:
- Action nodes perform a task, such as moving the arm or opening the gripper.
- Condition nodes check something, such as whether the gripper is holding an object, and answer yes or no.
Every time the tree runs, a signal called a "tick" travels down from the top. When a node is ticked, it reports back a status:
- SUCCESS
- FAILURE
- RUNNING — the task has started but needs more time to finish.
Condition nodes only ever report SUCCESS or FAILURE, since a check is answered right away.
For more information about Behavior nodes, please refer to our concepts page on Behavior Node Types
Data Sharing through Ports and the Blackboard
Behaviors communicate with each other via the Blackboard (key/value storage). To manage access to data, Behaviors can assign ports.
There are three types of ports:
- Input
- Output
- Bidirectional (Note: All Subtree remapping ports are bidirectional)
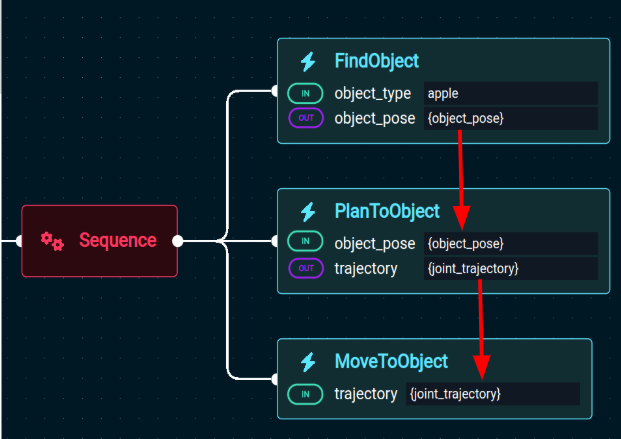
Ports can be assigned direct values (typically numbers or strings), or variables from the Blackboard, which is indicated by enclosing the variable name in curly brackets (e.g. {blackboard_variable} ).
Blackboard variables must exist before they can be used:
This concludes our Behavior Tree theory!
Using SAM3 AI Model
Reset the simulation so the bottles return to their original positions. Click the gear icon in the top right and select Reset Simulation, as you did earlier in this tutorial.
Run the ML Find Objects on Table Objective
This Objective runs an ML model that requires a decent GPU and uses a significant amount of VRAM. It may not work on all machines, or may run very slowly on systems without a dedicated GPU.
To see an example:
- Open the left Objectives sidebar and search for
ML Find Objects on Table. Click the play icon to run it. - Wait for the Objective to complete.
- Switch one of your view panes to
/masks_visualizationusing the dropdown menu at the top of the pane, you should see something like the following:
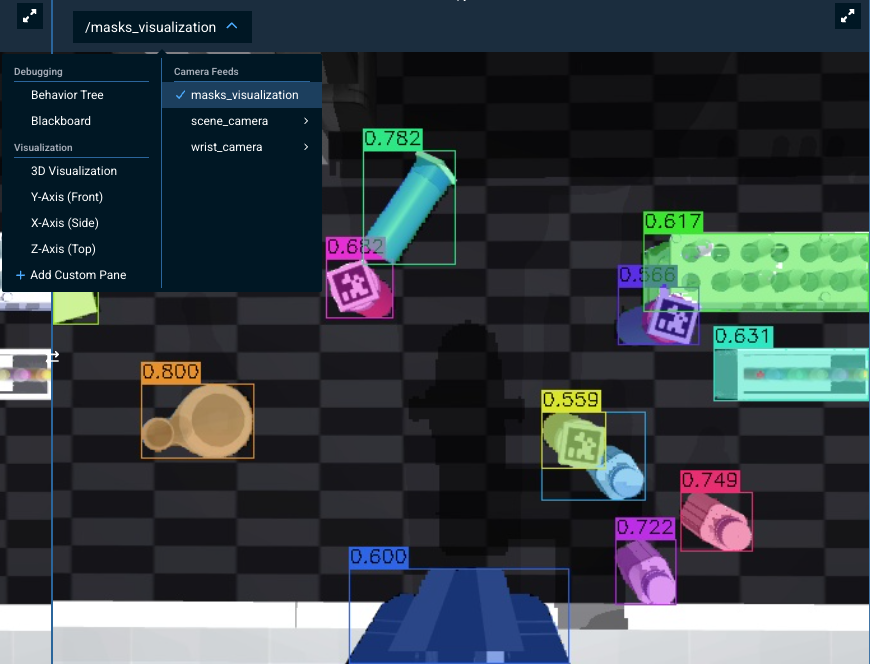
In Tutorial 3, we dive deeper into MoveIt Pro's ML and perception capabilities, including how to integrate your own custom ONNX models and build full ML-powered pick and place applications.
Saving your work
This section does not apply to MoveIt Pro Cloud users, where your work cannot be saved once the cloud session expires.
Wrapping up this tutorial, you may be curious how all these changes are stored and saved.
In this beginner tutorial we are working out of our basic moveit_pro_example_ws, which is stored on your computer at ~/moveit_pro/moveit_pro_example_ws.
Your changes are auto-saved to file, but you can also push it into the cloud using standard Git code repository practices.
To do this:
- Open a terminal explore the changes you have made:
cd ~/moveit_pro/moveit_pro_example_ws
git status # see the files you have changed
tree # explore the file structure of this repo
- Fork the moveit_pro_example_ws repo on Github, to your own account
- Connect your local workspace to your new fork
git remote set-url origin <url_of_your_new_fork>
- If you want to now save the changes:
git checkout -b my_pick_demo
git add -A
git commit -m "Adding My Pick and Place Objective"
git push origin my_pick_demo
Exploring More Robot Configs
Before continuing on to the next tutorial, feel free to explore other example robot configs provided in MoveIt Pro beyond lab_sim.
These example worlds showcase other hardware and various reference applications.
To do this:
- Bring down your current instance of MoveIt Pro with
Ctrl-C. - See all available configuration packages with the command
moveit_pro run --list. - Choose one, such as
moveit_pro run -c grinding_sim. - Within the UI, try out the various example Objectives from the sidebar.
Summary
By completing this tutorial, you've built a strong foundation in using MoveIt Pro—from running Objectives and teleoperating the robot, to creating your own pick-and-place application with safety zones and recovery Behaviors. You explored how to configure the user interface, use Behavior Trees for task logic, and integrate ML-based perception. In the next tutorial, you'll learn how to use MoveIt Pro as a developer platform — including the runtime SDK, Python integrations, and how to build your own custom Behavior plugins.
Just completed our live training? We would love to hear your feedback on this course!
🎉 Congratulations, we're now ready to move to the next tutorial!