Tutorial 1 - Intro & Basic Usage
🕒 Duration: 1-2 hours
💪 Level: Beginner
Four Course Overview
Welcome to MoveIt Pro's four part tutorial series for teaching you how to use MoveIt Pro. These four tutorials are self-paced, and can be completed independently within two hours each. If you prefer a more guided experience, the same material is also covered in our monthly live training sessions, but with expert engineers available to answer questions and guide you through the material.
Training Goals
The tutorials all build on top of each other, and assume you have completed the previous tutorial:
- Tutorial 1 leverages our optional, yet comprehensive, user interface, to make the beginner experience easy.
- Tutorial 2 covers how to use MoveIt Pro without its frontend, diving into the runtime SDK, Python integrations, and how to build Behavior plugins / extensions.
- Tutorial 3 teaches more advanced Behavior Tree concepts with subtrees, building with LLMs, and using more computer vision and machine learning.
- Tutorial 4 teaches advanced motion planning and control concepts, including the many types of dynamic trajectory generation, collision checking, and Cartesian control.
Tutorial 1 Basic Usage - Overview
This tutorial is designed to be your first hands-on introduction to the high level functionality of the platform, giving you a general overview of MoveIt Pro, including how to:
- Create and run your own robot applications (Objectives) using Behavior Trees.
- Leverage teleoperation tools
- Build a pick-and-place workflow
- Set up keep-out zones
- Integrate human-in-the-loop recovery
An Objective is basically an application in MoveIt Pro, though it can also be a lower level function (a subtree) that is then combined into a higher level Objective. Objectives are created using behavior trees, which are similar to state machines. Behavior Trees are composed of Behaviors, which are the low-level nodes or skills. An example of a Behavior is opening a gripper or moving to a pose. To learn more about Behaviors, see the Behaviors Concepts Page.
Pre-reqs
We assume you have already installed MoveIt Pro and have some familiarity with robotic arms.
Start MoveIt Pro
Launch the application if you haven't already, using:
moveit_pro run -c lab_sim
Exploring the User Interface
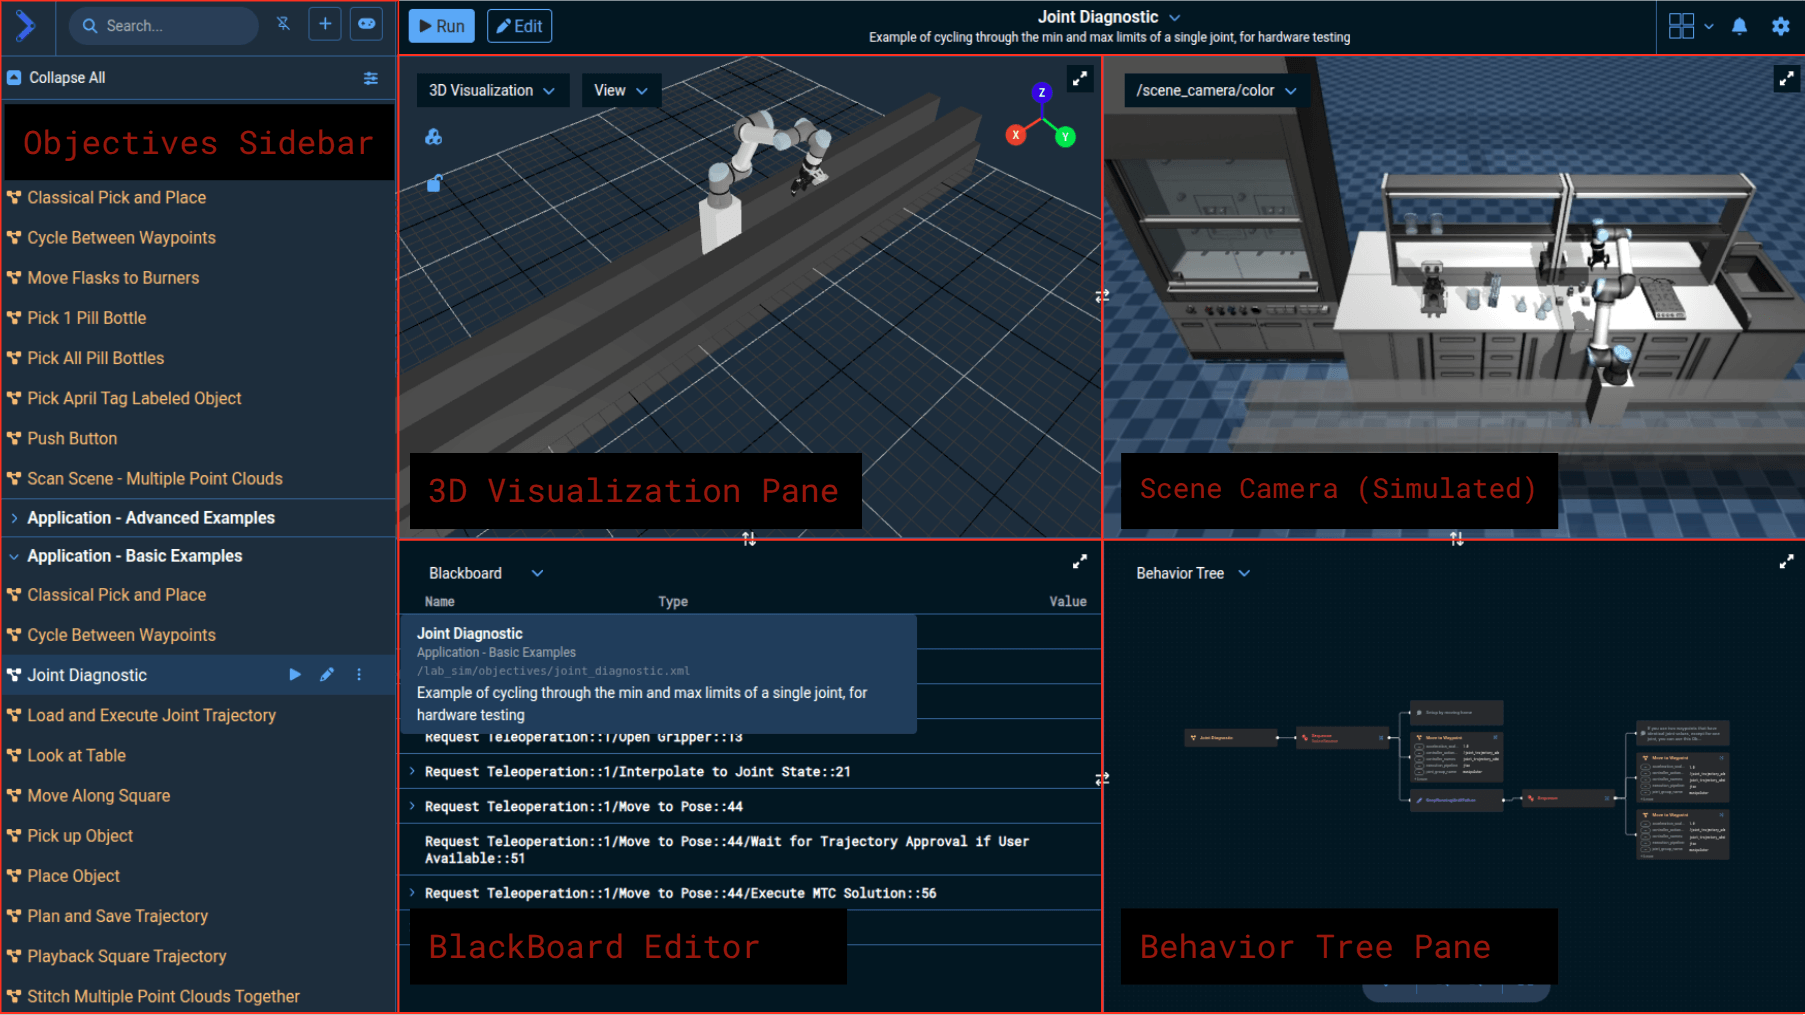
Panes Overview
You should see a UI similar to the following, though the exact view pane layout may vary as it is customizable:
Customizing the Panes
Your configuration of panes may vary depending on previously saved settings. The following diagram highlights some of the ways to customize your view panes:
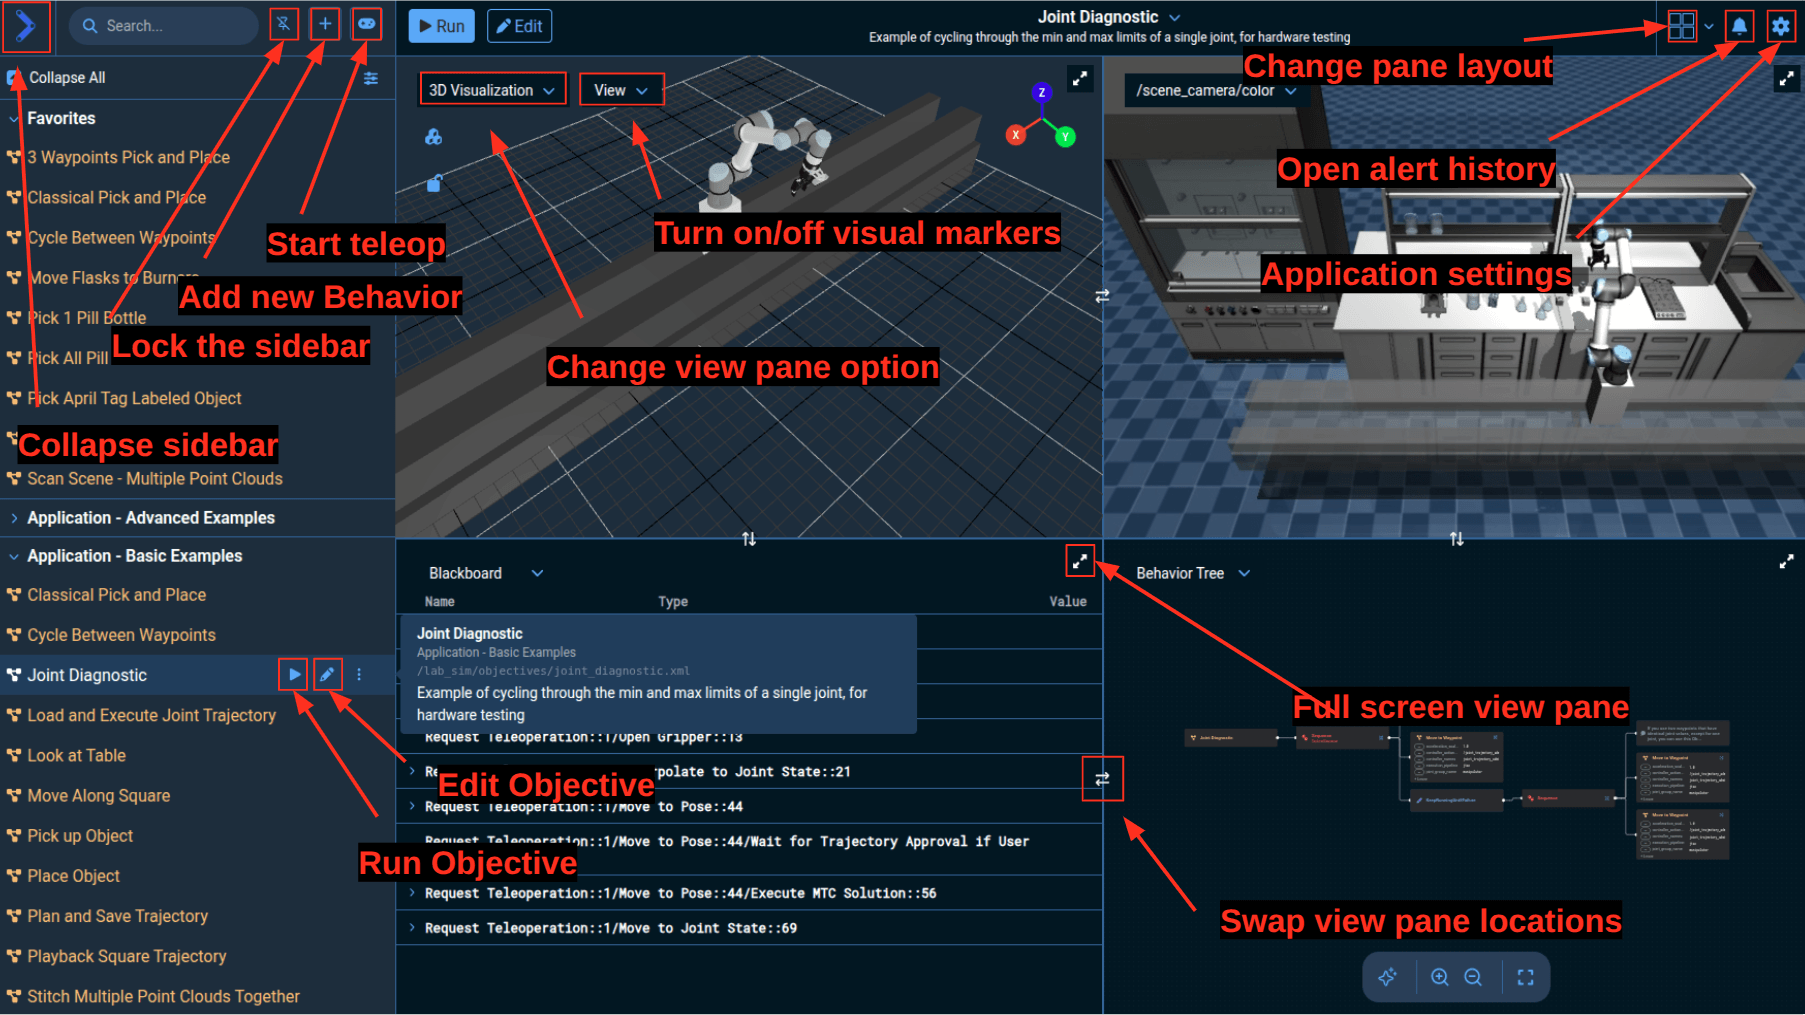
Try it yourself:
- Use "Change view pane option" to change the bottom right pane to
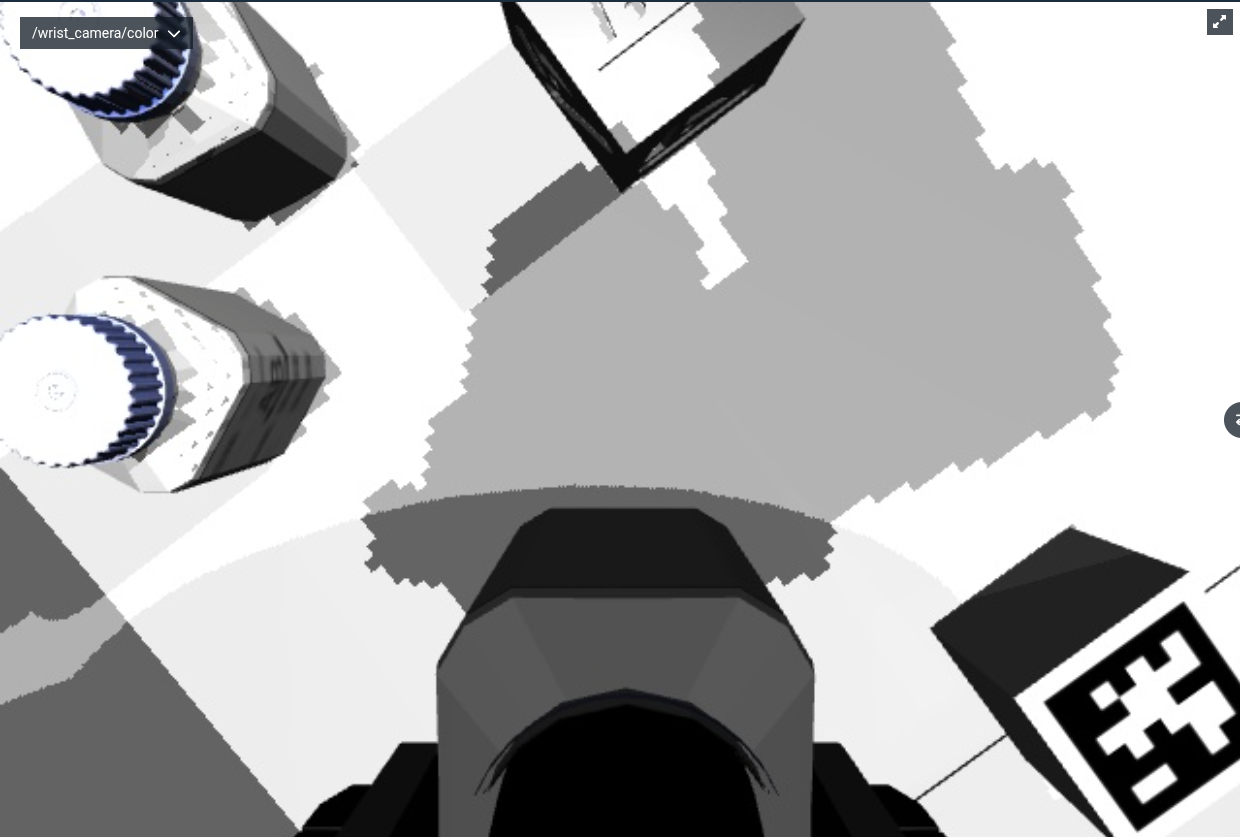
/wrist_camera/color. This will allow you to see the camera view of the camera mounted on the robot’s wrist.
- Change the number of panes available by clicking on the Pane Selection menu in the top right. Select the 3 pane view option
Visualization Pane
Displays a rendering of what the robot understands of the world, similar to the common Rviz visualizer in ROS. In MoveIt Pro this understanding of the world is stored in a Planning Scene. The Planning scene is a combination of our robot’s URDF model, point clouds, octomaps, meshes, and geometric primitives. These data sources are used to avoid collision with the robot and the world.
For lab_sim, you should see a robot arm on a rail. We shouldn't see any other objects from the simulated scene, since the robot has not 'perceived' them yet. The view of the scene can be adjusted by clicking within the pane and dragging the mouse around. The left mouse button rotates the scene, and the right mouse button drags the scene.
Camera Feeds
The /scene_camera/color, /scene_camera/depth, /wrist_camera/color, and /wrist_camera/depth panes show the camera feeds from the underlying simulator. If you were connected to hardware, these cameras would show the real world and not simulations. By default, these are set to the scene cameras, which are simulated third-person views of the robot, both in color, and depth respectively.
Behavior Tree Pane
In this pane the most recently run Objective is shown, if any. While running an Objective, this pane will highlight which Behavior is currently executing, which is useful for debugging and introspection.
Blackboard Pane
This pane shows the variables being passed around on the Behavior Tree blackboard. These parameters are the key data that is passed around between Behavior nodes.
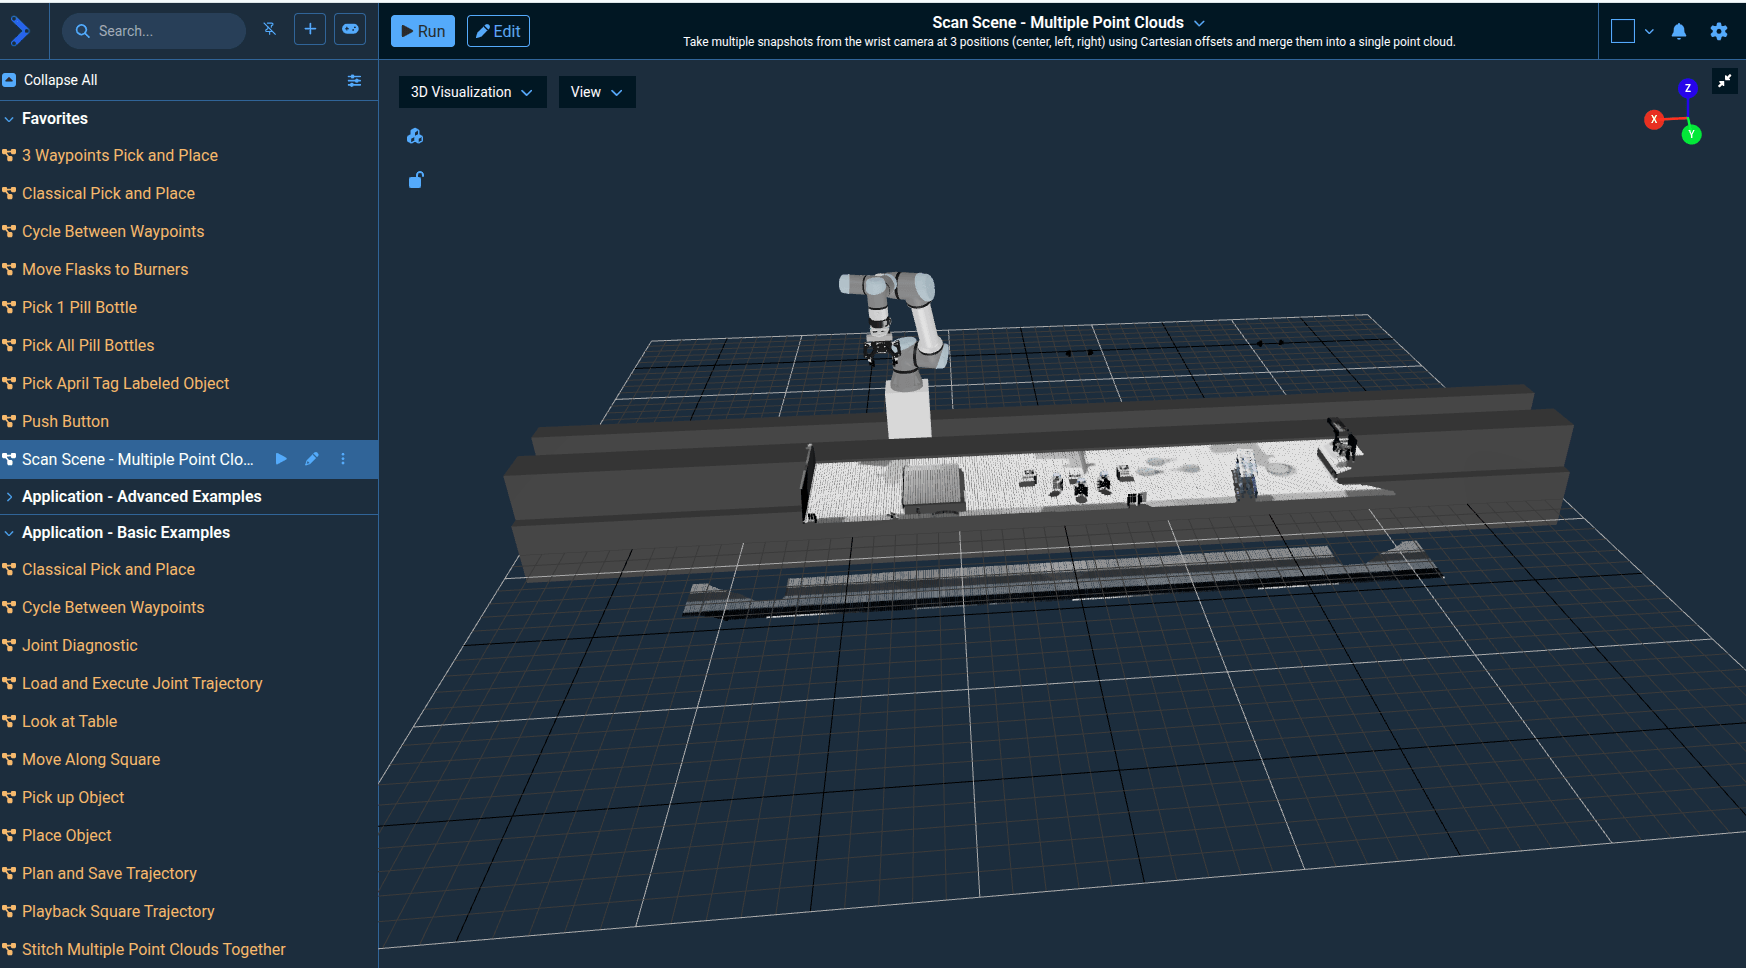
Scan the environment into the scene
You might notice our virtual world in the Visualization pane is a bit empty - let’s scan in the entire environment by running the Scan Scene - Multiple Point Clouds Objective. We can find it in three different ways:
- In the favorites toolbar (clicking runs automatically)
- By scrolling through the Objectives sidebar categories
- Or by typing in the name of the Objective in the sidebar search area
If using the sidebar, click the play icon next to Scan Scene - Multiple Point Clouds to run the Objective, and you should see:
The planning scene is a representation of the robot's environment, including the robot itself, obstacles, and other objects.
It is used by motion planners to determine valid paths and trajectories for the robot.
In MoveIt Pro, the planning scene is represented by the moveit_msgs::PlanningScene message type.
Obstacles can be added manually from the UI (keep-out zones), in Behavior Trees via planning scene manipulation Behaviors, or automatically from perception data by configuring the perception pipeline.
Running an example lab application
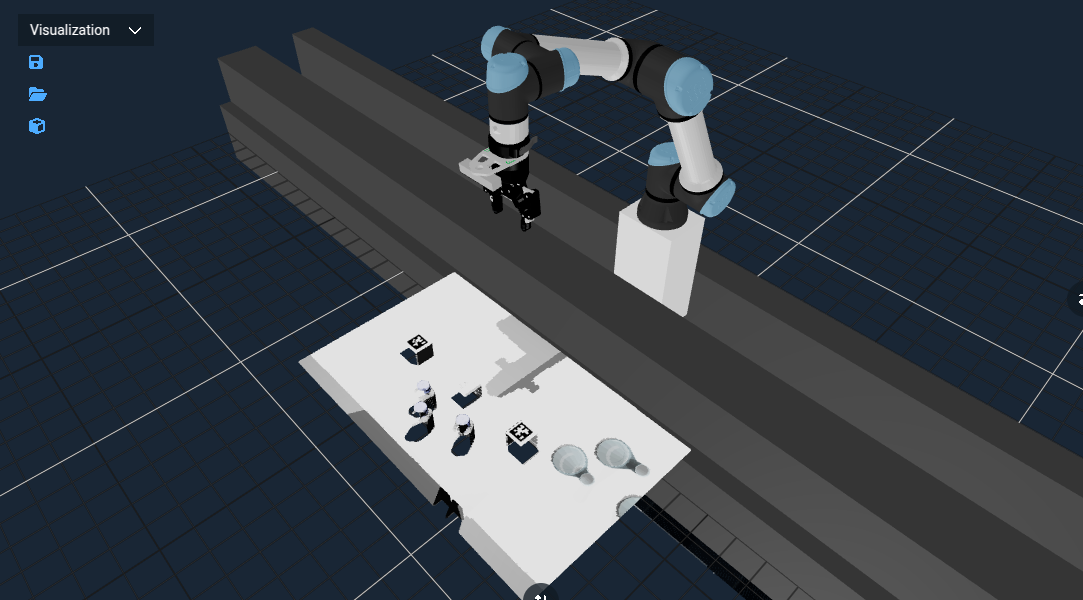
Navigate and choose to Run the Move Flasks to Burners Objective. You can use the search bar at the top of the sidebar to find this Objective quickly.
We should see the robot arm pick up each of the three flasks on the left side of the workspace and move them to the burner on the right.
Now run the Push Button Objective and the robot will press on the controls of a simulated burner to heat up the Flasks 🧪. This Objective uses admittance/force control to push the button with an exact force. That’s science! ⚗️
In this beginner tutorial we are showing you how to do everything from the UI. However, MoveIt Pro ships with a powerful API that allows you to start, stop, and monitor Objectives in a headless mode, without the UI.
Modifying the Planning Scene
We can clear the scanned in environment at any time by running the Clear Snapshot Objective - try that now. We should see the Visualization pane be cleared out.
Next you can take a snapshot from a different camera - the camera on the robot’s wrist. Run Take Wrist Camera Snapshot Objective and you should see a much smaller area show up as a point cloud.
Restore the full scene by running Scan Scene - Multiple Point Clouds a second time.
Stop looping Objectives
Some applications will run forever, until you tell it to stop. The 3 Waypoints Pick and Place Objective is a simple example like that - run it now. It will pick a small cube object using hard-coded waypoints forever.
Use the Stop Objective button on the top left to stop the loop once we've seen it through once and put the block back where it started.

To reset the robot pose back to its original pose, run the Look at Table Objective. This Objective is an example of a very simple Behavior Tree that simply commands the robot to named waypoint. We can also move to waypoints using the Teleoperate functionality that is covered later in this tutorial.
Running an example ML Objective
MoveIt Pro offers a powerful set of tools for using machine learning models within your robot application, while still providing safety and reliability guardrails. One example that ships out of the box is ML-based image segmentation. Given a text prompt like “hotdog”, the model will search for all instances of hotdogs within the camera field of view, and return its location for use in manipulation.
Not all computers are powerful enough to run ML models, especially if they do not have a dedicated GPU. In particular, this Objective can take upwards of 1 GB of VRAM to run on top of the approximated 1 GB MoveIt Pro uses.
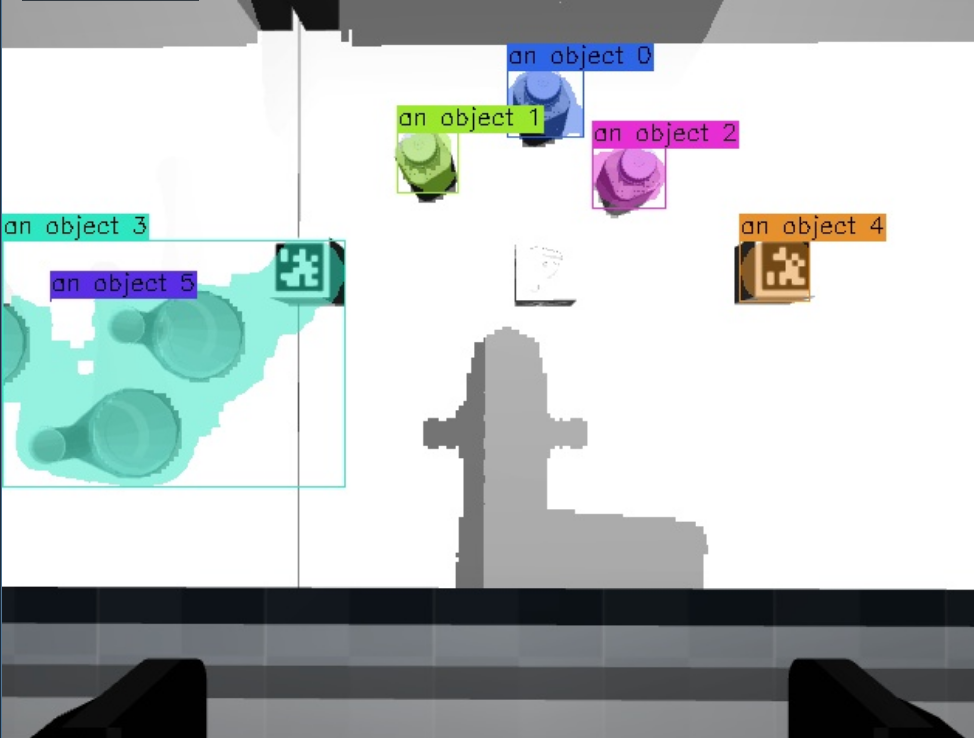
Let’s run the ML Segment Image Objective. The default value of the prompt string is an object. The output of this Objective is a new camera topic /masks_visualization that should automatically be added to our view panes, with all the detected objects highlighted in different colors.
Modify the example ML Objective
Now we are going to edit the ML Segment Image Objective by selecting the Edit button on the top left of the menu bar.

We should see the Behavior Tree ready to be edited:
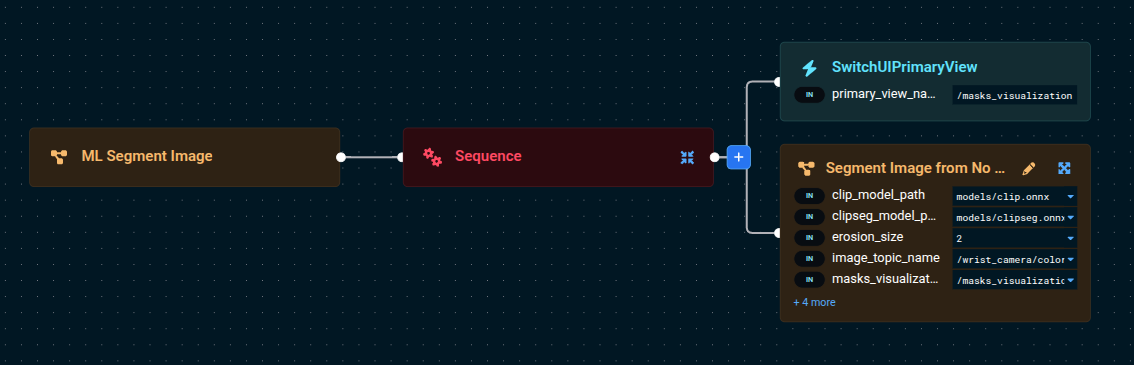
Click on the Segment Image from No Negative Text Prompt Subtree so that a sidebar opens on the right side. In this sidebar you can easily set and edit parameters.
Scroll down in the sidebar until you see the prompts variable, towards the bottom.

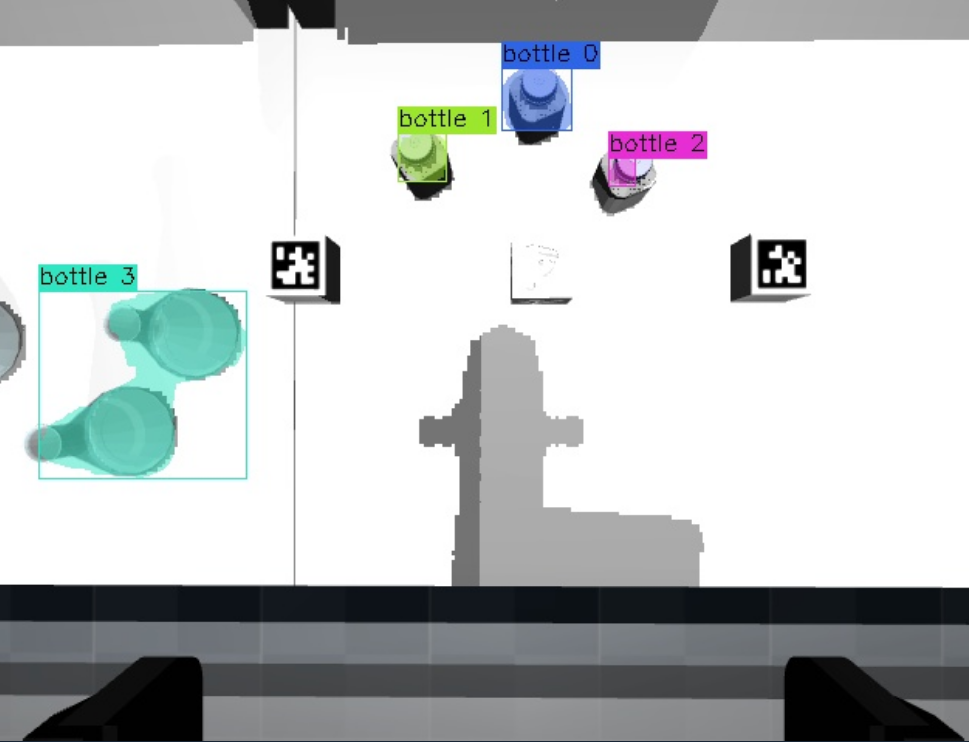
Change the value from an object to bottle. This will prompt the ML model to find only bottles in the camera image.
Now choose the Run button from the top left of the menu bar to run the Objective again. We'll see the /masks_visualization camera image update to show only the bottles are segmented.
Try changing the value of prompts to block and you should see that the blocks are now segmented. For fun, try random inputs like “dog” and see what happens. 🥴
View Parameters on the Blackboard
Now that you are editing parameters within Behavior Trees, we should mention that MoveIt Pro uses a blackboard to store and share data between Behaviors and Behavior Trees. To view the state of the blackboard, choose Blackboard from the drop down menu in any view pane. Then expand the arrow buttons to see the variables within each subtree, and you should see a list of variables that are currently on the blackboard.
You'll learn more about the concept of subtrees in Tutorial 3
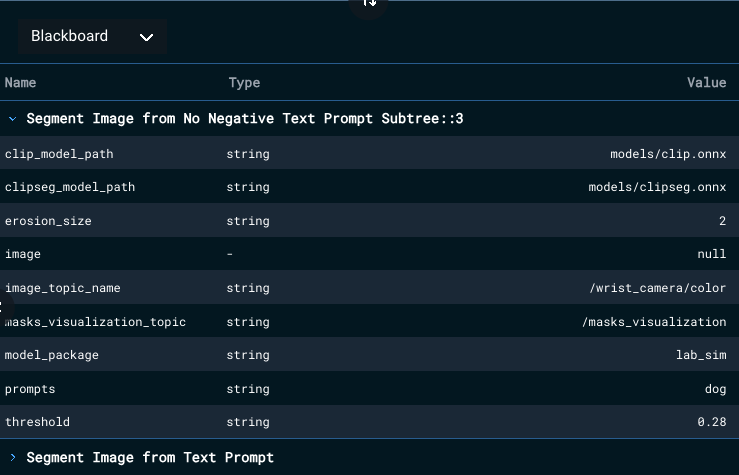
Find the variable named prompts and its value should be whatever you most recently set it to. This tool is useful for debugging complex data flows within a Behavior Tree.
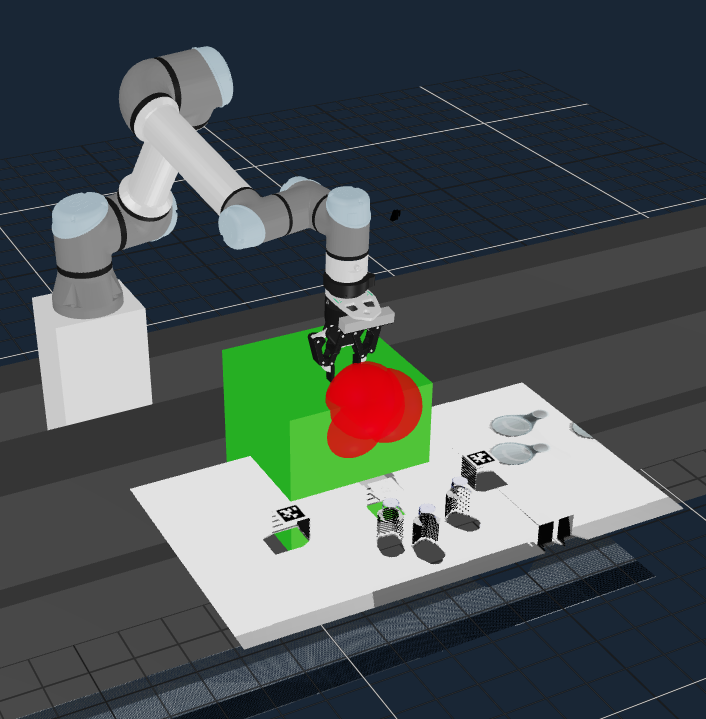
Picking and Grasping with ML
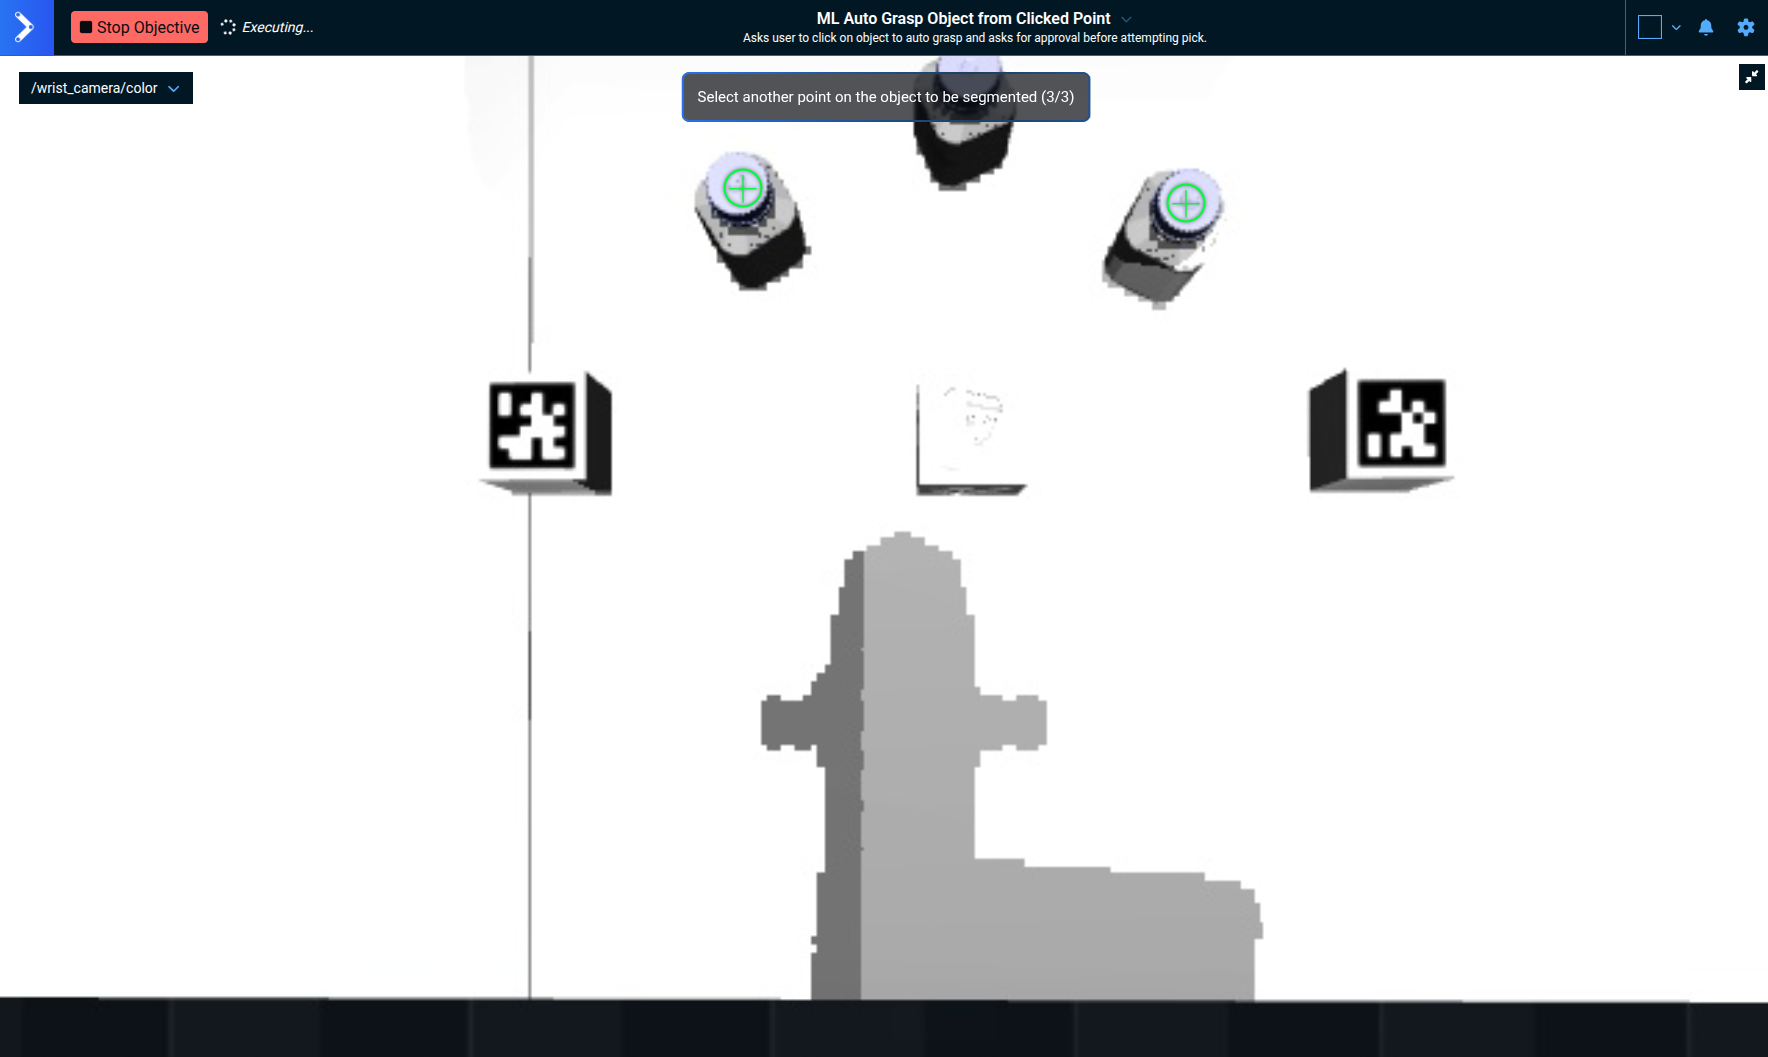
Another way to segment an object is by clicking on it. The ML Auto Grasp Object from Clicked Point Objective allows you to click on an object and the robot will try to pick it up. It will segment the object point cloud from the scene and use an ML model to infer different grasps it could use to pick the object. Run it and you will see the robot look around and present you with this camera feed pane:
This Objective can take upwards of 5.5 GB of VRAM to run, on top of the 1 GB that MoveIt Pro uses. Not all graphics cards will have enough VRAM to accommodate, especially if they are running other video intensive applications.
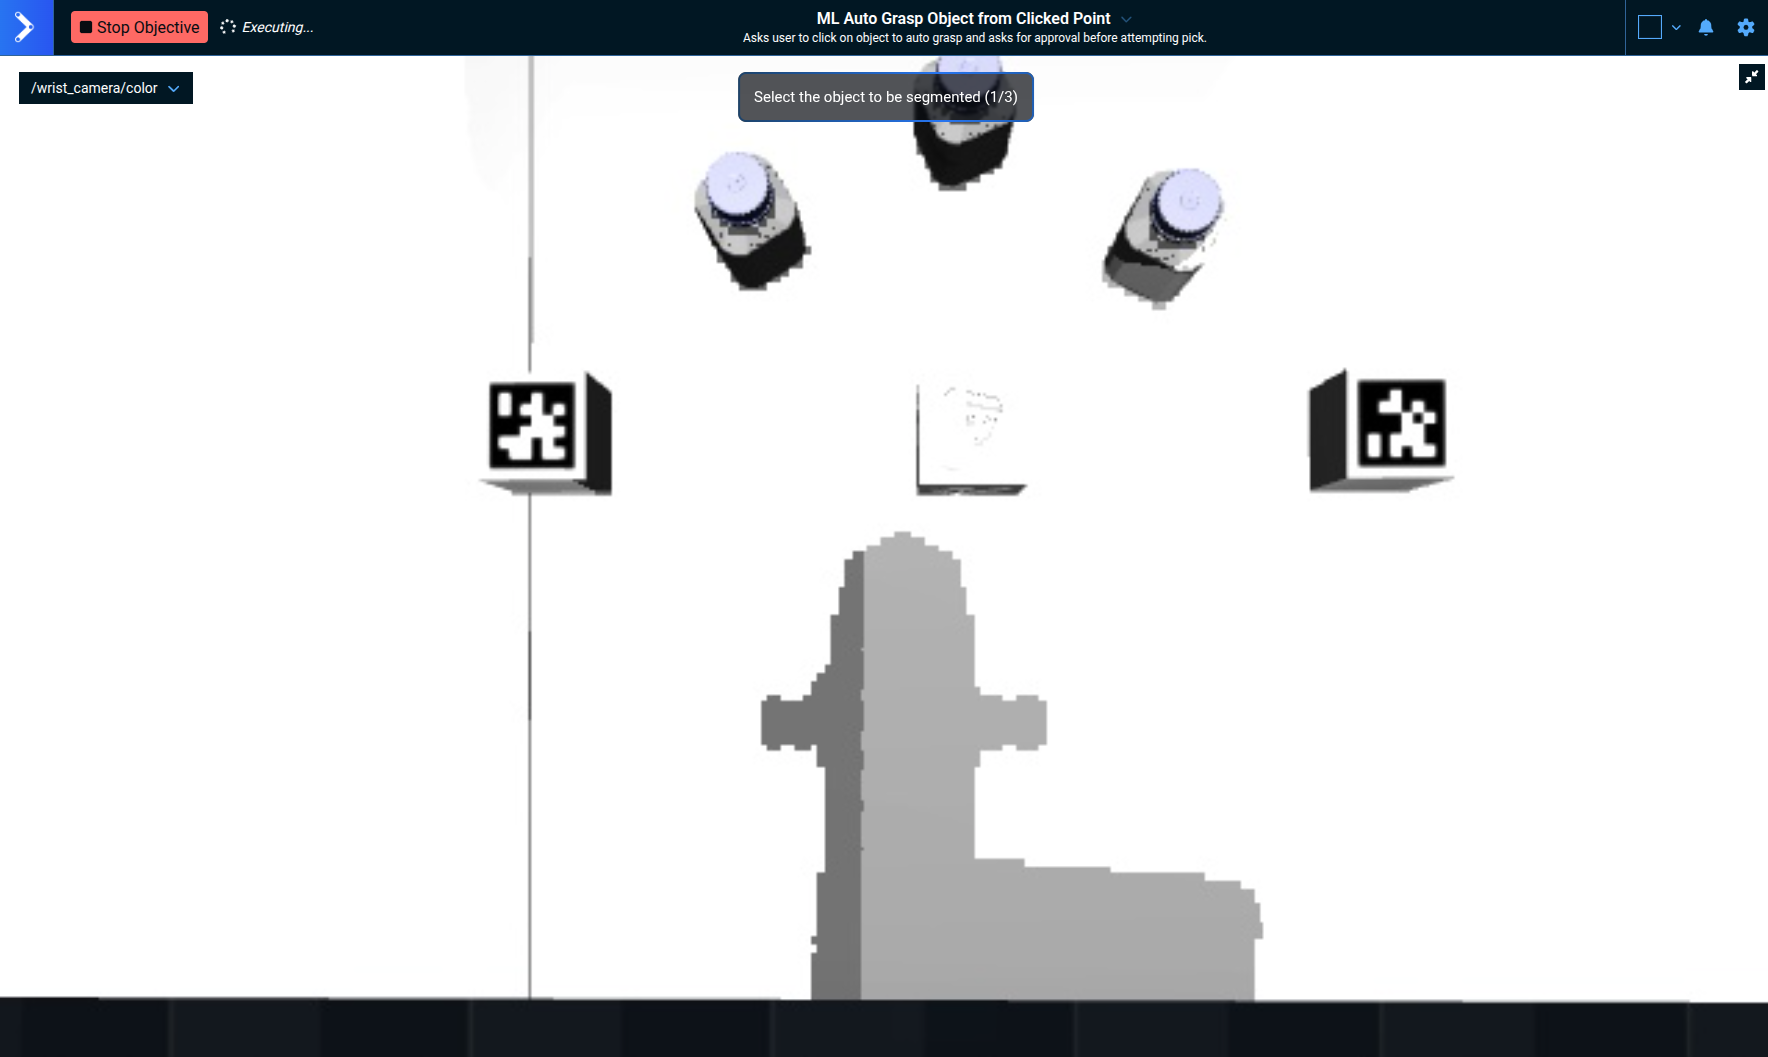
Click on the left bottle in three different places and the robot will plan how to pick up the object.
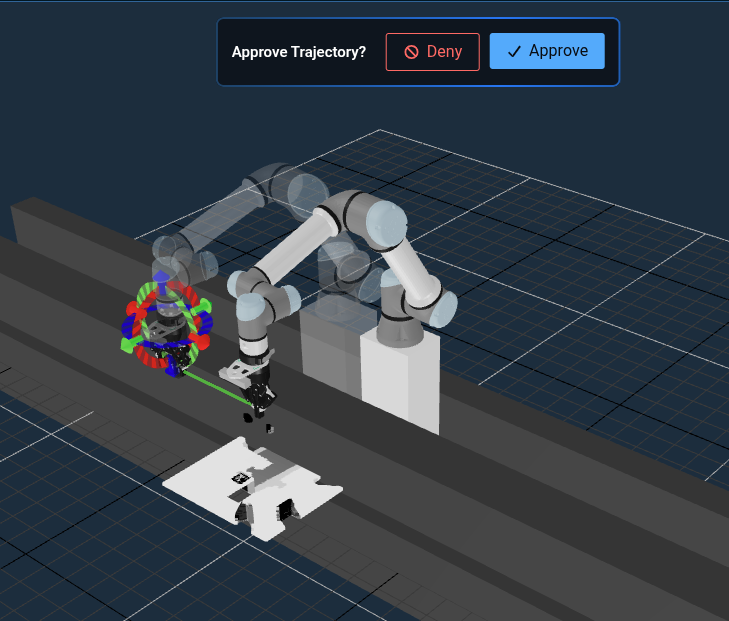
It asks for your approval before attempting the pick. If it looks good, approve by clicking on the green check mark! Otherwise you can cancel by clicking on the red circle and slash. It will then try another plan.
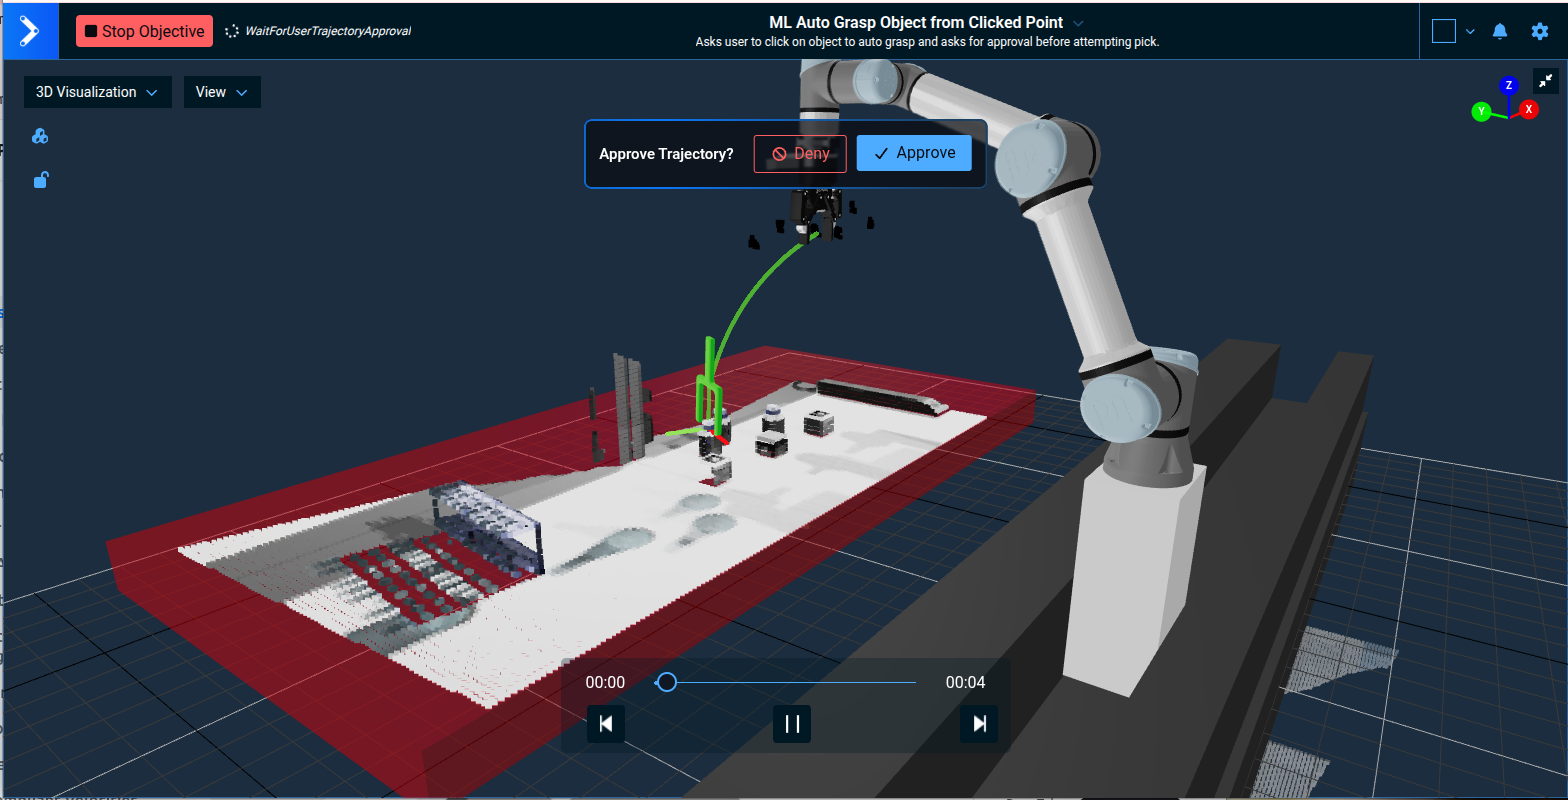
You can see that the bottle was picked by looking at the wrist camera view. The red box below the table is a virtual collision object added to the planning scene. This allows the motion planner to avoid the table while planning the grasp.
Try running the Objective again and see what else the robot can pick!
Teleoperate the Robot
MoveIt Pro provides four types of manual control in the UI for when a robot needs to be set up, diagnosed, or recovered.
There are additional hardware-based teleop approaches documented here including Haply, Meta Quest, and Game Controllers.
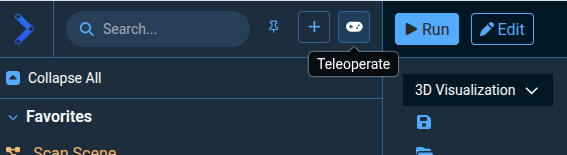
To dive in, click on the Teleoperate button on the top left of the toolbar.
At the top of the left sidebar you should see four available Teleoperation modes - click through them to explore how the user interface changes for each mode.

At the bottom of all the teleop modes are two simple buttons that can be used to open and close the gripper.

Teleoperating the gripper to joint values other than "Open" or "Close" is not currently supported.
Interactive Marker Control
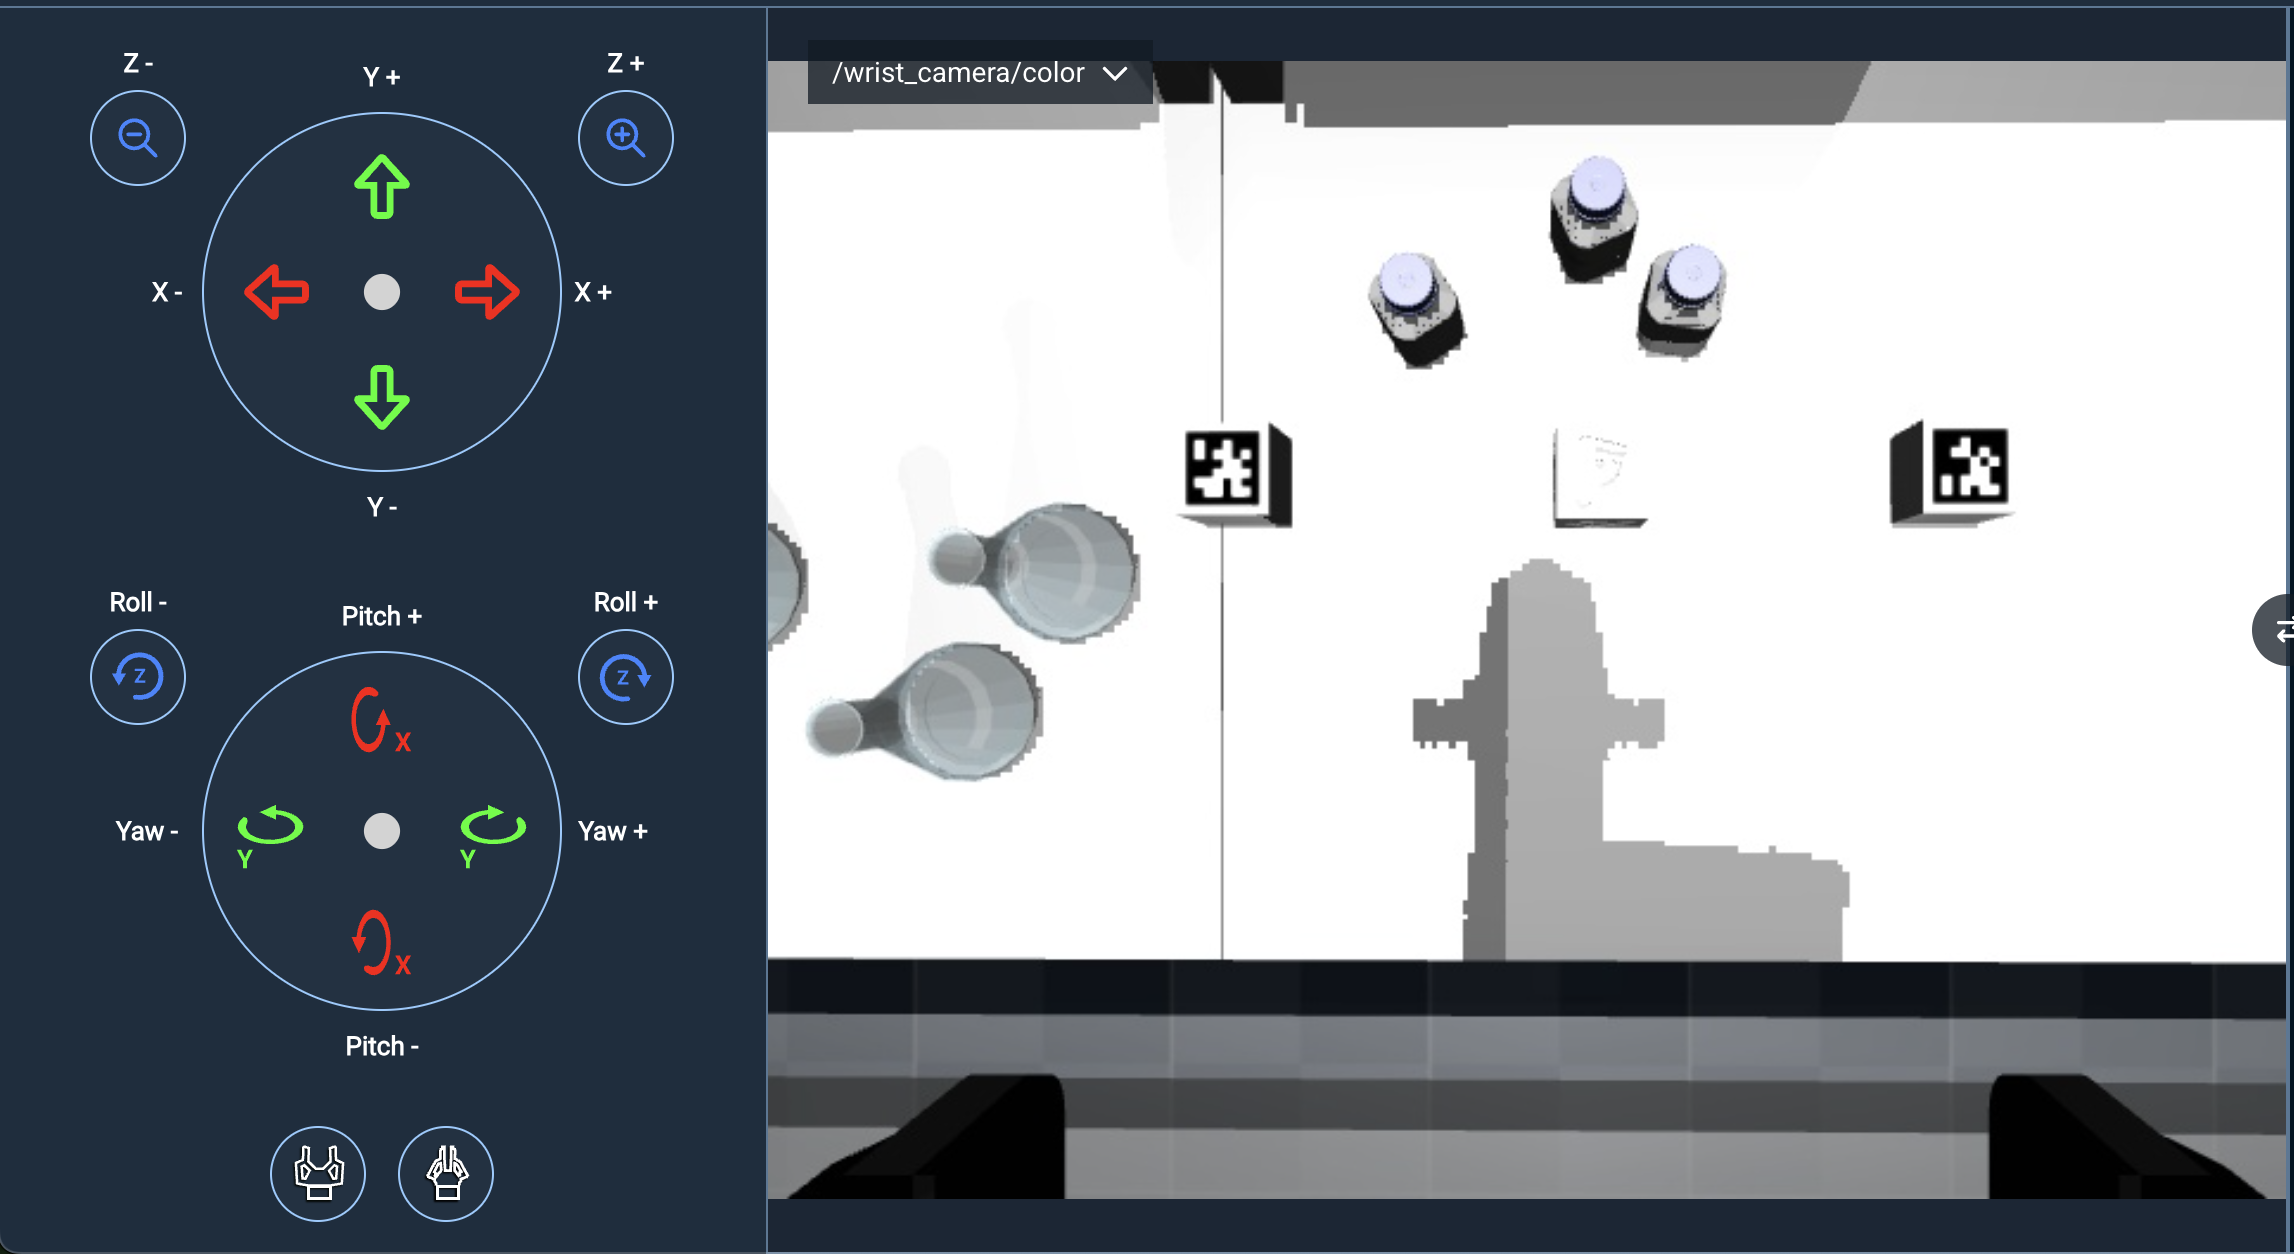
The Interactive Marker (IMarker) teleoperation mode allows users to move the robot's end effector in 6 degrees of freedom using arrows for translation, and discs for rotation.
Try dragging the arrows and rotating the disks to get an idea for how the interactive marker can be moved.
To interact with the Interactive Marker, you will need the "Visualization" view panel selected.
As the interactive marker is moved, a motion will be automatically planned that moves the end effector from the current pose to a goal pose. A preview of the trajectory will be visualized before execution. It also asks for your approval before executing the trajectory. If it looks good, approve by clicking on the check mark, otherwise, cancel by clicking on the red circle. It will then try another plan.
If no preview is shown, it means that there is no valid inverse kinematics solution for the desired pose. We may have dragged the interactive marker beyond the robot’s physical reach. Use the Reset Marker button to fix this situation.
Some elements of the simulation scene (e.g. the bench) may not be known to the robot for planning purposes, and therefore you can command the robot to collide with those elements, unless they are added to the planning scene. Check out our how-to guide on creating keepout zones and saving/loading a Planning Scene for more information.
Cartesian Pose Jog Control
The Pose Jog mode enables the user to translate or rotate the end-effector along different planes or axes, and open or close the gripper. To use this mode most effectively, we recommend you switch your largest view pane to the /wrist_camera/color since the controls are mapped to the coordinate frame of the wrist camera. Try out these controls now to get a feel for them.
Pose Teleop Settings
On the toolbar you’ll see a settings icon which allows you to change the jog speed. It also has a setting for changing planning groups, which is an advanced feature you can ignore for now. Try adjusting the jog speed to see how it affects the Behavior.
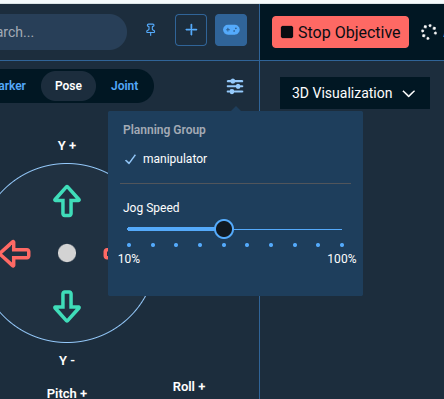
To make it easy to control our jogging during this tutorial, change the Jog Speed to 30% using the slider.
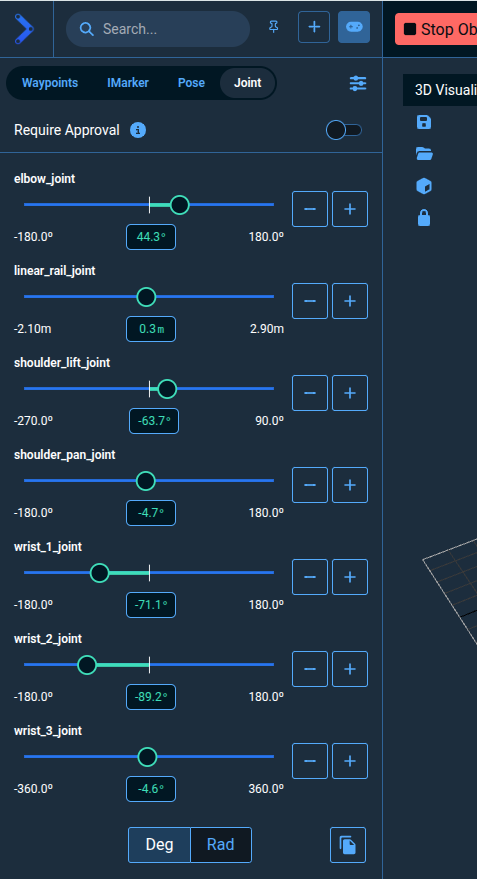
Joint Control
The Joint Jog mode can be used to perform low-level individual joint control. Switch to this mode and you should see:
- The +/- buttons allow you to jog the arm slowly.
- The slider bar allows you to automatically move to a setpoint.
- The text input box allows you to type an exact degree or radian you want the robot to achieve.
Joint Teleop Settings
In the settings menu for Joint teleop, the Jog Collision Checking can be turned off so that the robot can be teleoperated in situations where the robot's trajectory is in collision with an object.
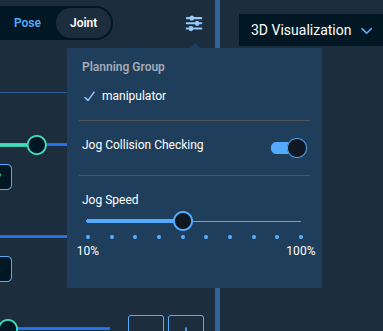
It’s recommended to keep collision checking on unless you move the robot into a collision and need full manual control to get it back into a safe state. After it is moved back to a non-collision state, it is recommended to turn collision checking back on for safety reasons.
The Jog Collision Checking toggle button applies only when jogging a joint via the +/- buttons in the Joints Jog view, for safety reasons. As of version 8.8, the Jog Speed value applies to both the +/- buttons and the joint position slider. Prior to 8.8 jog speed only applied to the +/- buttons.
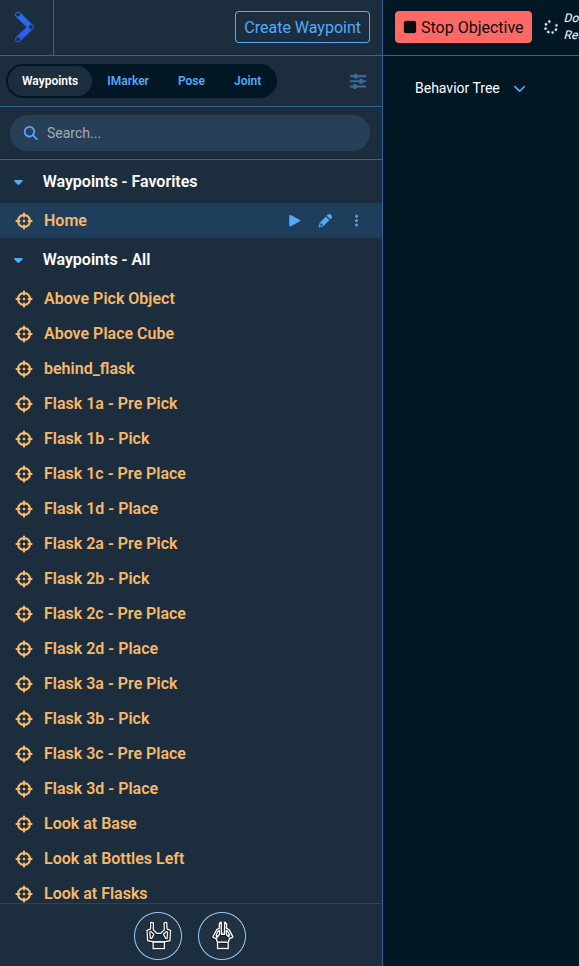
Running and Creating Waypoints
Next, let's execute various saved waypoints:
Waypoints are saved joint states that can be reused later in Objectives or standalone.
- Switch to the Waypoints Teleoperation mode.
- Hover over various waypoints in the list, you should see a ghost robot that previews the saved robot location.
- Click on the play button to command the robot to move to various available waypoints in the list.
Let's create a new waypoint that grasps the cube on the right side of the table. We’ll use this later when we create a new Objective.
- Set the largest view pane to the
/wrist_camera/colorcamera view. - Open the gripper using the bottom buttons.
- Use various teleop modes to drive the robot arm to a grasp position that envelopes the cube. We recommend using Pose Jog as the easiest mode for driving the arm around the cube.
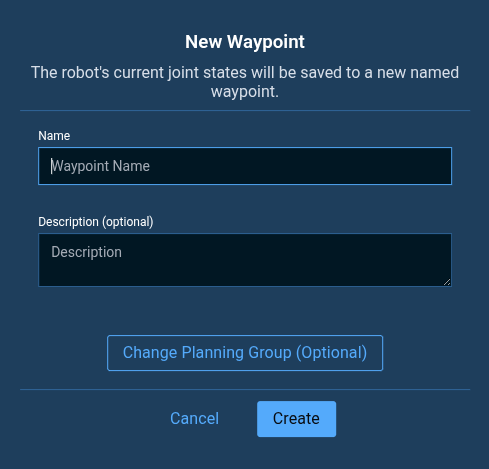
Once you are happy with your robot's grasp position, save the robot's state by creating a waypoint:
Press the Create Waypoint button.

The dialog will open.
-
Name your new waypoint
Pick right cube.tipYou can adjust which parts of the robot to save as a waypoint, by clicking the Change Planning Group button when adding a new waypoint. However, this is an advanced feature you do not need to worry about for now.
-
Click Create to finish creating your new waypoint.
-
Exit teleoperation mode by clicking the Stop Objective button on the left.
Building your own Objective
Create New Objective
Now we're ready to build our own custom Objective. We’re going to build a simple pick and place application using the waypoint you created earlier called Pick right cube, as well as some existing waypoints that should come out of the box.
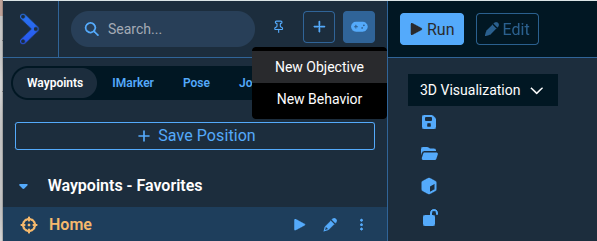
To begin, select the + button to the left and click New Objective. This opens the New Objective dialog.
Enter My Pick and Place as the name.
For the category, create a new one using your company or organization's name. This can be your first custom category.
You can also provide an optional description, which we recommend. Try A simple example using hardcoded waypoints.
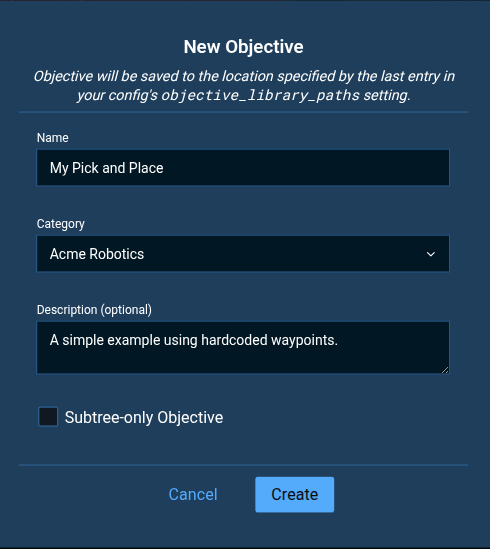
Leave the checkbox Subtree-only Objective unchecked. It specifies if an Objective can be executed. If an Objective is marked for usage as a subtree only, then it is non-runnable, but can instead be used inside another Objective in the same way we use Behaviors.
Click the Create button. You should see a new, mostly empty Objective.
Adding Behaviors
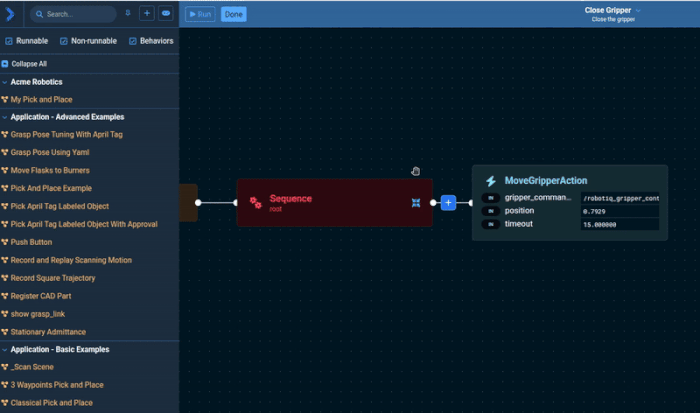
You should see three behaviors pre-populated in your new Objective.
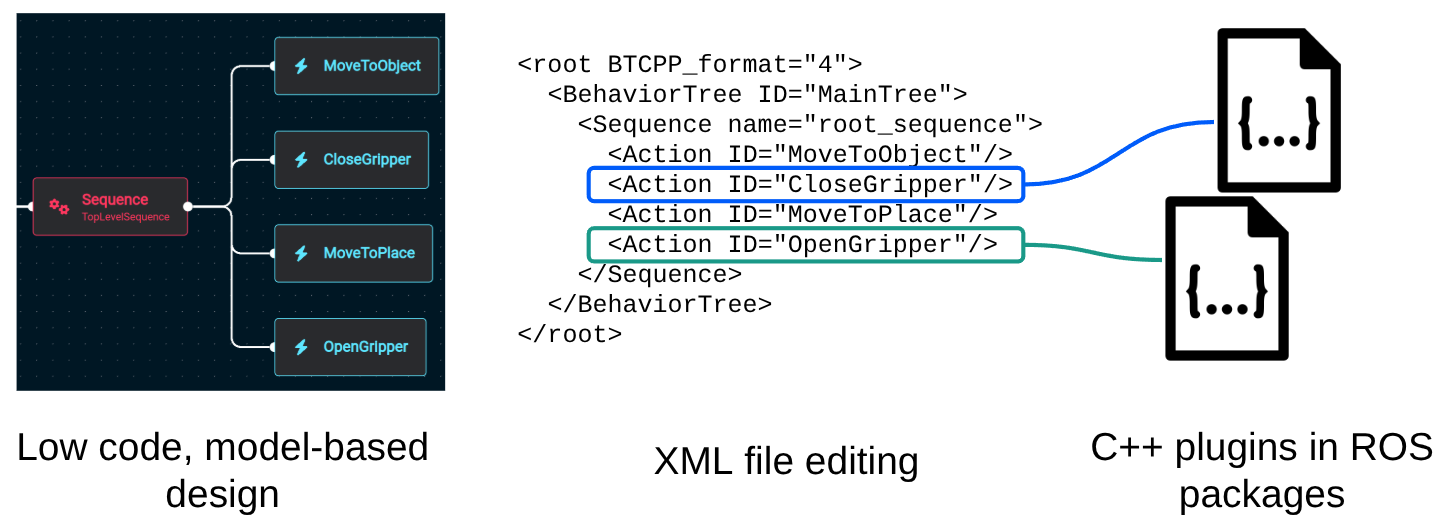
In the Behavior Tree concept, a Behavior, also known as a node in other domains, is the fundamental building block of a Behavior Tree. Each Behavior represents a single unit of a robot skill or control logic. It always returns a status — SUCCESS, FAILURE, or RUNNING—when ticked (i.e., executed). Behaviors can perform actions, evaluate conditions, manage flow between other nodes, or modify Behaviors. They fall into categories such as Action, Condition, Control, Decorator, and Subtree nodes. By combining and organizing Behaviors hierarchically, developers can create complex and reusable robot applications in a modular and maintainable way.
All new Objectives are instantiated with a simple Behavior Tree using the AlwaysSuccess Behavior. Without this AlwaysSuccess Behavior, it would be considered an invalid / malformed tree and would throw warnings.

Delete the AlwaysSuccess Behavior by clicking on it and either selecting the popup delete icon, or by pressing the Delete button on your keyboard.
Checkout our full Summary of Keyboard Shortcuts in MoveIt Pro.
The MoveIt Pro Behavior Tree editor includes an Undo/Redo button that can protect you from accidentally deletions, or other mistakes. You can find it on a bottom bar; on the bottom right of the editor screen. Try using this feature to undo and redo the deletion.
Now we are going to add our first Behavior.
In MoveIt Pro, there are three main ways to add Behaviors:
- Click the plus button shortcut next to certain Behaviors within the Behavior Trees
- Scroll through the full library of Behaviors on the left sidebar, expanding categories as needed
- Use the search bar to find the Behavior from memory
The plus button is our newest and recommended approach:
If you choose options 2 or 3, you must drag it onto the Behavior Tree editor and have it “snap” to a Sequence or other node.
Using your preferred approach, add the Move To Waypoint Behavior to our new tree. Click on the Behavior and scroll to the bottom of the sidebar list to find the waypoint_name port dropdown selector. Use the dropdown list to set the waypoint name to Look at Table.
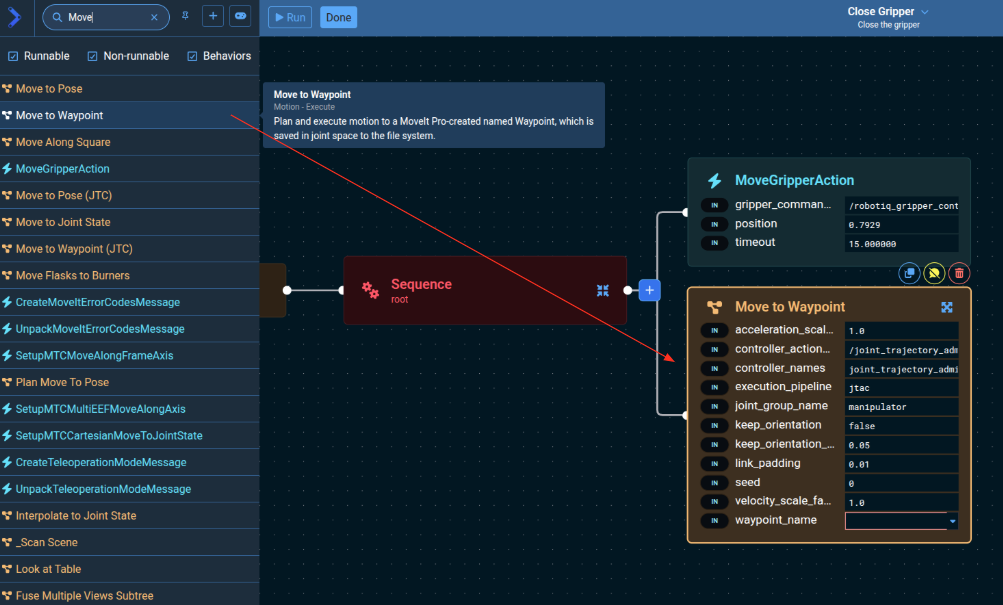
Each Behavior in an Objective has a name attribute that can be useful for identification. Let's set this Behavior’s name to Look at Table.
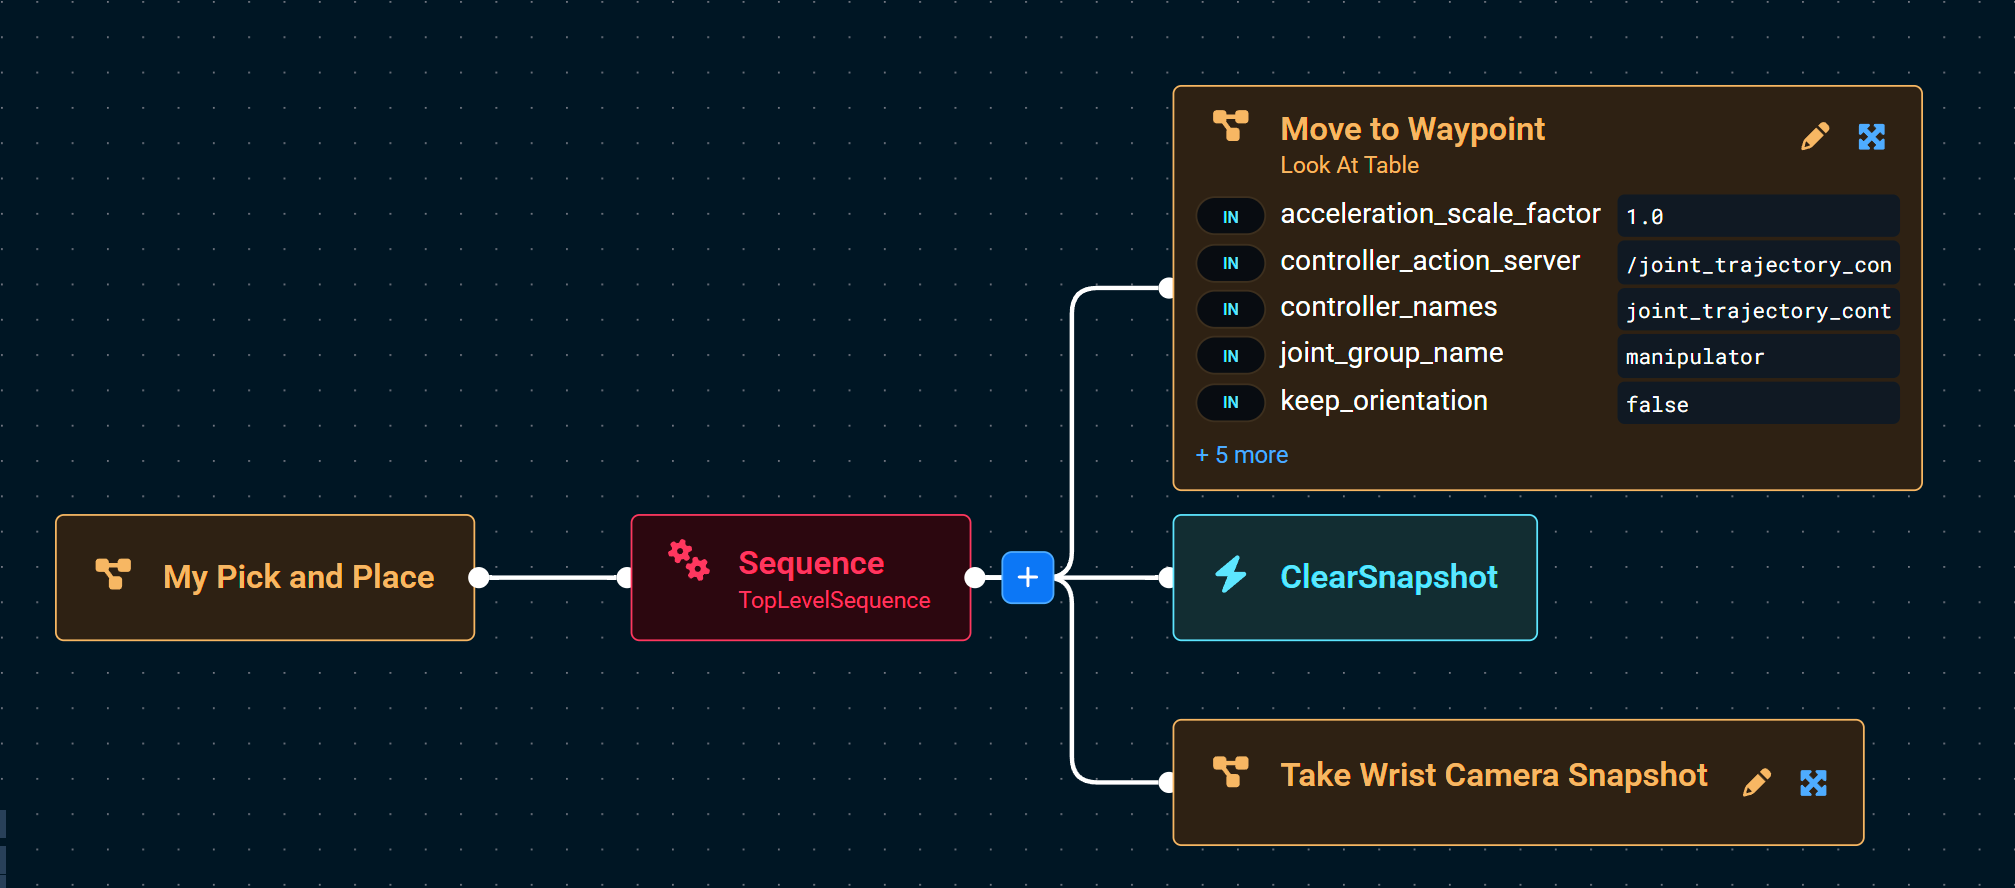
Next, add a Clear Snapshot Behavior, then add a Take Wrist Camera Snapshot Behavior to the tree. This will add a fresh point cloud to the visualization pane when you run the Objective.
As a sanity check, let’s run our Objective that is under construction, and you’ll see the Visualization updated to show the depth camera view of the objects on the table.
Now click the Edit button shortcut in the top left to jump back into editing this Objective.
MoveIt Pro ships with 200+ Behaviors for all domains of robotics: motion planning, machine learning, inverse kinematics, Cartesian planning, real-time control, grasping, task planning, human in the loop teleop, and more. You are also encouraged to build your own custom Behaviors and plugins, which allows you to incorporate other ROS packages or third party capabilities with MoveIt Pro for unlimited potential.
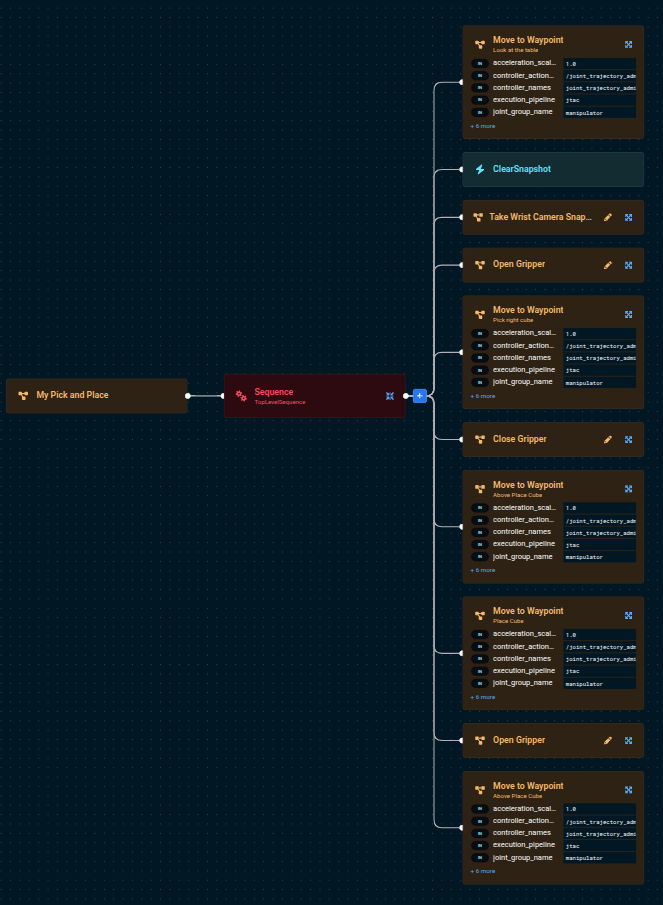
We are going to add a few more Behaviors to complete the Objective for pick and place. Below is a complete list of steps, including the ones we’ve already added in the above.
Full Behavior Sequence
Full sequence:
Move To Waypoint: Look at TableClear SnapshotTake Wrist Camera SnapshotOpen Gripper- To make sure the gripper is open before we pick
Move To Waypoint: Pick right cube- This is the new waypoint you should have created earlier during the Teleop tutorial section
Close GripperMove To Waypoint: Above Place Cube- This waypoint is used as a mid-point between pick and place
Move To Waypoint: Place CubeOpen GripperMove To Waypoint: Above Place Cube
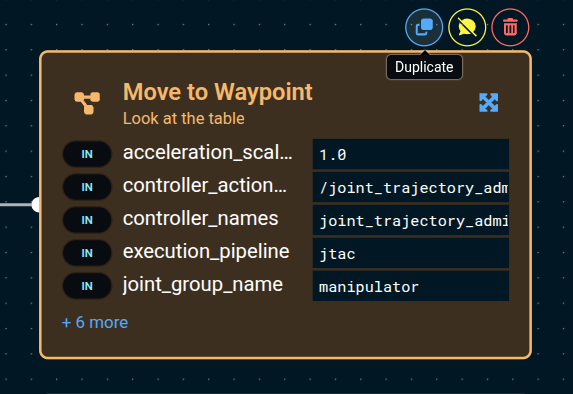
To save time, you can use the blue Duplicate icon on the top right side of any Behavior to make a copy of it.
Take advantage of the build navigation buttons located on the bottom of the pane. To keep your tree clean and organized, try the Auto Layout button!

Your completed Objective should look similar to this:
Run the Objective to make sure it works.
We should see the robot pick up the right cube and place it in a different location on the table! We realize this is a very basic example, but this is our intro tutorial. MoveIt Pro can do much more advanced applications that involve computer vision, reasoning, and machine learning.
You can also edit Objectives using your favorite IDE / code editor, as all Behavior Trees are saved to file in plain text XML format.
The Behavior Tree you just created can be found on your filesystem, and you can run the following command in terminal to see all available Objectives in lab_sim:
ls -1 ~/moveit_pro/moveit_pro_example_ws/src/lab_sim/objectives
Example contents of objectives folder
3_waypoint_pick_and_place.xml
add_point_cloud_to_vector.xml
add_poses_to_mtc_task.xml
add_waypoints_to_mtc_task.xml
apriltag_pick_object.xml
classical_pick_and_place.xml
clear_previous_obstacles.xml
close_gripper.xml
constrained_pick_and_place_subtree.xml
constrained_pick_place.xml
create_pose_vector.xml
cycle_between_waypoints.xml
force_relaxation.xml
fuse_multiple_views_subtree.xml
And many more.
Great job on creating your first Objective! We will come back to this in a minute, but first we'll dive a little deeper into some Behavior Tree theory.
Behavior Tree Basics
A Behavior Tree, also called a decision tree, is a hierarchical, modular way to model decision-making logic. It is implemented in MoveIt Pro in a visual node-based, block-diagram, style workflow. At the highest level, the MoveIt Pro UI offers an accessible and intuitive low-code development environment. The underlying Behaviors are implelmented as customizable C++ plugins via ROS packages.
Nodes
All Behavior Tree nodes must either:
- Control execution of child node(s), or
- Run code that executes at every time step, or "tick".
In addition, they always return a BT status:
- SUCCESS
- FAILURE
- RUNNING.
For more information about Behavior nodes, please refer to our concepts page on Behavior Node Types
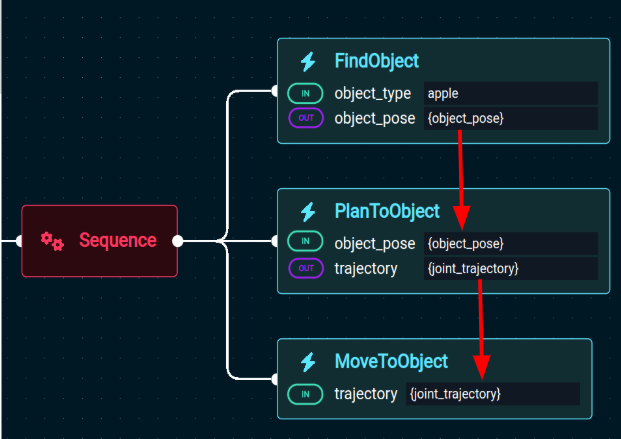
Data Sharing through Ports and the Blackboard
Behaviors communicate with each other via the Blackboard (key/value storage). To manage access to data, Behaviors can assign ports.
There are three types of ports:
- Input
- Output
- Bidirectional (Note: All subtree remapping ports are bidirectional)
Ports can be assigned direct values (typically numbers or strings), or variables from the Blackboard, which is indicated by enclosing the variable name in curly brackets (e.g. {blackboard_variable} ).
Blackboard variables must exist before they can be used:
This concludes our Behavior Tree theory!
Adding Keep-out Zones
Please restart MoveIt Pro to reset the simulation and bring the blocks back to their original position. Terminate the program by using Ctrl+C in the terminal you used to launch MoveIt Pro.
Next restart the application with:
moveit_pro run -c lab_sim
You can do this whenever you wish to reset the simulation scene. Don't worry, your Objectives are automatically saved.
In MoveIt Pro, keep-out zones are areas the motion planners must avoid, and are essentially easy-to-configure collision objects.
In motion planning, a collision object represents a physical item in the environment that the robot must avoid during motion. These objects are typically defined by their shape, size, and position in the planning scene and can include things like tables, walls, tools, or even other robots. Collision objects are used by the motion planner to ensure that generated paths are free of collisions, allowing the robot to move safely and efficiently through its workspace.
To add a keep-out zone, find the upper left side of the Visualization pane and you should see a cube symbol.

Click on the cube to open the pop-up modal.
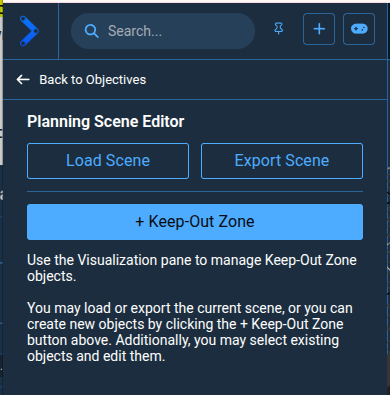
- Click + Keep-Out Zone to add a keep-out zone.
- Adjust the height, width, and length parameters to 0.3, 0.3, 0.3.
- Adjust the position parameters to 0, 0.5, 0.5.
- Adjust the orientation parameters to 0, 0, 0.
You will see a yellow cube appear in front of the robot.
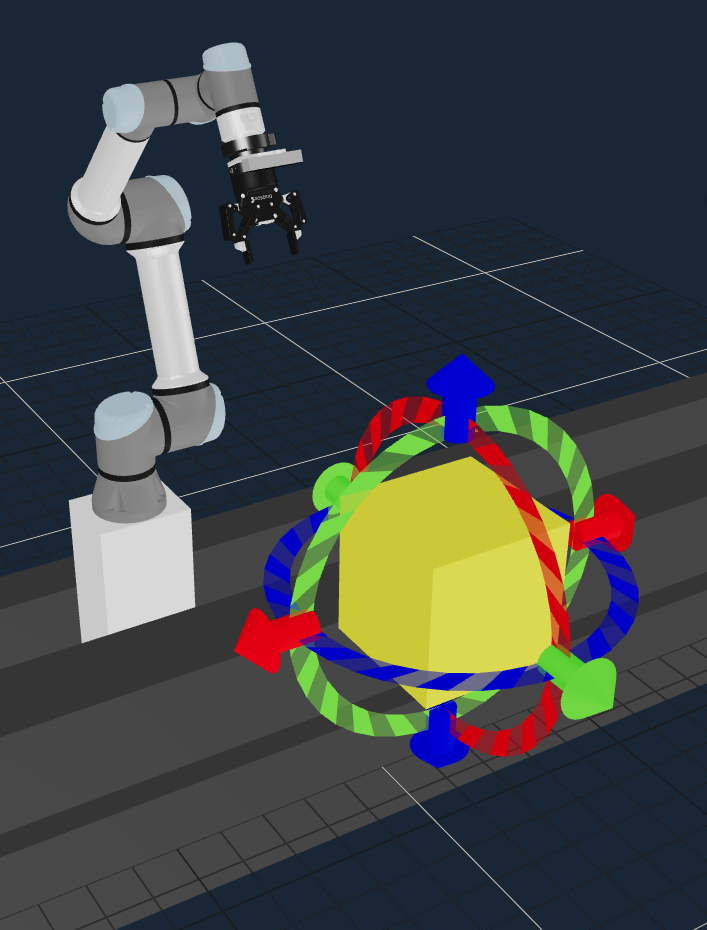
Try adjusting the cube's position and orientation using the interactive marker's arrows and rings. To deselect the zone and hide the interactive marker, click anywhere outside the cube in the visualization pane and it will turn green. Reselect the cube, and remove it by pressing Delete on your keyboard. Then generate a new zone with the same parameters that will prevent the robot from picking up the block in our My Pick and Place Objective.
Next we'll run the My Pick and Place Objective again, and we should observe it fail due to this new collision object.
Notice the red spheres that highlight where the collision between the robot URDF and collision object would have occurred, had the motion plan been executed. In the next section we'll explain how to add teleop recovery to our custom-built Objective to overcome this issue.
Modify your Objective to add teleop recovery
In some industries and applications, such as in unstructured environments, a robot may encounter an unexpected condition where it may be appropriate to call in a human operator to help recover the robot — “human in the loop” style. This is not true for all industries and applications, of course.
A unique feature of MoveIt Pro is that it allows user interventions, approvals, and feedback to be seamlessly integrated within the Behavior Tree. We can add a special Behavior for teleop recovery before proceeding with the rest of the Objective. To do this, we're going to modify our Objective to add a Fallback Behavior, which then switches into Teleoperation mode for the user to move the robot.
Adding a Fallback Node
The location where our Objective is currently failing is the second to last Move to Waypoint Behavior in the tree. You can see this node highlighted red after running the My Pick and Place Objective with the keep-out zone in the way (from the previous section).

To overcome this, we will add a Fallback Behavior to the Objective to allow the application to recover from this failure.
- Switch into edit mode for our previous
My Pick and PlaceObjective. - Add the
FallbackBehavior, dragging it to the editor and connecting it to theSequencenode, and placing it above theOpen GripperBehavior.
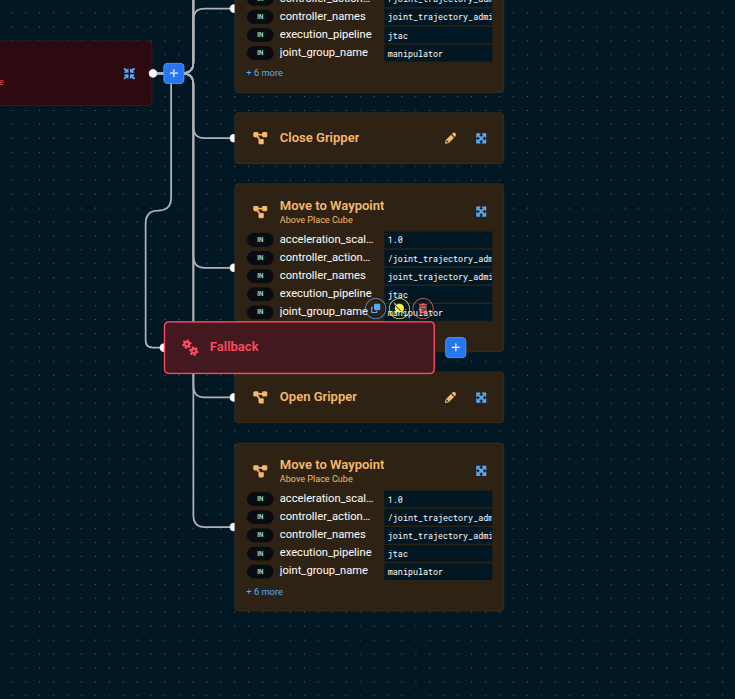
These allow you to execute a different set of Behaviors when you encounter a failure. These Behaviors are called recovery Behaviors.
- Delete the line connecting the second to last
Move to WaypointBehavior from the parentSequencenode. You can do this by clicking on the line then pressing the Delete key. - Drag a line from the orphaned
Move to WaypointBehavior to the newFallback.
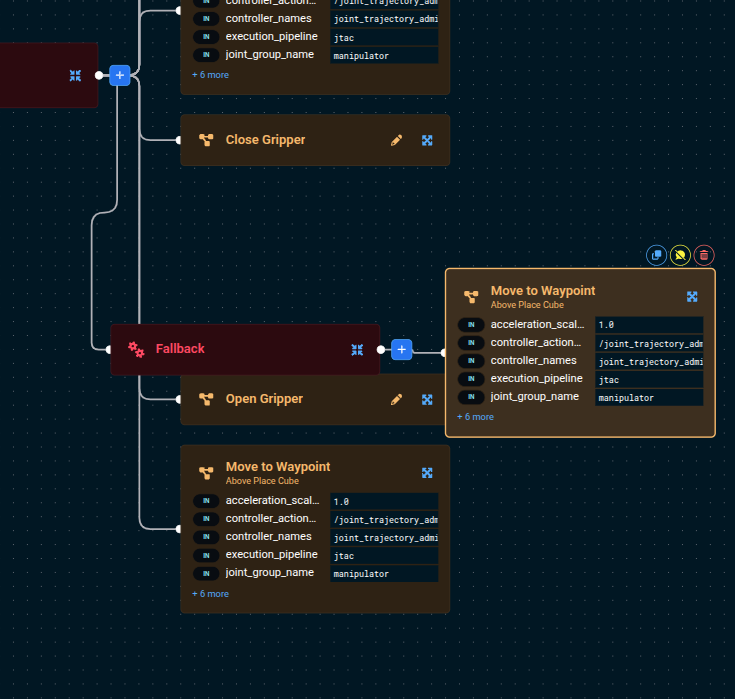
At this point your Behavior might look pretty messy. Click the Autolayout button in the bottom left of your Behavior Tree editor.
Adding Request Teleoperation
We're going to use the Request Teleoperation Objective as our recovery Behavior.
- Find and add the
Request TeleoperationBehavior to the Behavior Tree, adding it below theMove to WaypointBehavior as a separate branch.

- Modify the
Request TeleoperationBehavior parameters:- Set the
enable_user_interactionvalue totrue. - Set the
user_interaction_prompttext to sayChoose a different place location.
- Set the
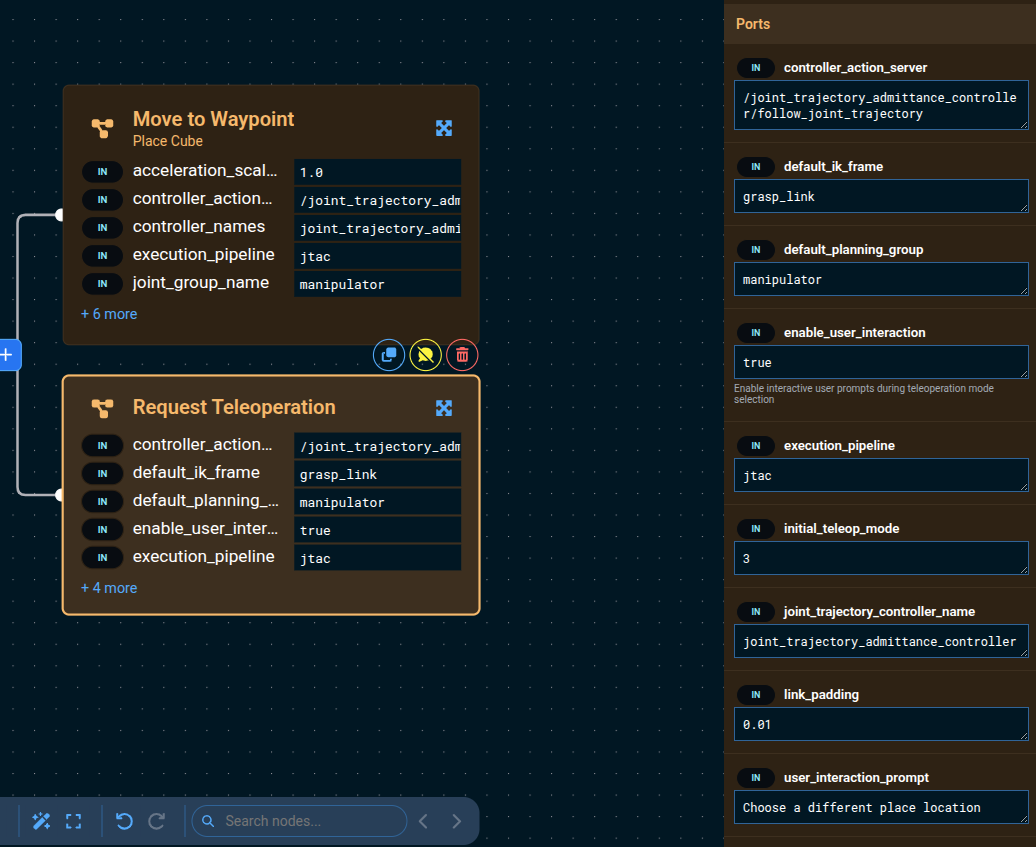
- Now run the
My Pick and PlaceObjective again. - (Optional) You may wish to first restart Pro to reset the right block to its original pick position.
This time after the cube is picked up it does not just stop. Instead, a Teleoperation menu appears and you can manually drive the robot, using various teleop modes like IMarker, to a different location to drop off the cube.
If you do not have the Visualization view visible, you will not see the teleoperation prompt.
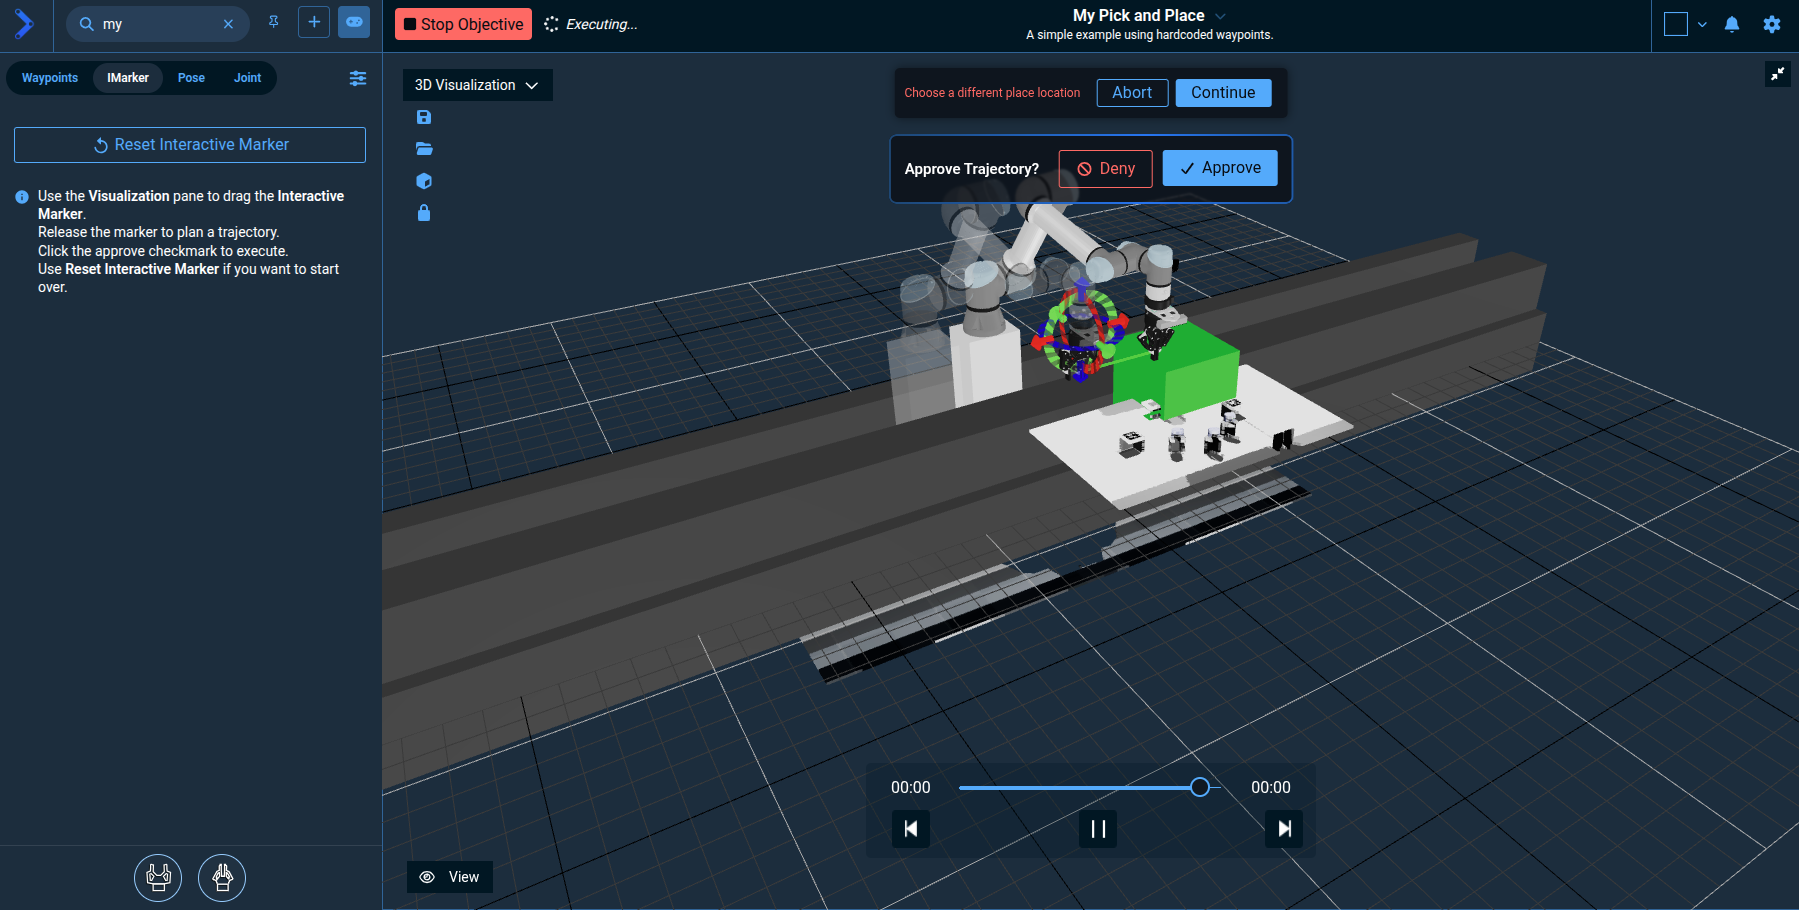
Teleop the robot to a new location to drop off the cube, and click the Continue button to continue operation of the still-running Objective. It should then open the gripper and move to its home position automatically.
Disabling Parts of the Behavior Tree
As we've been developing our pick and place Objective, you might have noticed that every time we Run the Objective we have to start running from the beginning. To make development and debugging faster, MoveIt Pro lets you disable parts of your Behavior Tree.
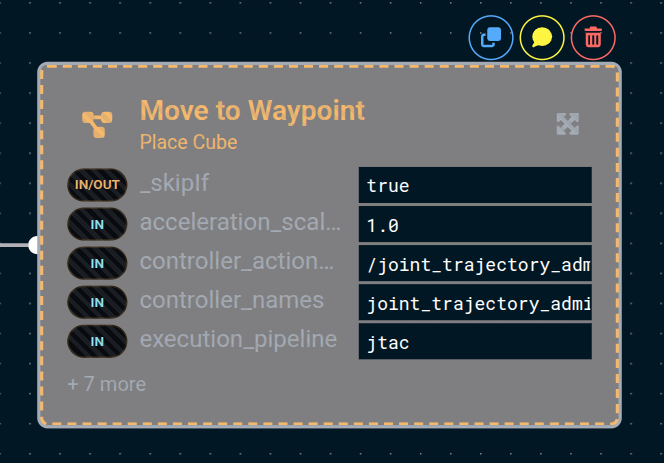
Let's skip the first Move to Waypoint step so it does not move home every time:
- Click on the first
Move to Waypointnode and find the icons that appear on top of the box. - Click on the Comment out (skip execution) icon.
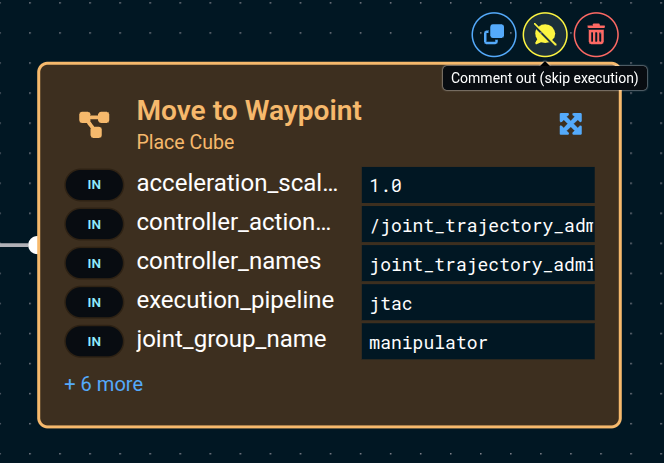
You should see that node change colors into "disabled" mode. This also works for entire subtrees and sequences.
Saving your work
Wrapping up this tutorial, you may be curious how all these changes are stored and saved. In this beginner tutorial we are working out of our basic moveit_pro_example_ws, which is stored on your computer at ~/moveit_pro/moveit_pro_example_ws. Your changes are auto-saved to file, but you can also push it into the cloud using standard Git code repository practices. To do this:
-
Open a terminal explore the changes you have made:
cd ~/moveit_pro/moveit_pro_example_ws
git status # see the files you have changed
tree # explore the file structure of this repo -
Fork the moveit_pro_example_ws repo on Github, to your own account
-
Connect your local workspace to your new fork
git remote set-url origin <url_of_your_new_fork> -
If you want to now save the changes:
git checkout -b my_pick_place
git add -A
git commit -m "Adding My Pick and Place Objective"
git push origin my_pick_place
Exploring More Robot Configs
Before continuing on to the next tutorial, feel free to explore other example robot configs provided in MoveIt Pro beyond lab_sim. These example worlds showcase other hardware and various reference applications. To do this:
- Bring down your current instance of MoveIt Pro with
Ctrl-C. - See all available configuration packages with the command
moveit_pro run --list. - Choose one, such as
moveit_pro run -c grinding_sim. - Within the UI, try out the various example Objectives from the sidebar.
Summary
By completing this tutorial, you’ve built a strong foundation in using MoveIt Pro—from running Objectives and teleoperating the robot, to creating your own pick-and-place application with safety zones and recovery Behaviors. You explored how to configure the user interface, use Behavior Trees for task logic, and integrate ML-based perception. With these essential skills, you're now ready to dive into more advanced capabilities like AprilTag-based vision, motion planning, and debugging tools in the next tutorial.
Just completed our live training? We would love to hear your feedback on this course!
🎉 Congratulations, we're now ready to move to the next tutorial!