Auto Grasping using Machine Learning
General Context
Grasping goes beyond basic obstacle avoidance: the robot must reason about object shape, orientation, and affordances rather than just avoiding volume. Traditional methods rely on manually defined grasp poses or handcrafted heuristics, which can struggle with novel or deformable objects. By contrast, machine learning approaches infer grasp candidates directly from sensor data (e.g., point clouds), enabling flexible, end-to-end grasping pipelines.
PickNik has integrated the Learning to Grasp (L2G) model into MoveIt Pro as the GetGraspPoseFromPointCloud Behavior, allowing you to generate and evaluate grasps from raw point clouds in a single step.
Launch MoveIt Pro
We assume you have already installed MoveIt Pro to the default install location. Launch the application using:
moveit_pro run -c lab_sim
Manually Defined Grasp Poses
When your application works with a known, fixed set of objects and you have precise CAD models or object frames, manually defining grasp offsets can be effective and straightforward. For a full tutorial on this workflow, see our guide on Defining a Grasp Pose.
Heuristic Grasping via Centroid
For pick tasks where there isn't some obvious object marker (and without using a point cloud registration technique like ICP), you can use the centroid of the point cloud to base your grasp offsets on. Use one of the different ML segmentation Behaviors to get a point cloud of the object, then GetCentroidFromPointCloud Behavior to obtain the centroid. Finally, apply your fixed pre-grasp offset or approach strategy.
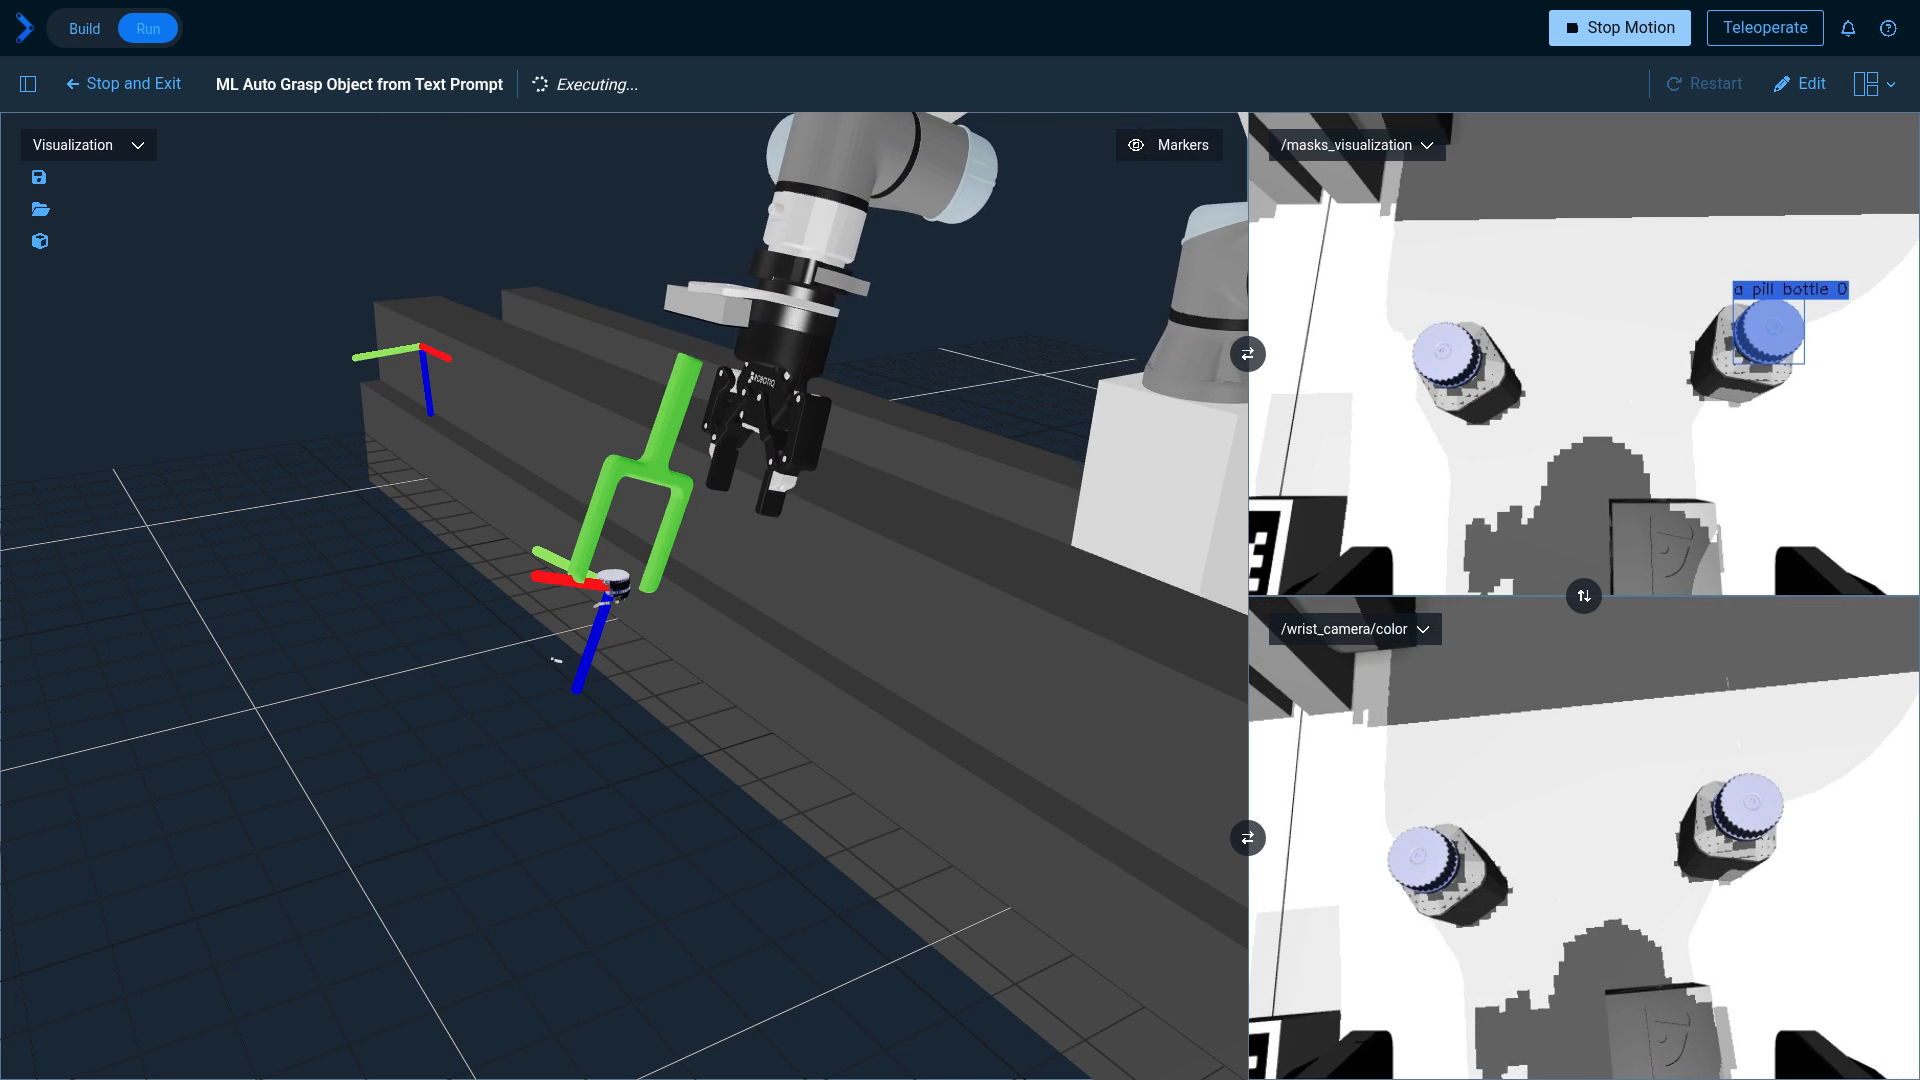
For a complete example using text prompts to segment and grasp objects, see the “ML Grasp Object from Text Prompt” Objective.
Machine Learning Based Auto Grasp
The centroid technique is heuristic because, without special knowledge of the object class, there is no reason for the centroid to be relevant to how the object is grasped. This is where machine learning can help.
The GetGraspPoseFromPointCloud Behavior wraps the L2G model to produce a set of candidate grasps from any complete or partial object point clouds. It was trained on thousands of point cloud and grasps pairs to learn what grasps might make sense. Grasp candidates are unordered in terms of grasp quality; you can iterate through them until one succeeds.
Let's build a sample Objective using GetGraspPoseFromPointCloud.
Build the following Objective
You can refer to "ML Auto Grasp Object from Clicked Point" for the final version of this Objective, though it differs slightly from the following steps
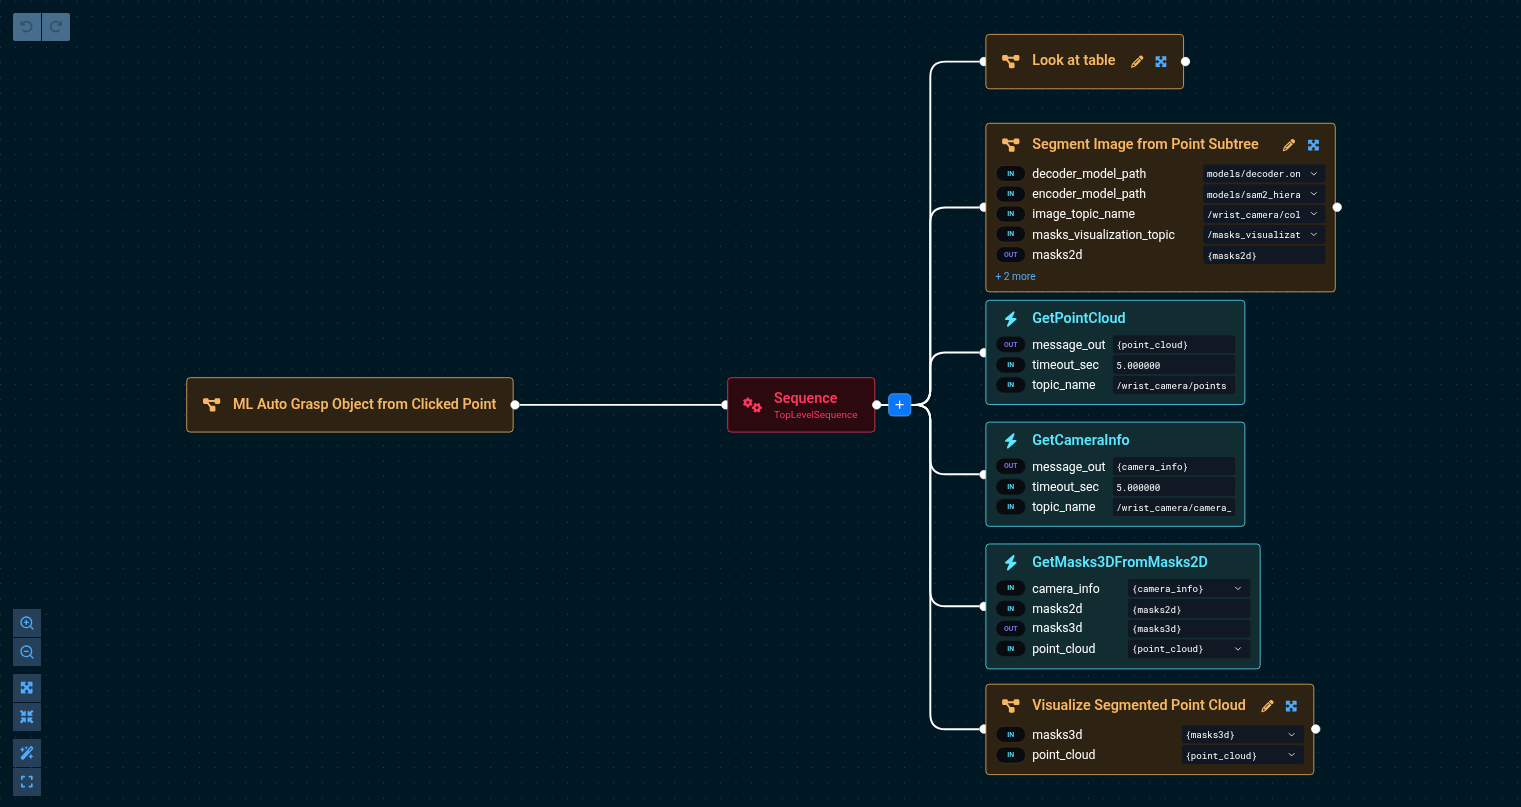
This tells the robot to:
- Look at the table
- Ask the user to click on an object and uses ML to mask out that object
- Gets the point cloud from the wrist and uses the mask to segment it Image Segmentation using Machine Learning has details on this process.
The port values are:
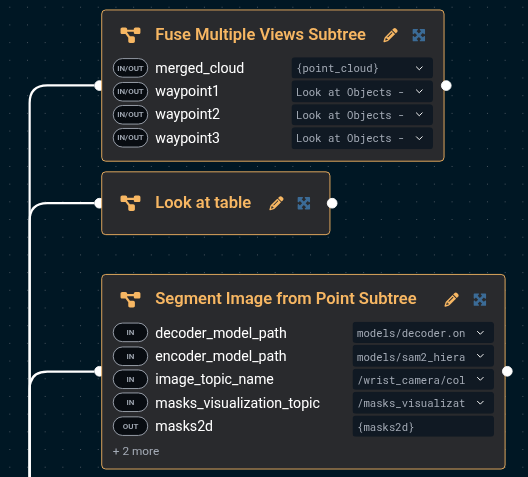
Segment Image from Point Subtree:
- encoder_model_path=models/sam2_hiera_large_encoder.onnx
- decoder_model_path=models/decoder.onnx
- image_topic_name=/wrist_camera/color
- masks_visualization_topic=/masks_visualization
- masks2d={masks2d}
- model_package=lab_sim
- pixel_coords={pixel_coords}

GetPointCloud:
- message_out={point_cloud}
- timeout_sec=5.0
- topic_name=/wrist_camera/points

GetCameraInfo:
- message_out={camera_info}
- timeout_sec=5.000000
- topic_name=/wrist_camera/camera_info

GetMasks3DFromMasks2D:
- camera_info={camera_info}
- masks2d={masks2d}
- masks3d={masks3d}
- point_cloud={point_cloud}

Visualize Segmented Point Cloud:
- masks3d={masks3d}
- point_cloud={point_cloud}
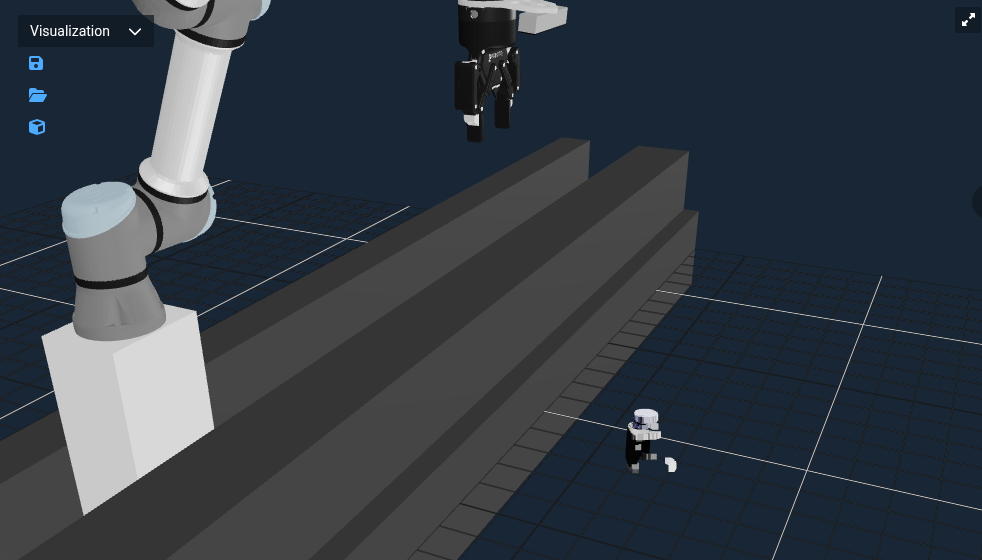
Many of these are the default. Running this will present you with the window to click on an object. Click on the leftmost bottle.
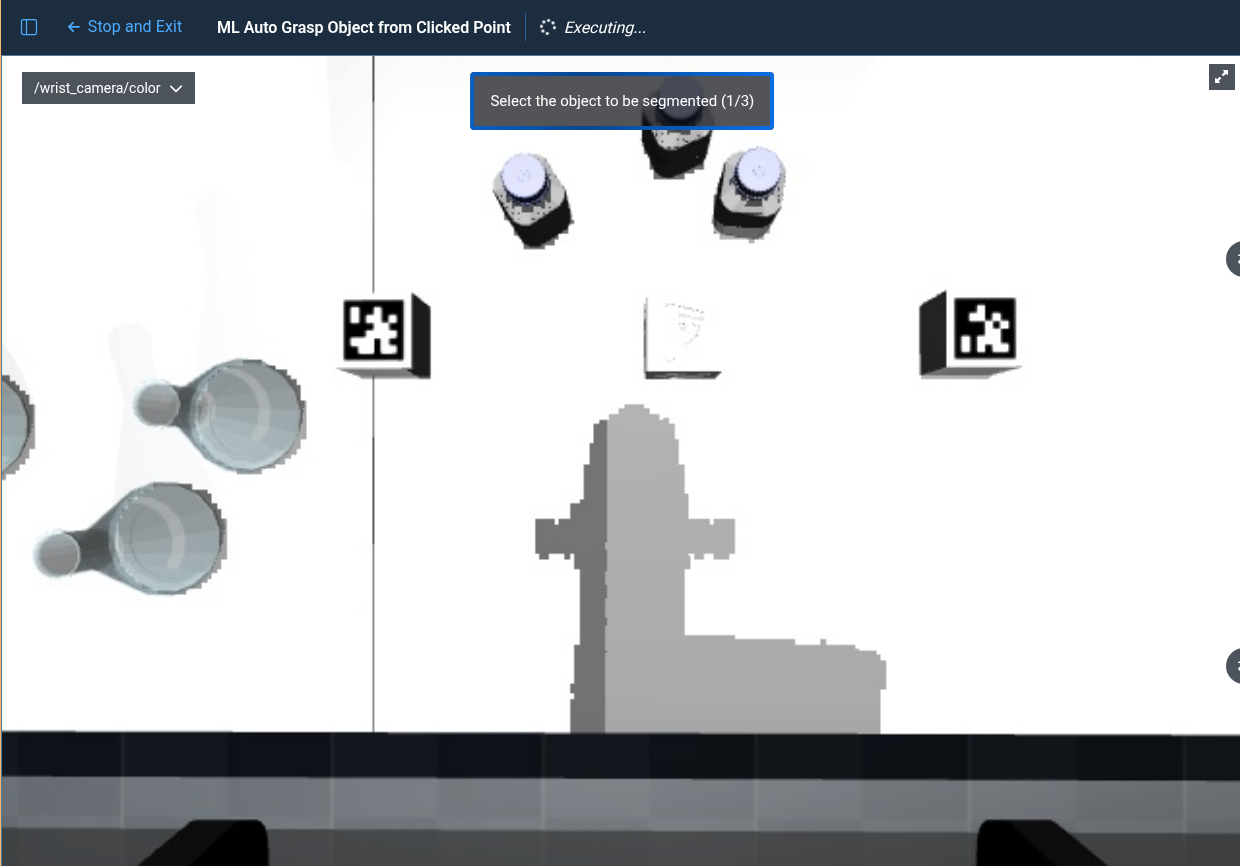 You should then see something like this.
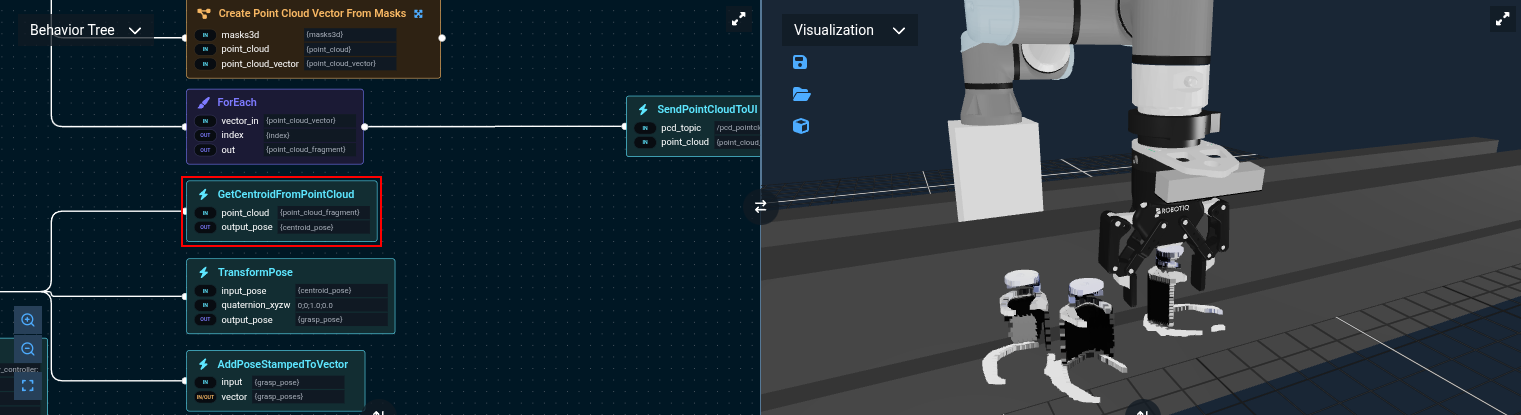
Now that we can feed GetGraspPoseFromPointCloud the object point cloud to infer grasps.
masks3d is actually a set of masks, so we'll use ForEachUntilSuccess to apply the masks to the point cloud until segmentation succeeds.
The result will be given to the ML grasp model. This is just one way to accomplish this but any way of getting the object point cloud will work.

The port values are:
ForEachUntilSuccess:
- index={index}
- out={mask3d}
- vector_in={masks3d}

GetPointCloudFromMask3D:
- point_cloud={point_cloud}
- mask3d={mask3d}
- point_cloud_fragment={point_cloud_fragment}

GetGraspPoseFromPointCloud:
- grasps={grasps}
- number_of_grasps_to_return=10
- point_cloud={point_cloud_fragment}
- model_package=lab_sim
- model_path=models/l2g.onnx
While most of these are the default, but be sure to pass {point_cloud_fragment} to the model which represents the object, instead of {point_cloud} which is the whole cloud.
This gets us the inference set, but as the model doesn't know anything about the robot arm, it can suggest grasp poses that would cause
the wrist to exceed its joint limits, even though a grasp rotated by 180 degrees would work just fine.
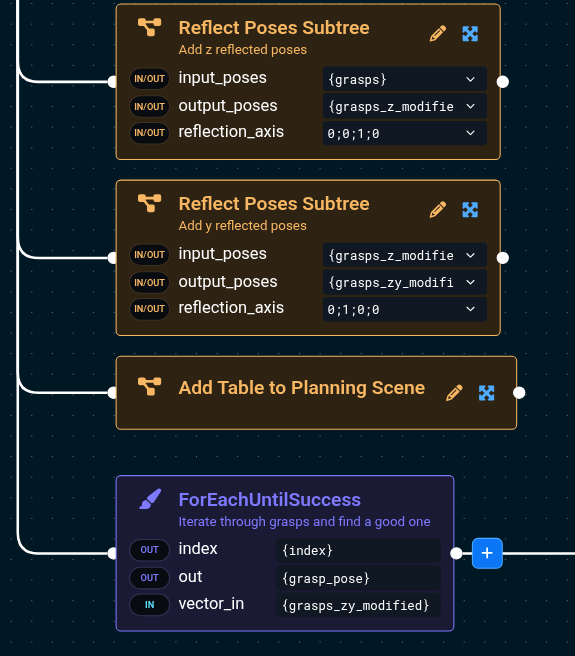
To help with this, the "Reflect Poses Subtree" can be used to add to the set grasp poses that are rotated around a specific axis.
Here, we will add to the set grasps rotated around z and another around y to be checked.
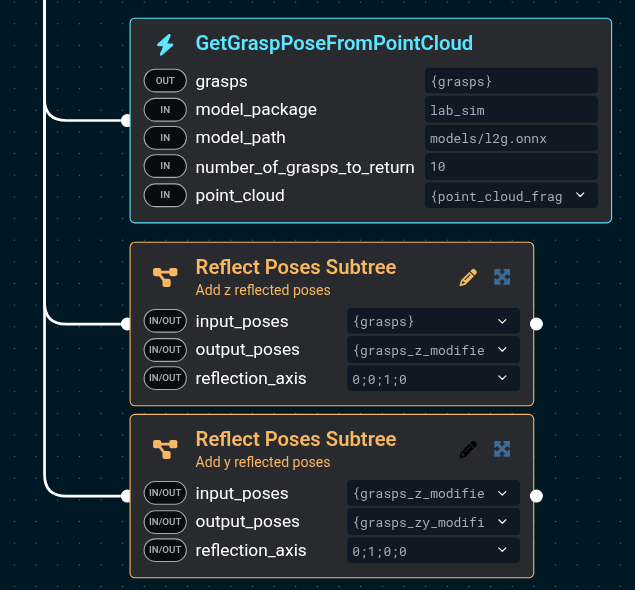
This subtree resets the input vector, so you cannot reuse the {grasps} vector and must make a new one
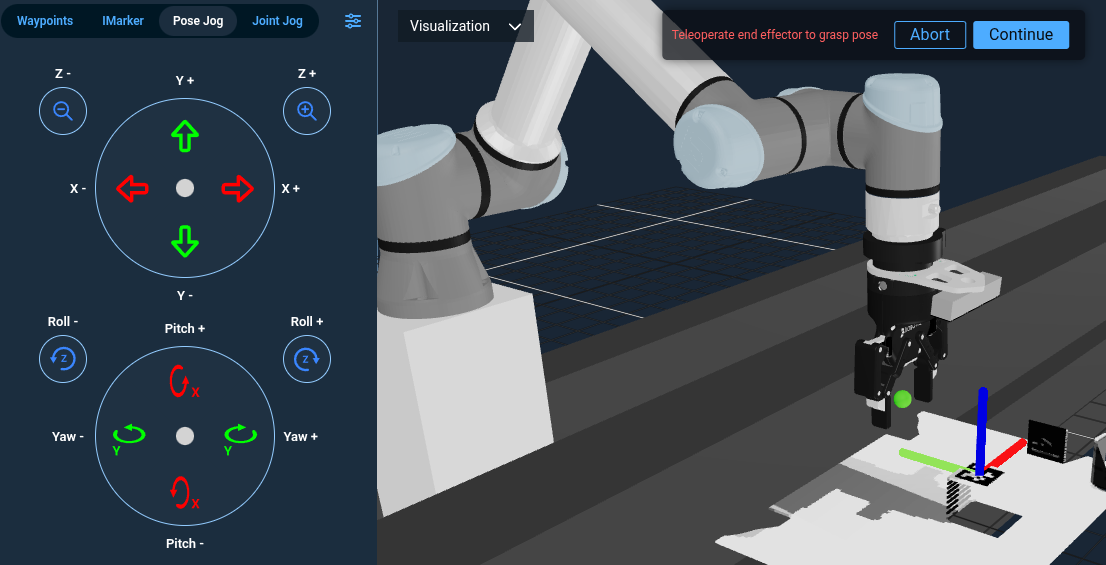
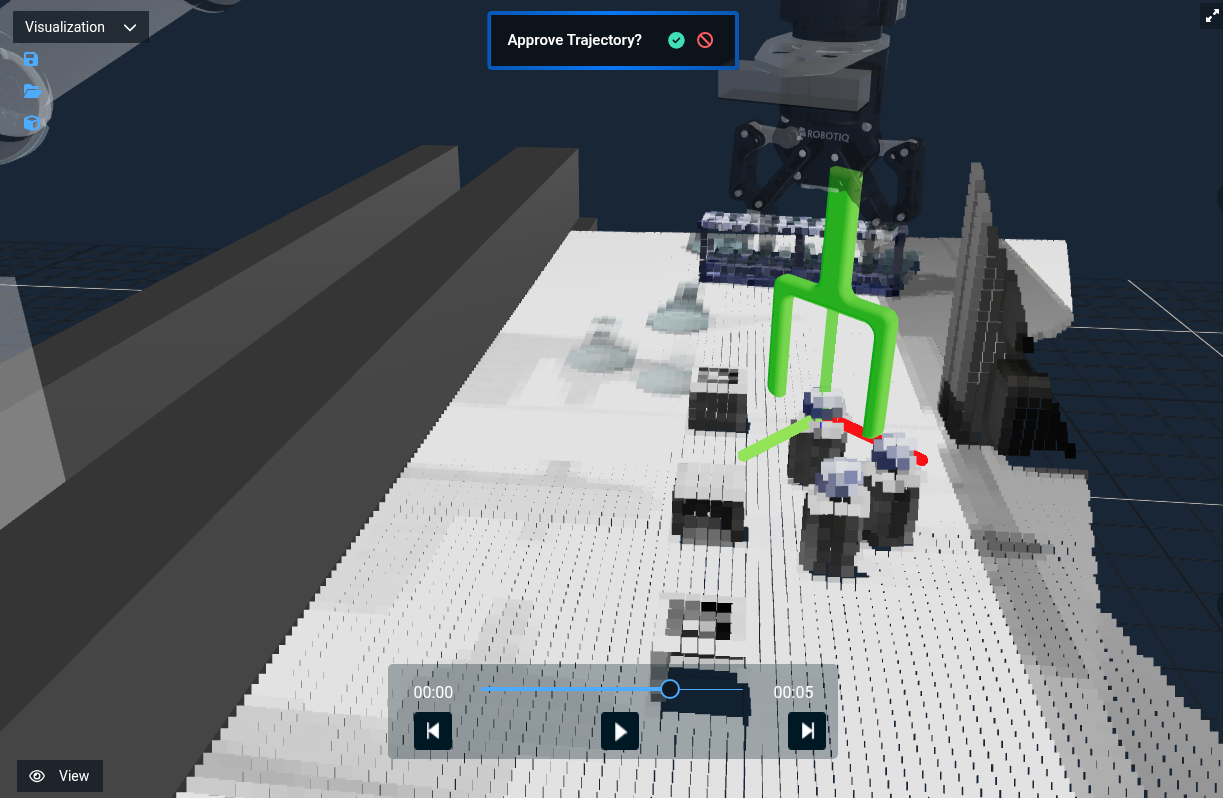
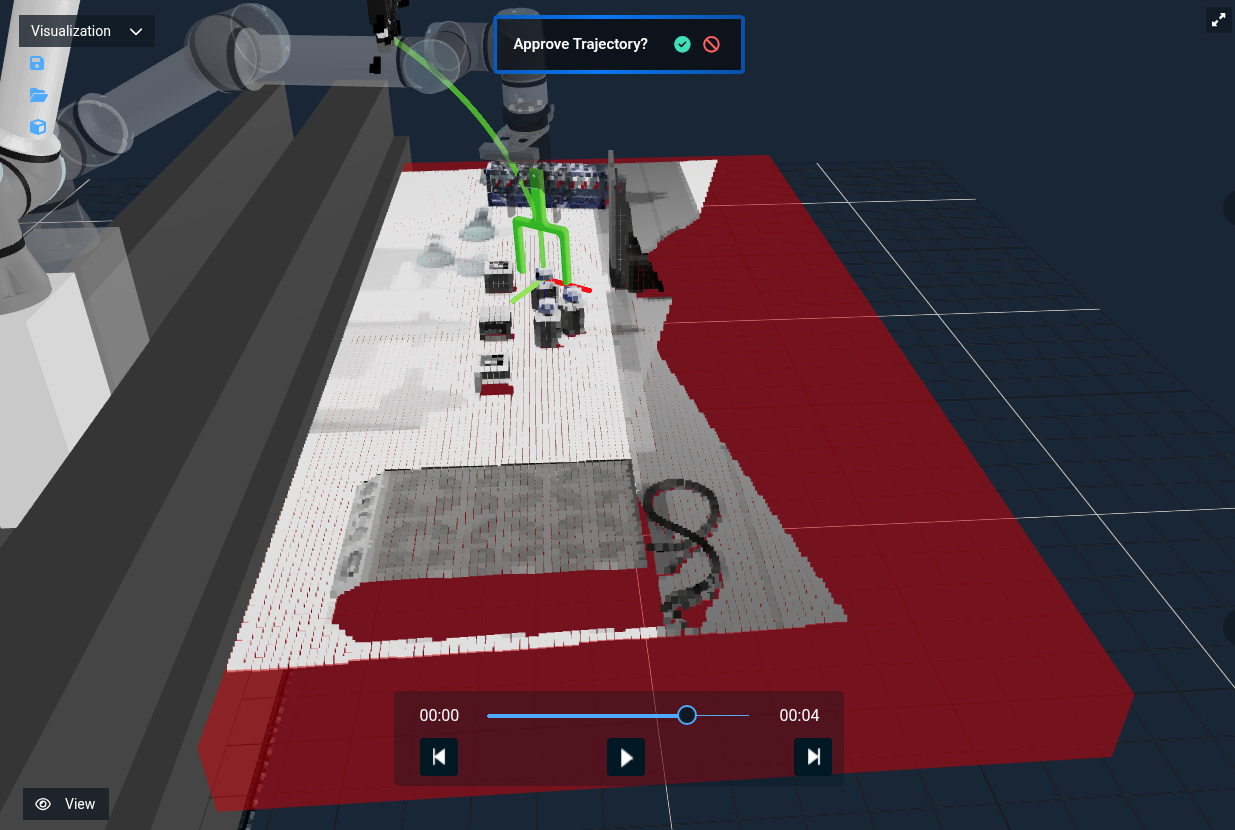
Now that we have all of these candidate grasps, we can send them to the robot. Only one can be used, and for this example we'll
have MoveIt Pro collision check and make sure the grasp is kinematically feasible using the "Pick from Pose With Approval"
which will ask the user to look at and approve the grasp. Other quality schemes could be used here such as pose filtering.
We'll iterate through all of the grasps until we find one that works. We also open the gripper ahead of time and visualize the grasp pose using a custom mesh.
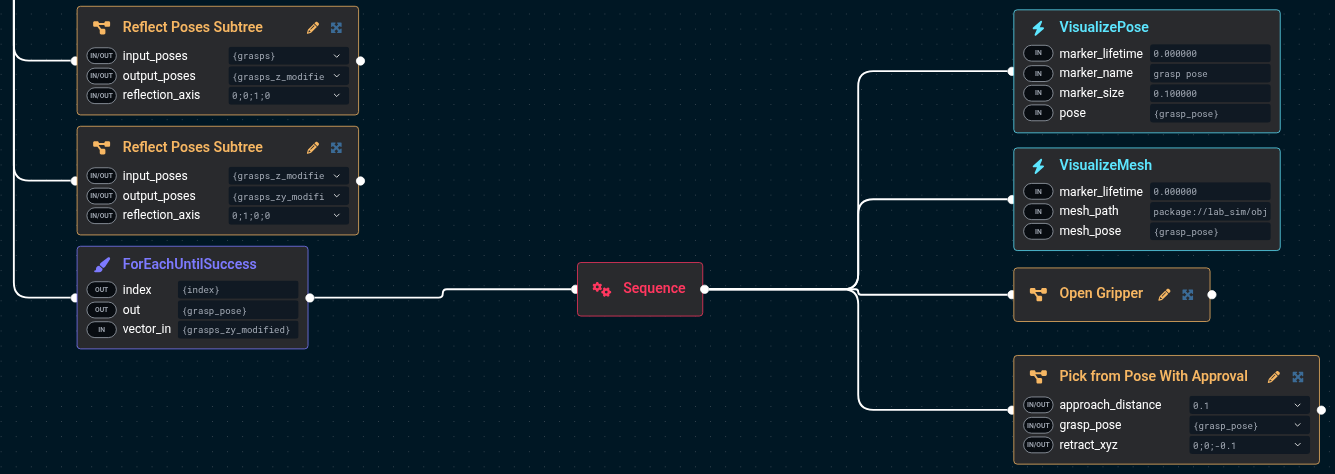
The port values are:
ForEachUntilSuccess:
- index={index}
- out={grasp_pose}
- vector_in={grasps_zy_modified}

VisualizePose:
- marker_lifetime=0.0
- marker_name=grasp pose
- marker_size=0.10
- pose={grasp_pose}

VisualizeMesh:
- marker_lifetime=0.0
- mesh_path=package://lab_sim/objectives/gripper_token.dae
- mesh_pose={grasp_pose}

Pick from Pose With Approval:
- approach_distance=0.1
- grasp_pose={grasp_pose}
- retract_xyz=0;0;-0.1
You should get something that looks like this:
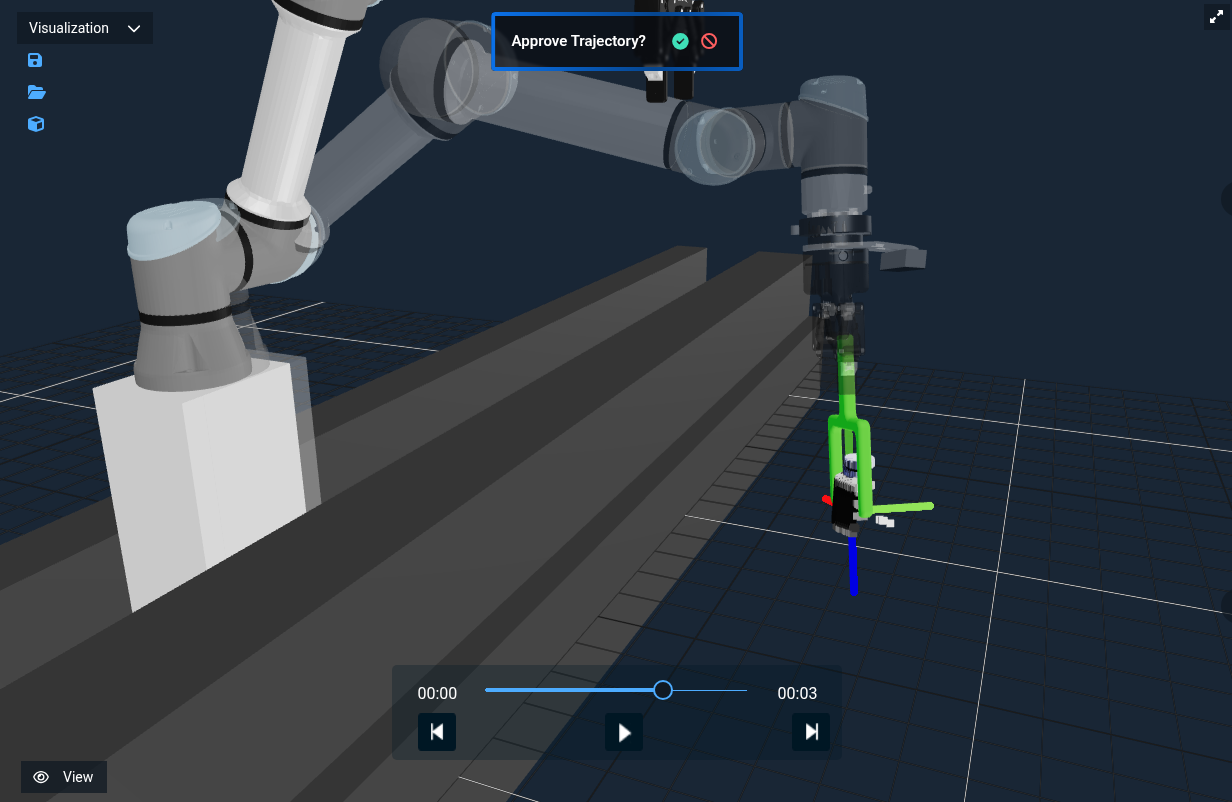 🎉 🎉 🎉 We've now used auto grasping to pick an object!
Point Cloud Quality
At times, the nature of the partial point cloud means that the model may produce strange grasps.
A way to improve this is to add more points!
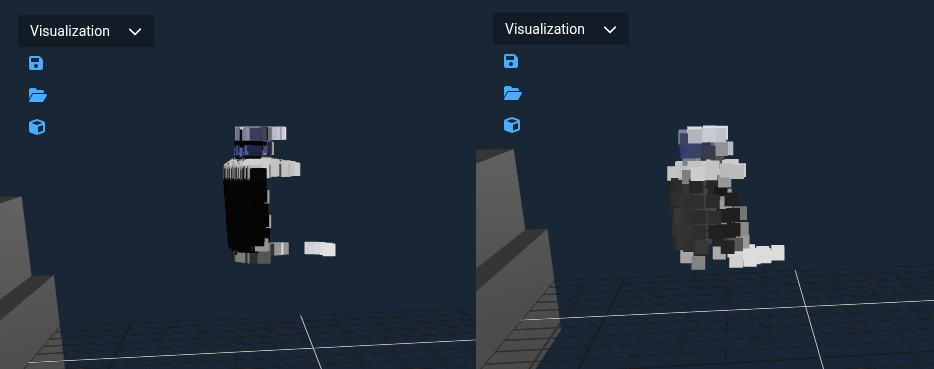 On the left, the point cloud of a bottle with a single camera view. On the right, views from left, right, and top.
More complete point clouds usually yield higher-quality grasps. Let's replace the single point cloud capture and use the
“Fuse Multiple Views Subtree” to the Objective to merge scans from different angles before running the ML grasp.
Here's the updated Objective, with the
On the left, the point cloud of a bottle with a single camera view. On the right, views from left, right, and top.
More complete point clouds usually yield higher-quality grasps. Let's replace the single point cloud capture and use the
“Fuse Multiple Views Subtree” to the Objective to merge scans from different angles before running the ML grasp.
Here's the updated Objective, with the GetPointCloud Behavior removed.
The port values are:
Fuse Multiple Views Subtree:
- merged_cloud={point_cloud}
- waypoint1=Look at Objects - Right
- waypoint2=Look at Objects - Top
- waypoint3=Look at Objects - Left
We'll still look at the table after getting the fused point cloud so we can segment the image.
You should now see:
"ML Auto Grasp Object from Clicked Point" has the complete version of this Objective.
Virtual Collision Objects
By default, the planning scene only contains collision geometry from the robot URDF. For example, it does not include point cloud data unless added using UpdatePlanningSceneService which converts the points to voxels. As the auto grasps are stochastic and do not consider geometry other than the partial point cloud of the object, it can propose grasps that would require the robot to collide with the table. A simple way to prevent this is to add a virtual collision object shaped like the table. Add the "Add Table to Planning Scene" to the Objective before the grasp iteration so that it can be used for motion planning:
Now when you rerun the Objective, you will see a red box that approximates the table but allows for faster planning versus the full voxel representation of the scene.
For a more involved Objective, see “ML Auto Grasp Object from Text Prompt” which picks all three medicine bottles on a table. (Be aware, this Objective uses a large amount of the GPU's VRAM and may not be able to run on all machines)
Next Steps
Don't forget to read about the other techniques mentioned, including
- ML Image Segmentation: Allows masking out objects from images
- Iterative Closest Point: Used to match point clouds to models
- Manual Grasp Pose Definition: Best for well known objects or fine tuning grasps