UI-Based Teleoperation
UI-based teleoperation methods are controlled directly through the MoveIt Pro web interface using on-screen controls. These methods are ideal for precise movements and don't require additional hardware.
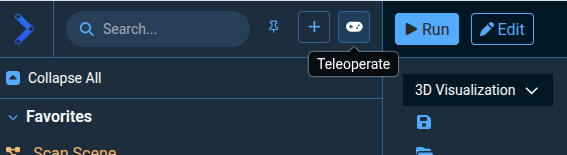
Teleoperation modes can be accessed from the Teleoperate button in the top left corner of the web app, or by running the Request Teleoperation Objective.

At the top of the left sidebar you should see four available teleoperation modes.
| Method | Best For | Precision | Setup Required |
|---|---|---|---|
| Interactive Marker | Visual positioning, trajectory preview | Medium | None |
| Pose Teleop | Cartesian movements, end-effector positioning | High | None |
| Joint Teleop | Joint-specific movements, singularity avoidance | High | None |
| Game Controllers | Familiar interface to many users | Medium | Plug in USB |
| Haply Haptic | Force-sensitive tasks, delicate manipulation | Very High | Setup Guide |
| Meta Quest VR | Intuitive hardware-based teleop | Medium | Setup Guide |
For hardware-based teleoperation, see the Gamepad Setup Guide, Haply Haptic Controller Setup Guide, or Meta Quest Setup Guide.
Interactive Marker Control
The Interactive Marker (IMarker) teleoperation mode allows users to move the robot's end effector in 6 degrees of freedom using arrows for translation, and discs for rotation.
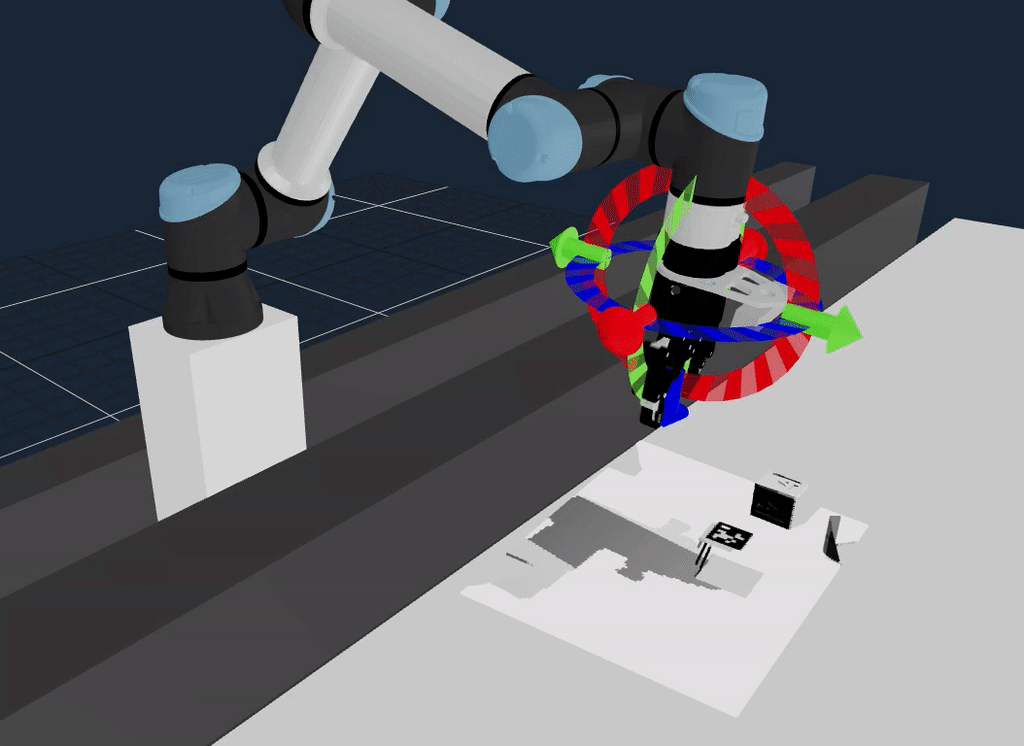
- Visual control: Click and drag arrows and discs to move the end-effector.
- Real-time preview: See inverse kinematics solutions before committing to movements.
- Trajectory planning: As the interactive marker is moved, a motion will be automatically planned that moves the end effector from the current pose to a goal pose. A preview of the trajectory will be visualized before execution.
- Visual feedback: If no preview is shown, it means there is no valid inverse kinematics solution for the desired pose. Use the Reset Marker button to fix this situation.
- Collision alerts: If the robot is in self-collision or environment collision, IMarker planning will fail.
To interact with the Interactive Marker, you will need the "3D Visualization" view panel selected.
Some elements of the simulation scene (e.g. the bench) may not be known to the robot for planning purposes, and therefore you can command the robot to collide with those elements, unless they are added to the planning scene. Check out our how-to guide on creating keepout zones and saving/loading a Planning Scene for more information.
Cartesian Pose Teleop Mode
The Pose teleoperation mode enables Cartesian control of the robot's end-effector using directional buttons in the UI.
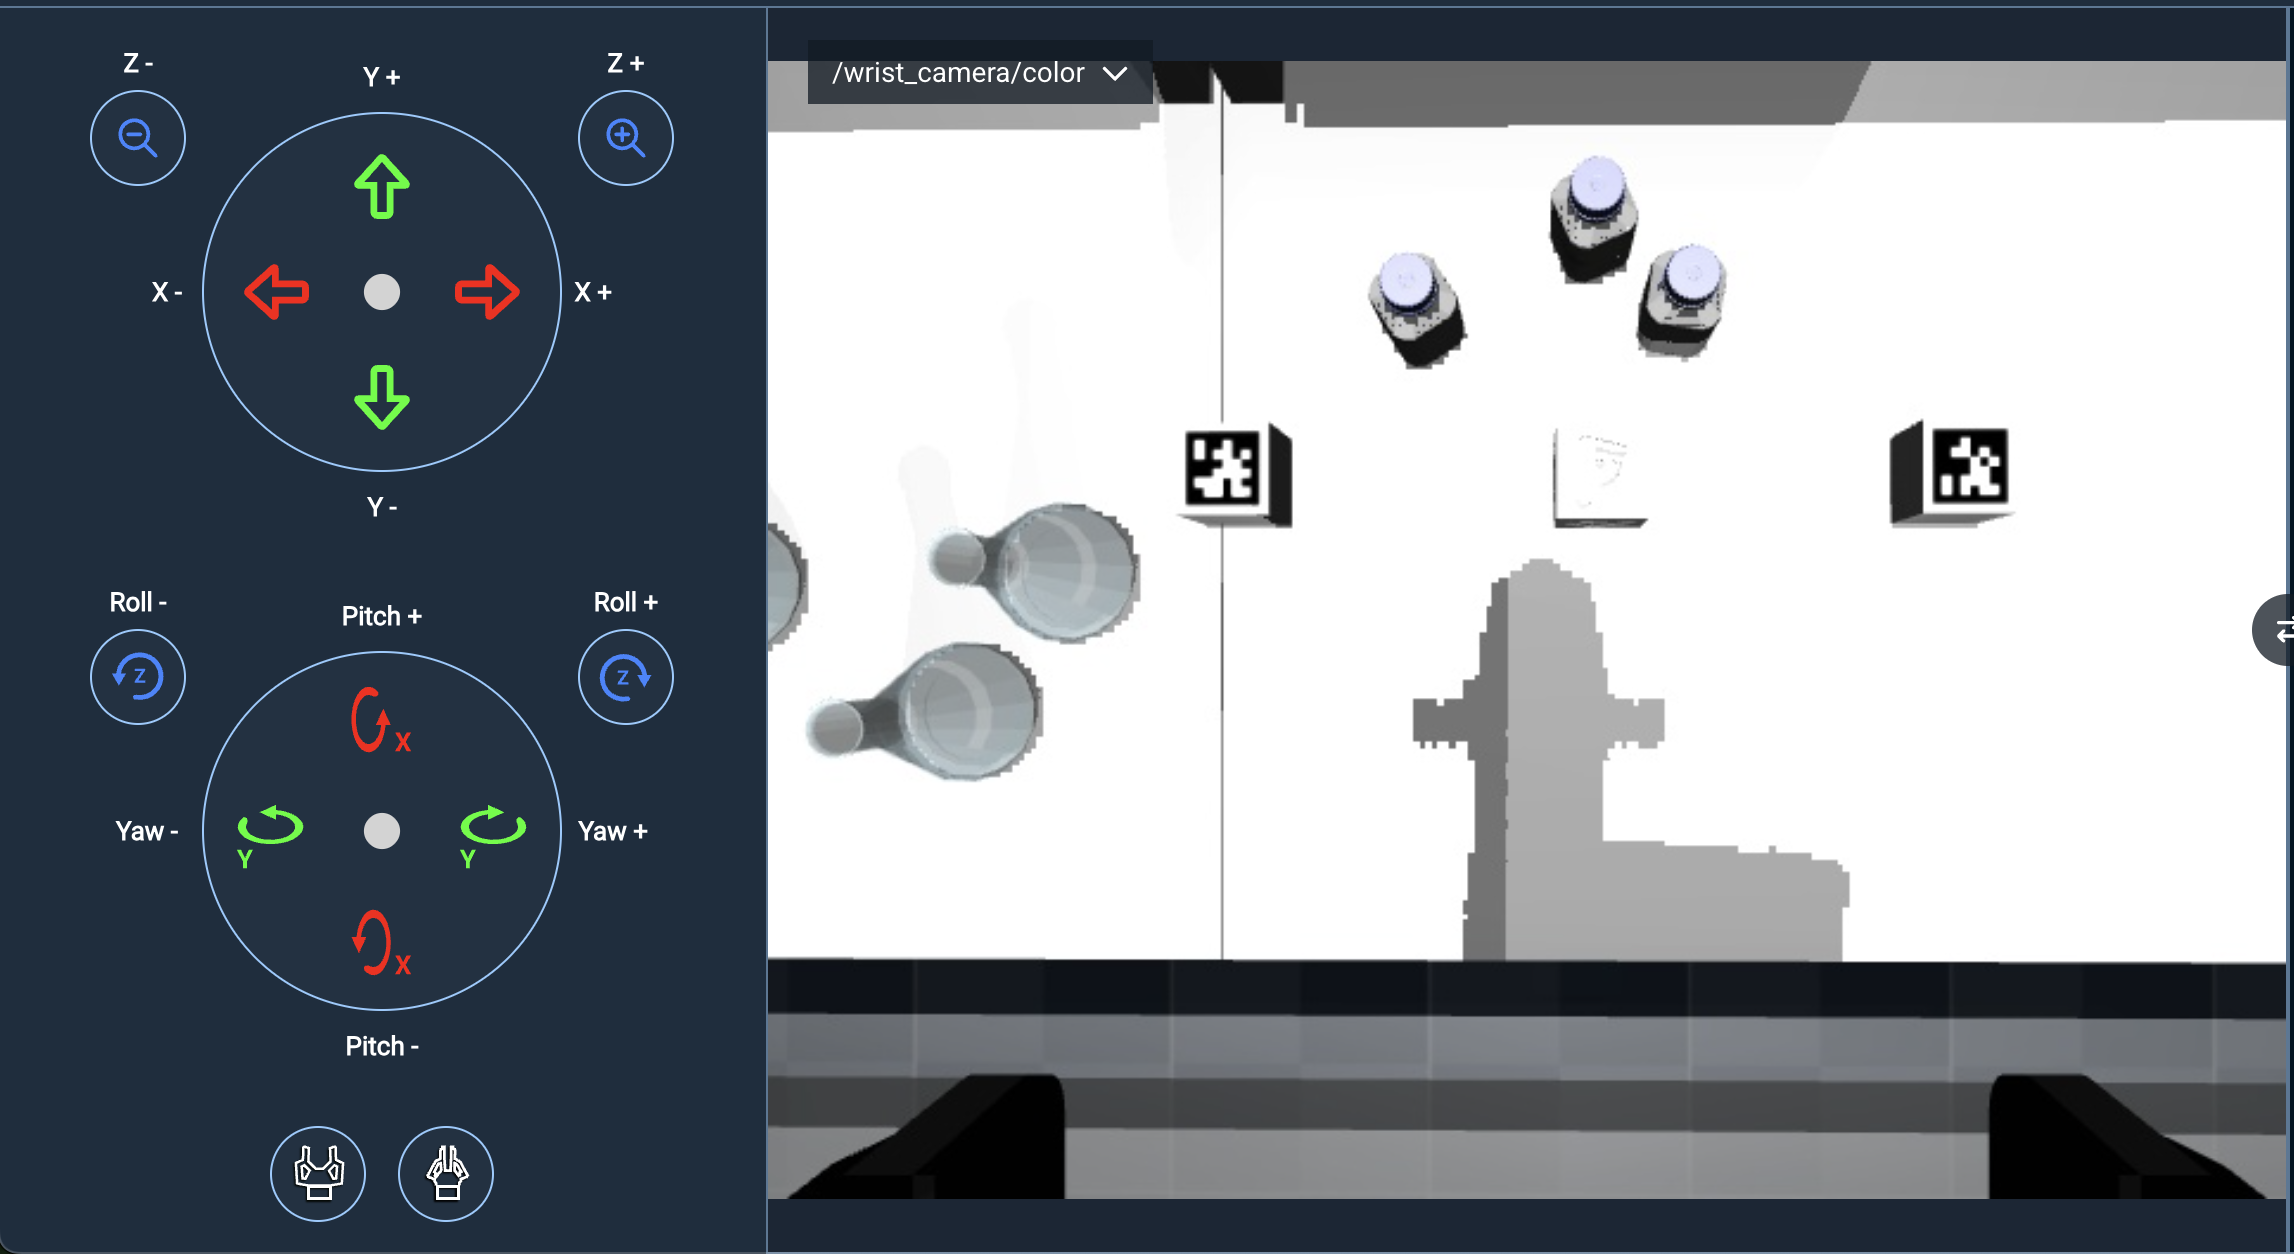
- Cartesian control: Translate and rotate the end-effector in Cartesian space.
- Multi-group support: Switch between different planning groups and controllers.
- Singularity handling: Stable control even at singularities and workspace limits.
- Collision avoidance: Advanced collision detection with automatic escape capabilities.
- Collision alerts: If the robot is in self-collision or environment collision, pose jogging will name and visualize colliding entities.
- Configurable limits: Adjustable Cartesian speed and acceleration limits.
To use this mode most effectively, we recommend you switch your largest view pane to the /wrist_camera/color since the controls are mapped to the coordinate frame of the wrist camera.
Pose Teleop Settings
On the toolbar you'll see a settings icon which allows you to change the jog speed. It also has a setting for changing planning groups, which is an advanced feature you can ignore for now.
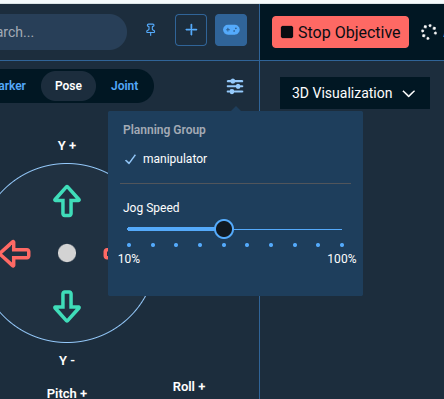
See the Pose Jog configuration guide for further setup details.
Joint Teleop Mode
The Joint teleoperation mode allows you to control individual robot joints.
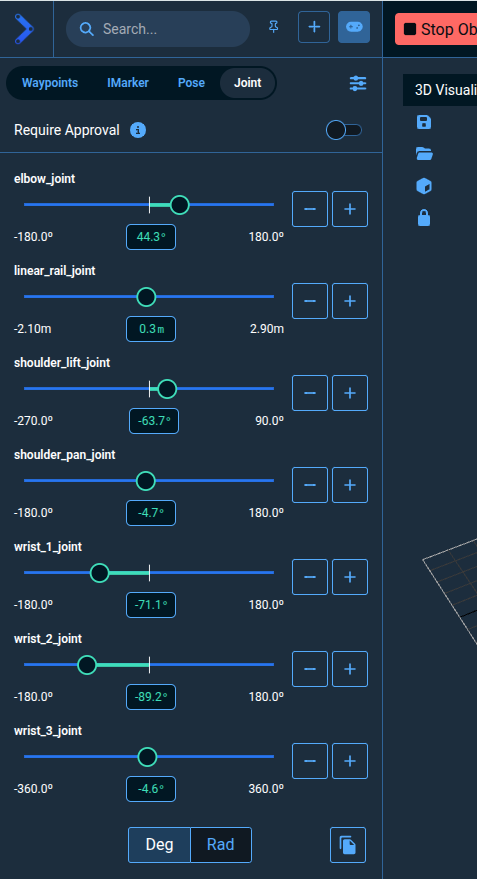
- Plus Minus +/- buttons allow you to jog the arm slowly.
- Slider bars allow you to automatically move to a setpoint.
- Text input boxes allow you to type an exact degree or radian setpoint.
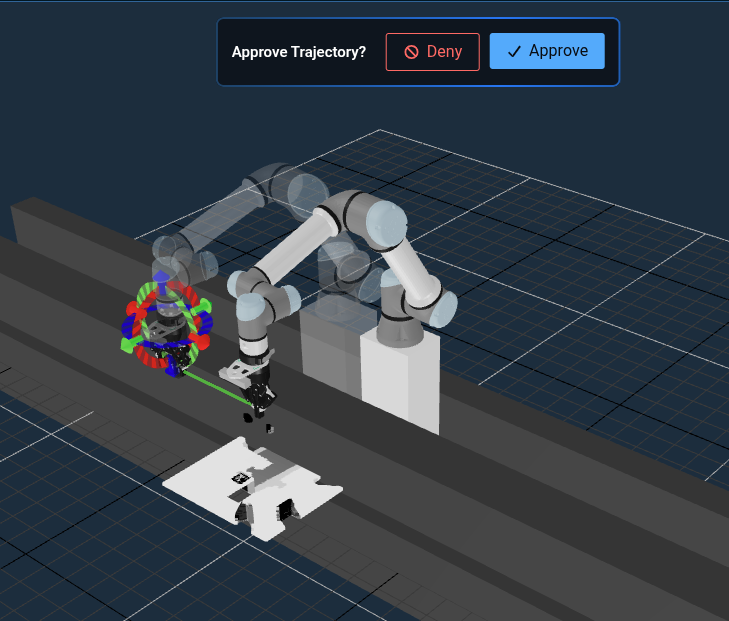
- Require Approval toggle at the top of the Joint teleop panel allows you to preview changes on a "ghost" robot before executing them on the real robot, which requires clicking the Approve button.
- Joint limits awareness: Automatically respects joint position, velocity, and acceleration limits.
- Collision alerts: If the robot is in self-collision or environment collision, joint buttons will fail and joint sliders will name the colliding entities.
Joint teleop mode is ideal when you need to move the robot to specific joint configurations or when Cartesian movements are not suitable due to singularities or workspace limits.
Joint Teleop Settings
In the settings menu for Joint teleop:
The Jog Collision Checking can be turned off so that the robot can be teleoperated in situations where the robot's trajectory is in collision with an object. The Jog Collision Checking toggle button applies only when jogging a joint via the +/- buttons, for safety reasons.
The Jog Speed value controls how fast the robot moves, and applies to both the +/- buttons and the joint position sliders.
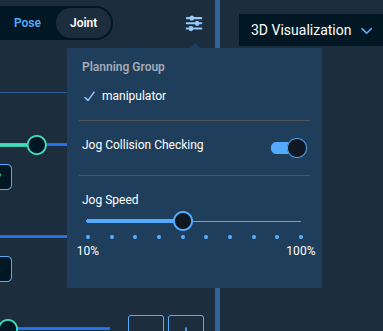
It's recommended to keep collision checking on unless you move the robot into a collision and need full manual control to get it back into a safe state.
Waypoint Control
Waypoint Control allows you to move the robot to previously saved joint configurations.
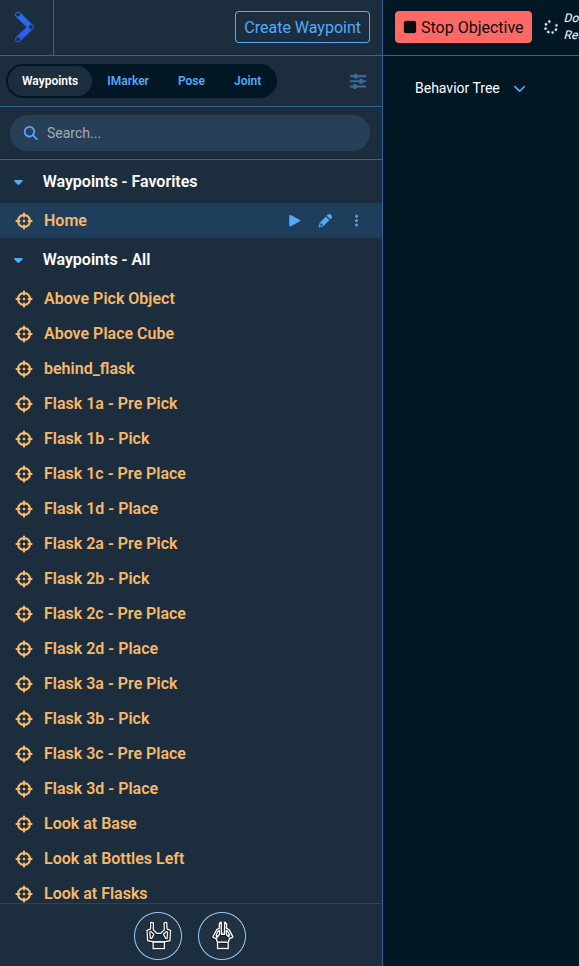
- Saved positions: Quick access to frequently used robot poses.
- Planning group flexibility: Save waypoints for individual or combined planning groups.
- Favorites system: Mark commonly used waypoints for quick access.
- Easy management: Add, remove, and organize waypoints through the UI.
- Collision alerts: If the robot is in self-collision or environment collision, waypoint planning will name and visualize colliding entities.
Waypoints are saved joint states that can be reused later in Objectives or standalone.
Waypoint Control is ideal for returning to known good positions or implementing repetitive positioning tasks.
Gripper Control
At the bottom of all the teleop modes are two simple buttons that can be used to open and close the gripper.

Teleoperating the gripper to joint values other than "Open" or "Close" is not currently supported.