Set Up the Seeed reBot B601-RS
This guide covers the stock Seeed reBot B601-RS and its MoveIt Pro 10.2 or later / ROS 2 Jazzy robot configuration packages. A reBot simulation is available for experimenting before you deploy a physical arm.
The reBot B601-RS is a Gold-Tier supported arm. Its controllers run at 100 Hz, lower than the other Gold-Tier arms.
The B601-RS has no brakes. With torque off, it holds its position only at HOME, where it rests on its built-in stops; anywhere else it falls. Start the arm at HOME, and return it to HOME before restart or torque-off.
The B601-RS does not ship with a power-isolation switch. You can add one so that you have a physical emergency stop: the Seeed Rebotic Bleeder Module for the B601-RS. Install and test it before physical motion.
Required Hardware
Seeed sells the arm, power adapter and accessories together as the reBot Arm B601-RS Bundle. Depending on your region, ordering the pieces separately can be simpler.
The full list of hardware for the stock configuration is:
- 1x Seeed reBot Arm B601-RS Assembled Kit with Gripper
- 1x Seeed Power Adapter Kit for the B601-RS
- A rigid mount, such as a bench clamp or base plate
- 1x host that runs MoveIt Pro 10.2 or later (ROS 2 Jazzy)
- Optional: 1x Seeed Rebotic Bleeder Module for a physical emergency stop
- Optional: 1x Star Arm 102 leader (includes its 12 V power supply)
The arm includes its USB-to-CAN adapter, the Seeed CANable (model UTC-T01).
Cameras are not included in the arm, kit or bundle, so you can choose your own.
Optional cameras:
- 1x wrist camera. We recommend the Orbbec Gemini 305 because it has a short stereo baseline. It needs a 3D-printed mount: Seeed's D405/305 wrist mount.
- 1x scene camera on a fixed mount. We recommend the Orbbec Gemini 335 because its wider baseline suits viewing the whole workspace from a distance.
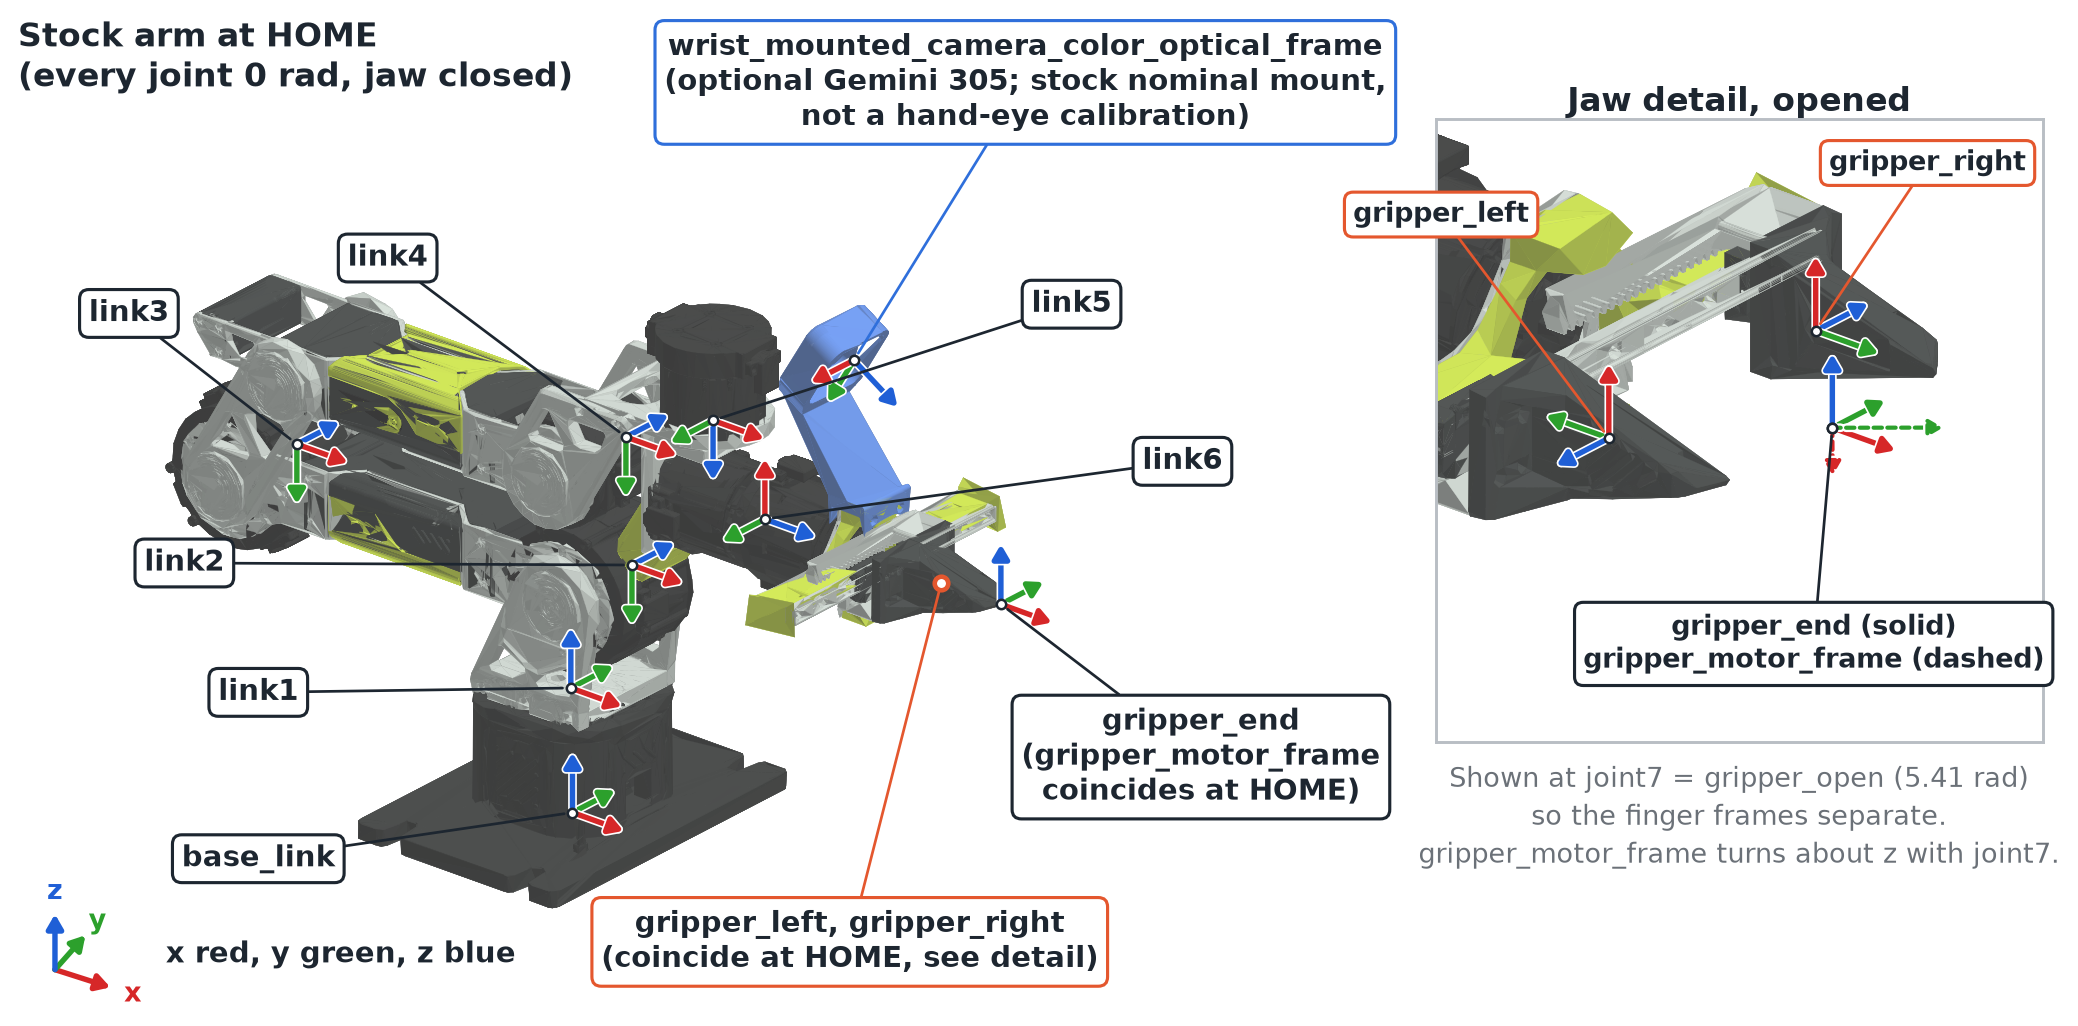
The stock arm's TF frames at HOME, with the optional wrist camera frame:
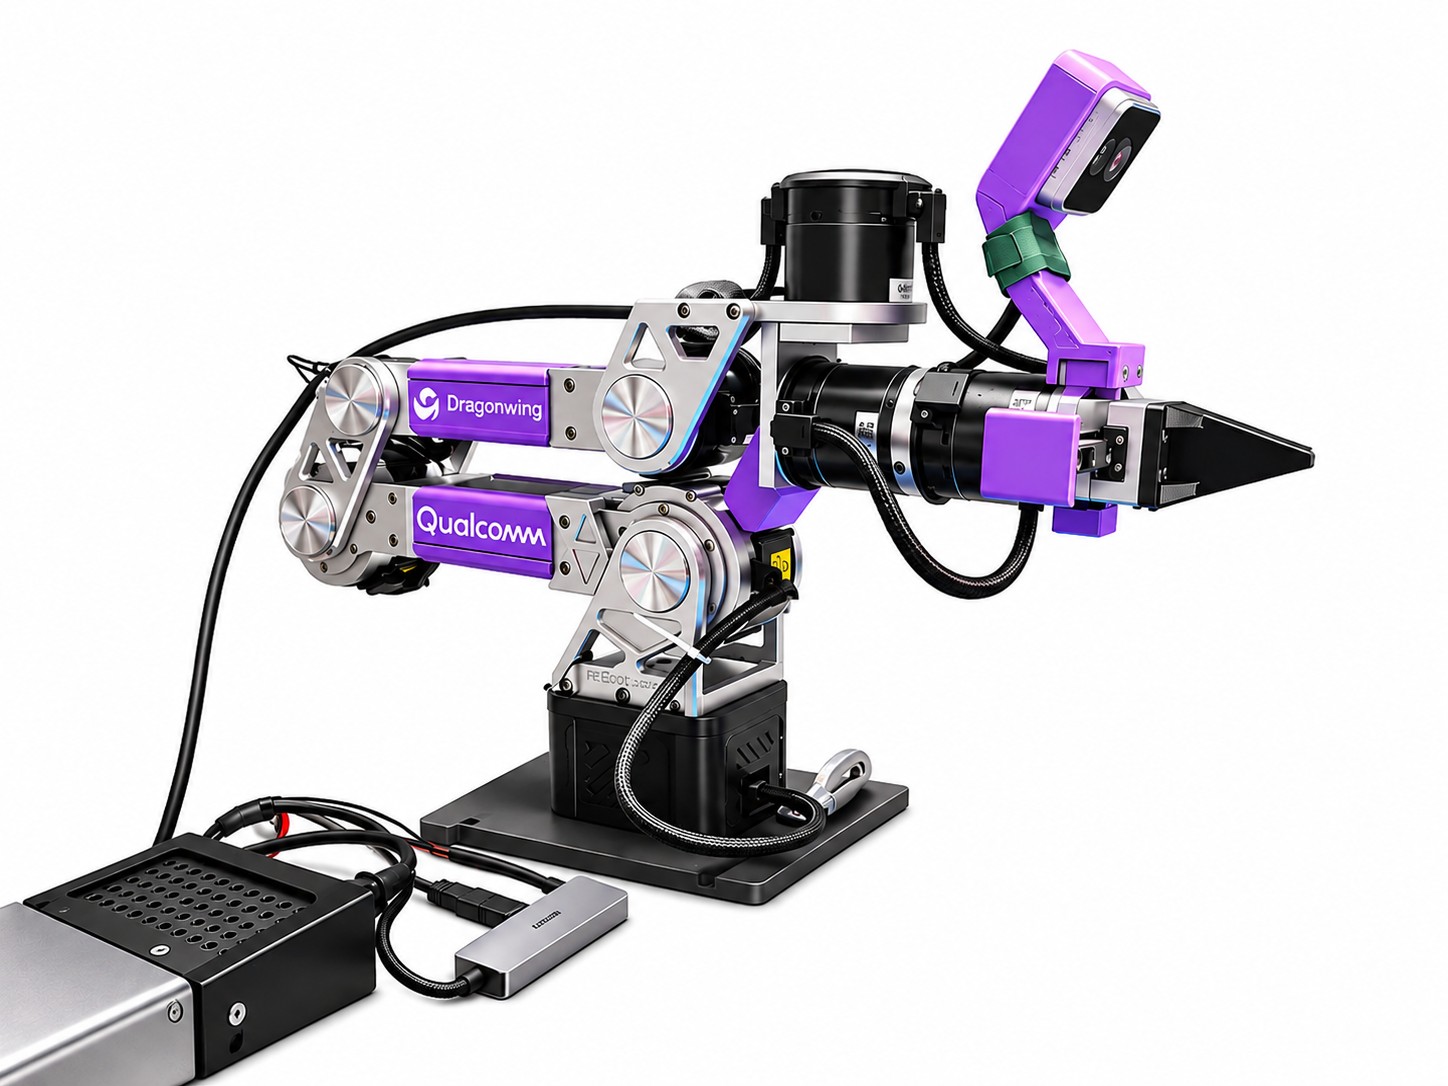
The image shows one bench layout: the arm bolted to a base plate, with the power supply enclosure, USB hub and wiring beside it. The arm has non-stock covers and a custom wrist camera mount.
Check Wiring Before Power
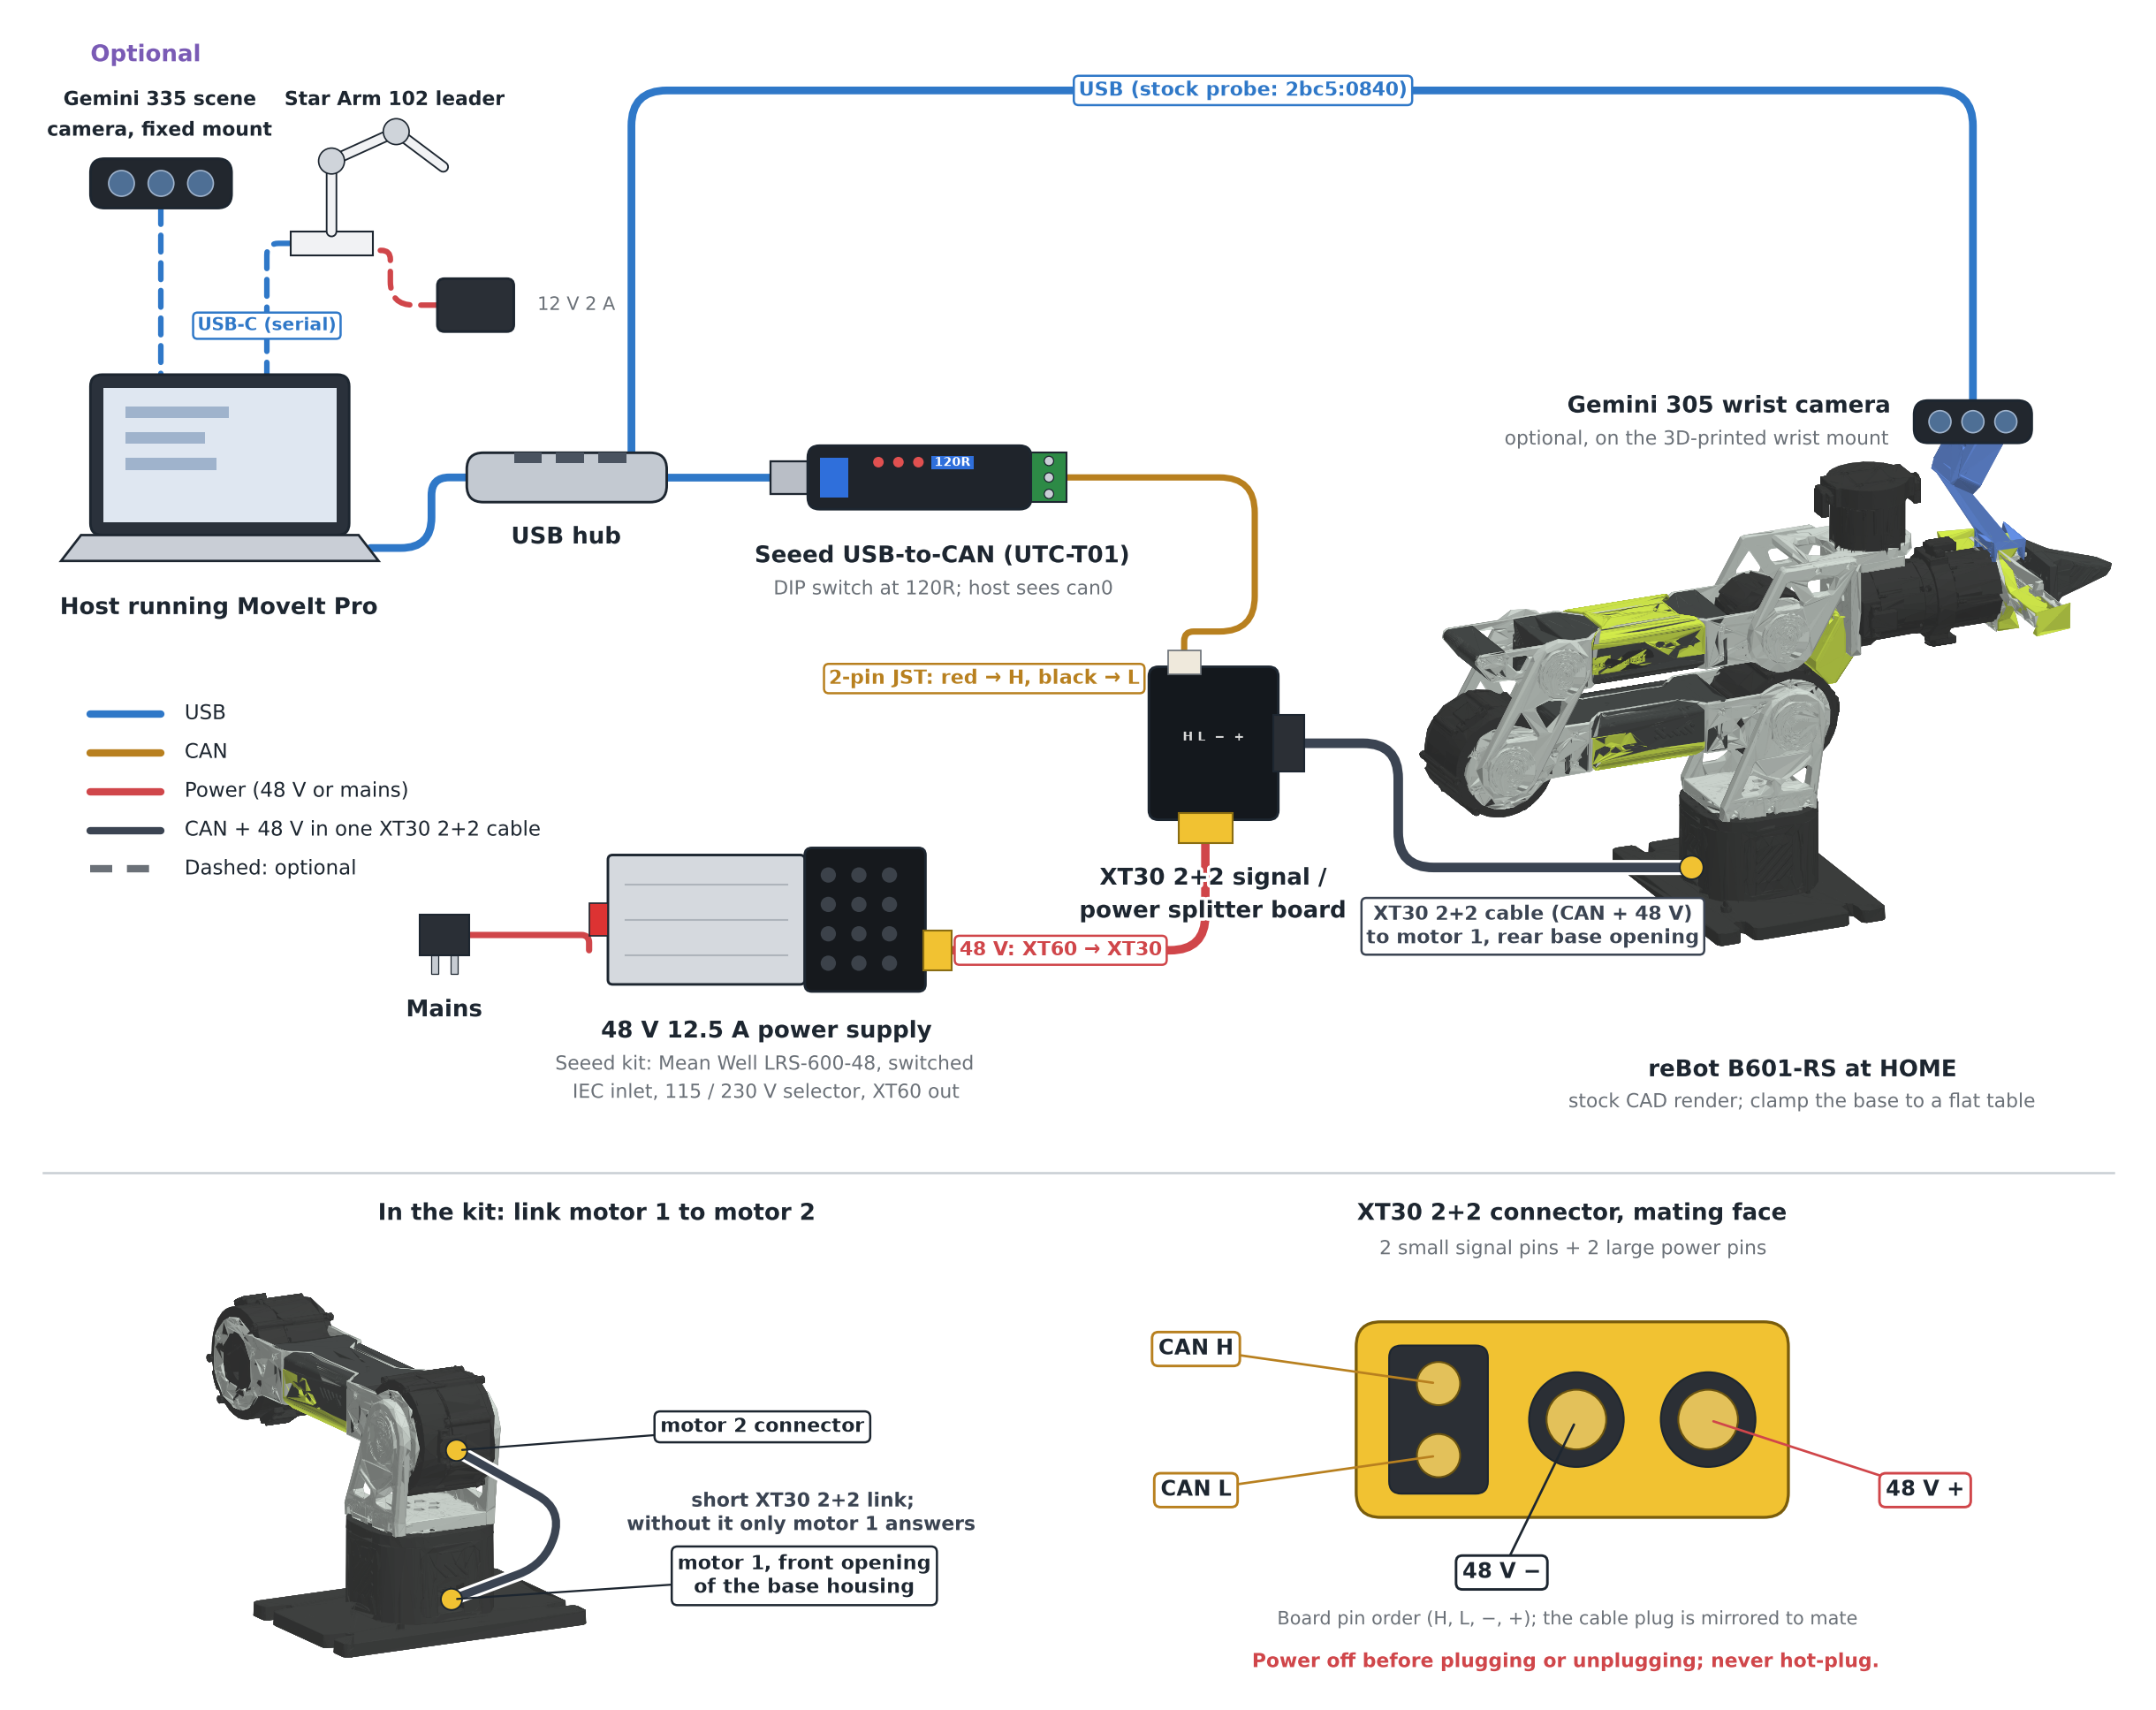
Connect the pieces as shown:
- Plug the USB-to-CAN adapter into the computer.
- Plug the wrist camera into the computer.
- Connect the USB-to-CAN adapter to the CAN port on the CAN + power adapter.
- Connect the power supply to the power input on the CAN + power adapter.
- Connect the combined CAN + power cable from the CAN + power adapter to the arm base.
The USB hub in the diagram is optional. If your computer has enough USB ports, plug the camera and the USB-to-CAN adapter in directly: through a hub, the camera may not get full USB 3 bandwidth and its frame rate can drop.
- Assemble the arm with Seeed's B601-RS getting started and assembly guide.
- Connect the short XT30 2+2 cable between motor 1 and motor 2. The CAN bus runs in series through every motor, so without this link the motors after motor 1 will not respond. Power the system off before connecting or disconnecting it.
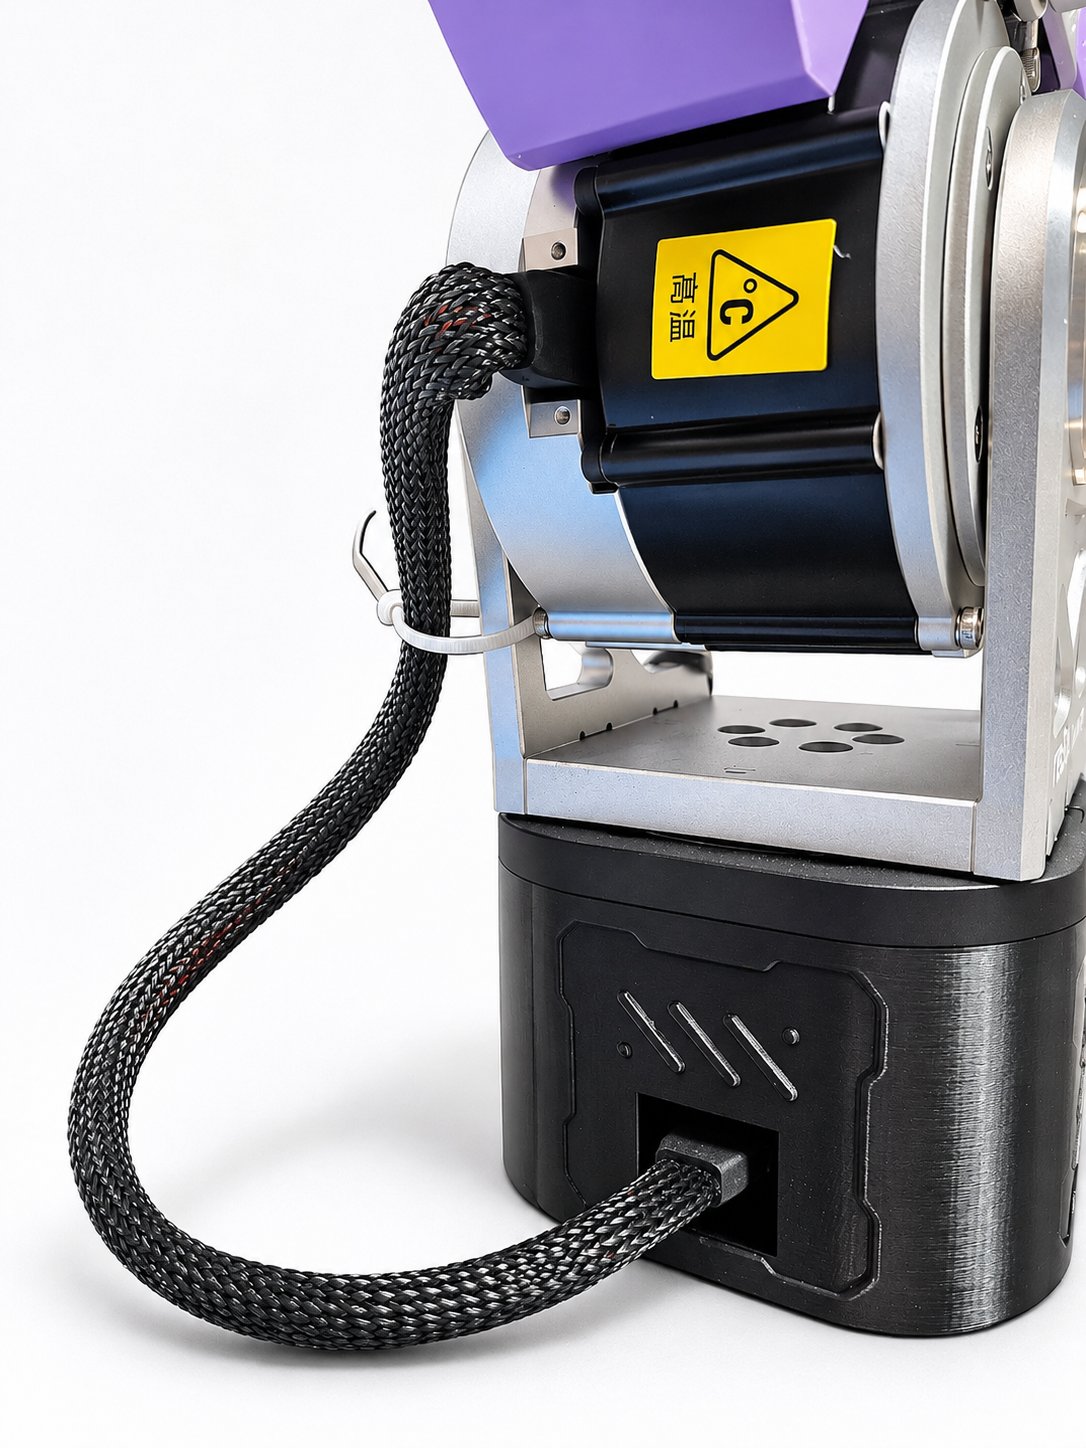
The cable runs from motor 1 in the base up to motor 2. Check that both ends are fully seated.
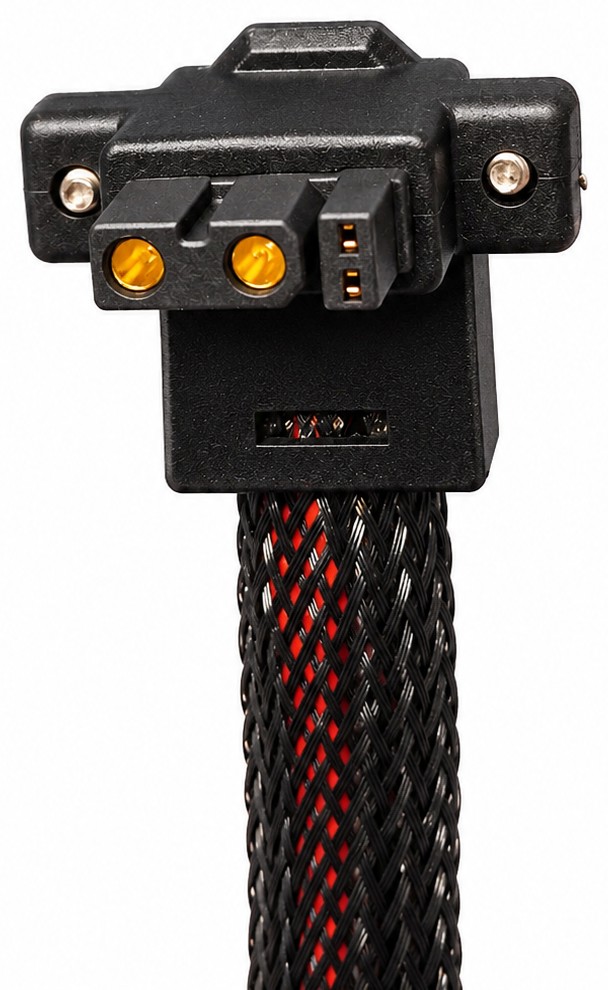
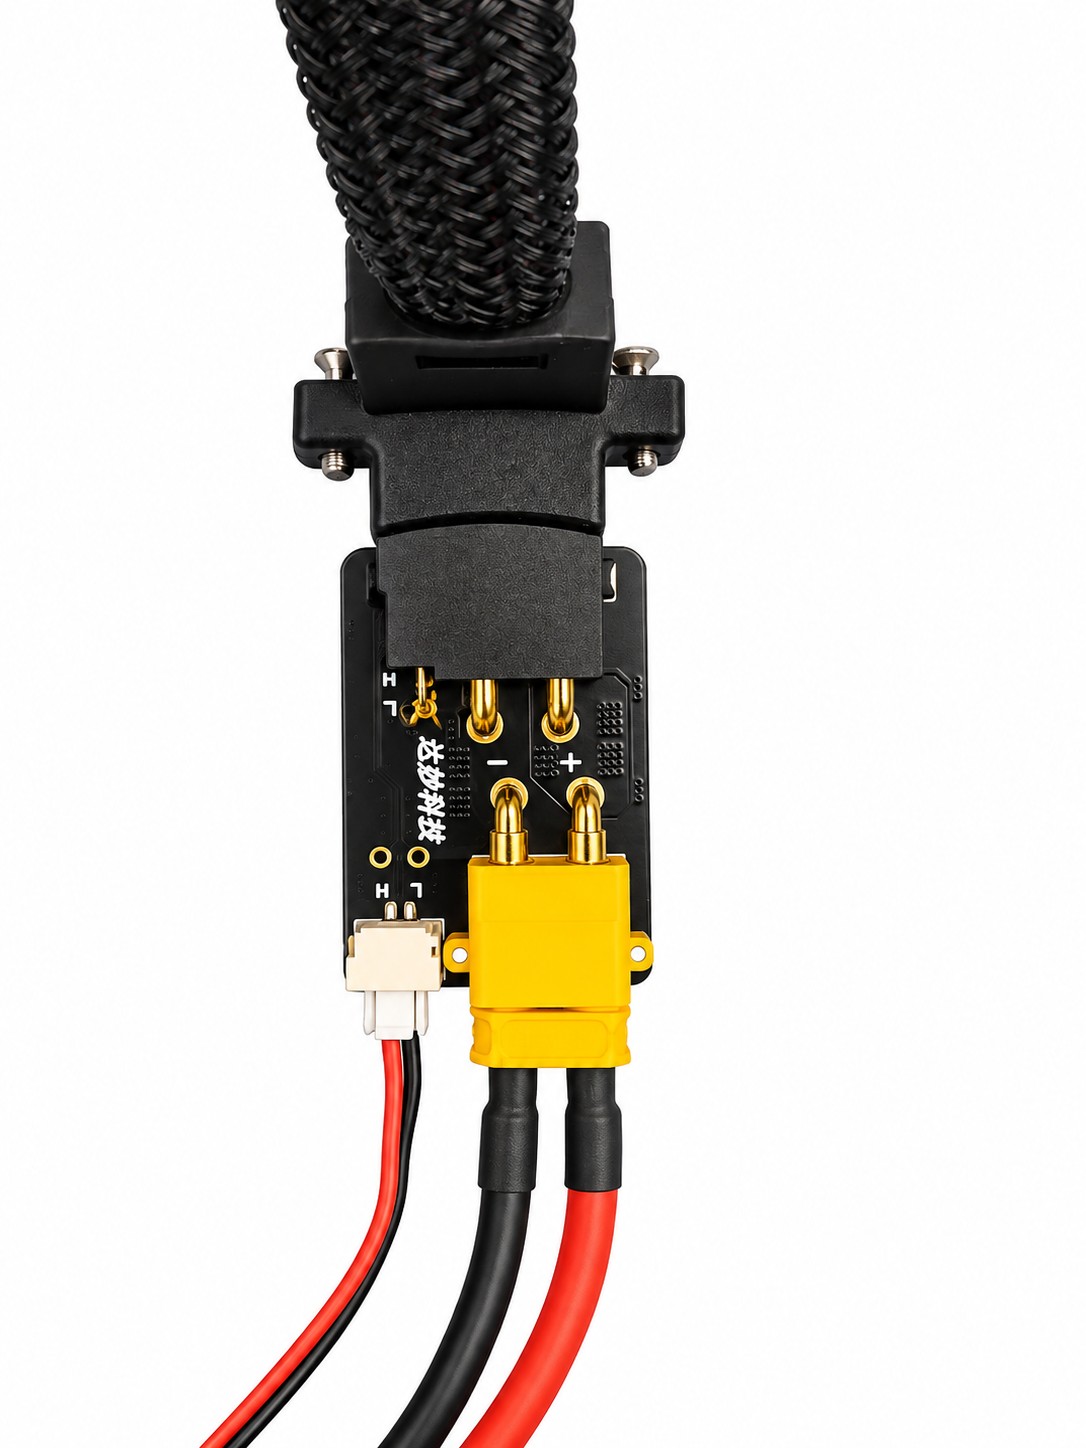
The link ends in an XT30 2+2 connector: two large power pins and two small signal pins in one housing.
1. Prepare the Host and SocketCAN
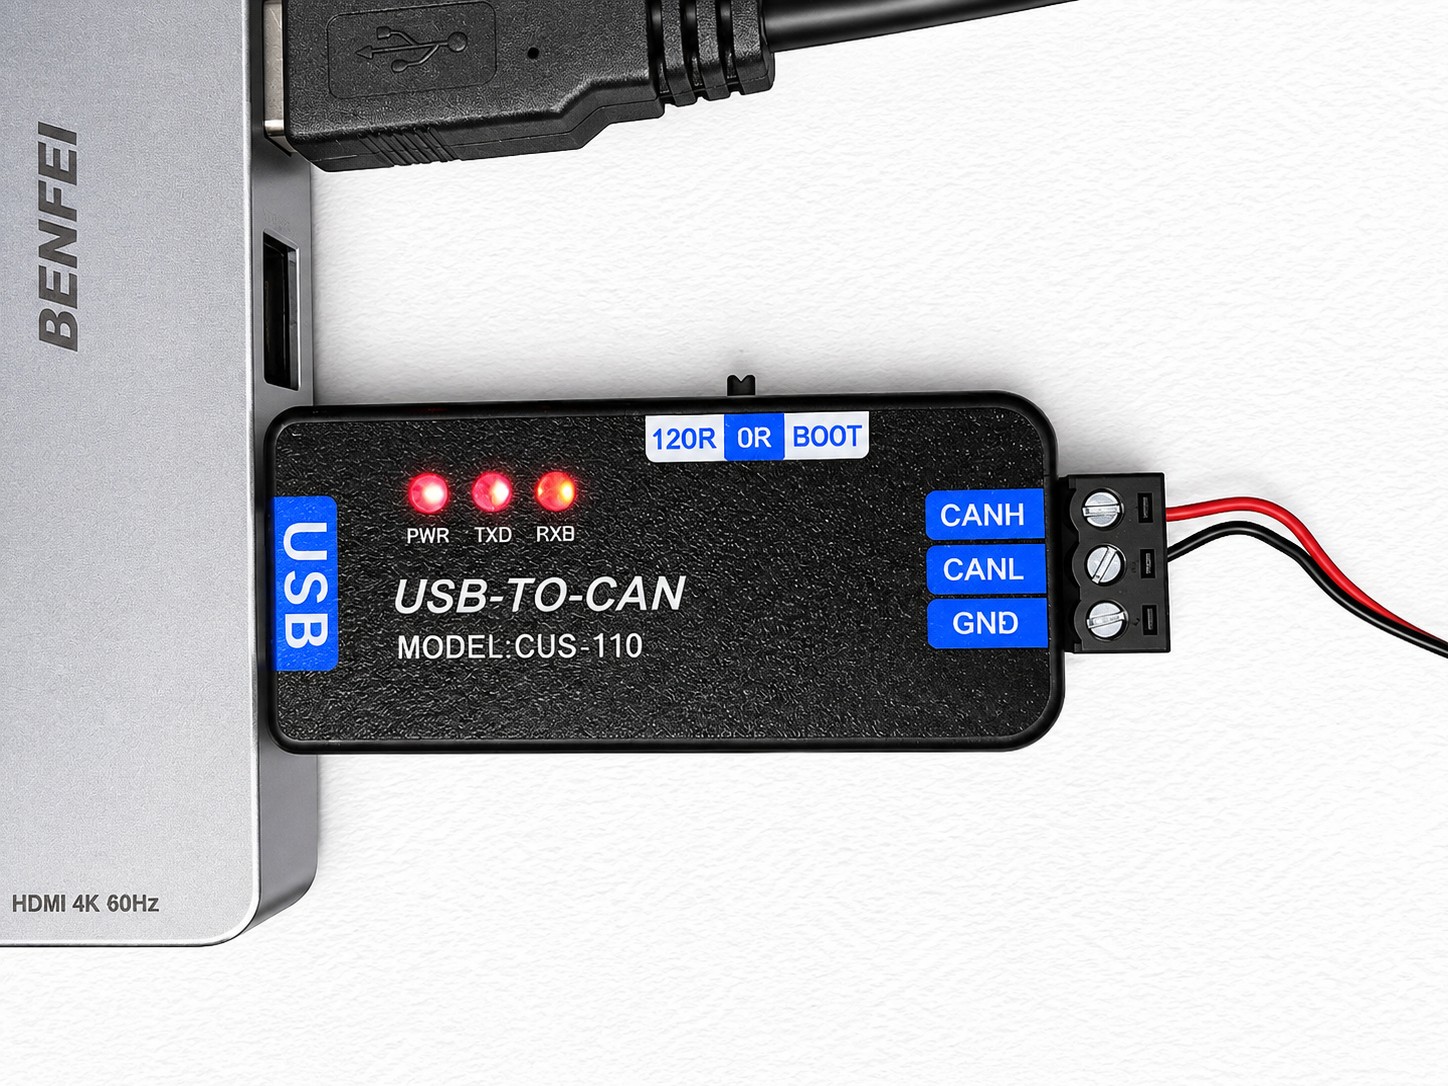
Make sure the CAN connections from Check Wiring Before Power are made: the USB-to-CAN adapter is plugged into the computer, and its CAN cable goes to the CAN + power adapter. Then bring the interface up as can0 at 1 Mbit/s:
sudo ip link set can0 down
sudo ip link set can0 type can bitrate 1000000 restart-ms 100
sudo ip link set can0 txqueuelen 1000
sudo ip link set can0 up
ip -details link show can0
The RobStride driver setup script runs the same commands. Replugging the adapter resets this configuration, so run them again after a replug.
Install Gemini 305 USB Permissions
The workspace installs the Gemini 305 driver (orbbec_camera), and the physical package starts the camera when it is plugged in. Before connecting the camera, install Orbbec's host USB rule. The Runtime's /dev mount does not replace host udev configuration:
curl -fsSL -o /tmp/99-obsensor-libusb.rules \
  https://raw.githubusercontent.com/orbbec/OrbbecSDK_ROS2/v2-main/orbbec_camera/scripts/99-obsensor-libusb.rules
sudo install -m 644 /tmp/99-obsensor-libusb.rules /etc/udev/rules.d/99-obsensor-libusb.rules
sudo udevadm control --reload-rules
sudo udevadm trigger
If the camera does not start, see Troubleshooting.
2. Install the Workspace
This guide assumes MoveIt Pro is installed. Install Git LFS before cloning the public reBot workspace with its pinned dependencies, then build it from the workspace root.
git lfs install
git clone --recurse-submodules https://github.com/PickNikRobotics/moveit_pro_rebot_ws.git
cd moveit_pro_rebot_ws
git lfs pull
git submodule update --init --recursive
moveit_pro build --user-workspace "$PWD" user_workspace
Select rebot_b601_rs_sim for the first Runtime launch. The build command sets this workspace as active, so the Simulator and mock launch commands below can find its packages.
3. Choose a Robot Configuration Package
| Robot configuration package | Hardware interface | Intended use |
|---|---|---|
rebot_b601_rs_sim | MoveIt Pro Simulator with MuJoCo | Start here. Run Objectives and teleoperation in simulation; no physical CAN bus or camera. |
rebot_b601_rs_mock | mock_components/GenericSystem | No physical I/O and no physics. Quick controller and Desktop App checks. |
rebot_b601_rs_hw | robstride_hardware_interface/RobstrideHardware over SocketCAN | The real arm. Run it without --instance so the Runtime sees can0. |
Launch the MoveIt Pro Simulator Robot Configuration Package
Start with the Simulator package. It does not touch the physical CAN bus or enable a real motor. The MoveIt Pro Simulator uses MuJoCo.
Launch the Runtime and Desktop App
We assume you have already installed MoveIt Pro to the default install location. Start the MoveIt Pro Runtime using:
moveit_pro run -c rebot_b601_rs_sim
Then launch or connect the separately distributed MoveIt Pro Desktop App. The Runtime does not serve a bundled user interface.
Launch the Mock Robot Configuration Package
The mock package has no physics. Start it with the same launch procedure for quick controller and Desktop App checks.
Launch the Runtime and Desktop App
We assume you have already installed MoveIt Pro to the default install location. Start the MoveIt Pro Runtime using:
moveit_pro run -c rebot_b601_rs_mock
Then launch or connect the separately distributed MoveIt Pro Desktop App. The Runtime does not serve a bundled user interface.
After running the Simulator or mock robot configuration package, stop that Runtime with Ctrl+C in its terminal or moveit_pro down before starting the physical inspection.
Inspect the Physical Package With Torque Disabled
This inspection is optional. Use it when bringing up a new or rebuilt arm, to check motor IDs, zero and joint signs before the motors power on. Otherwise go straight to Launch the Physical Robot Configuration Package.
-
Make sure the arm is securely mounted, the area is clear, and you can reach the power cutoff.
-
Put the arm at HOME (
Zeroed Rest) following the manufacturer's zeroing procedure. At HOME the arm rests on its built-in stops. This inspection checks the driver's reported zero and joint signs; it does not set the arm's mechanical zero.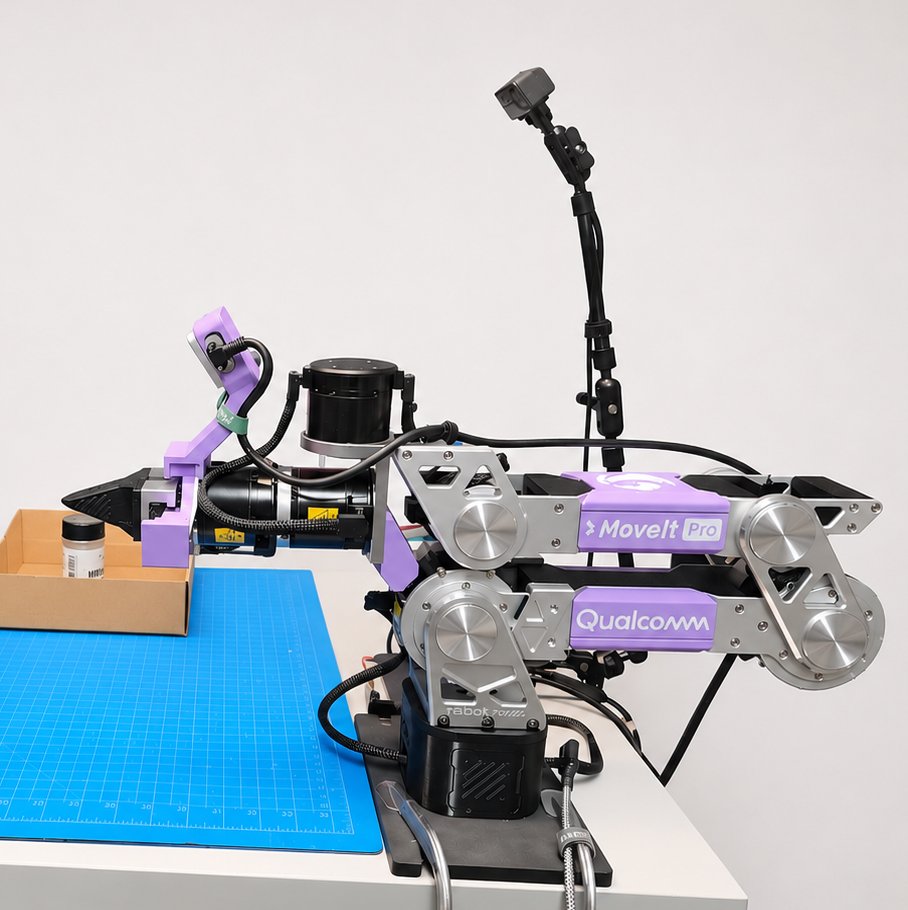
The photo shows HOME on our test bench; the manufacturer's zeroing procedure defines it.
-
Create a torque-disabled inspection child robot configuration package. For example, a package named
rebot_b601_rs_hw_inspectioncan inherit the physical package and settorque_enable: "false":based_on_package: rebot_b601_rs_hwhardware:robot_description:urdf_params:- torque_enable: "false" -
Build the workspace, then launch the child package with the physical host-network deployment. Do not add
--instance, because SocketCAN must remain visible from the Runtime:moveit_pro run --user-workspace "$PWD" --config-package rebot_b601_rs_hw_inspection --headlessCheck motor IDs, zero and joint signs, joint limits and fault status.
torque_enable: "false"only sets the startup state, so do not run motion Objectives during this inspection.
Launch the Physical Robot Configuration Package
If you ran the torque-off inspection, stop its Runtime with Ctrl+C or moveit_pro down. Start with the arm at HOME (Zeroed Rest), then launch the physical package. Do not add --instance: the Runtime must see can0.
moveit_pro run --user-workspace "$PWD" --config-package rebot_b601_rs_hw --headless
After the Runtime starts, launch or connect the separately distributed MoveIt Pro Desktop App.
Before stopping the physical Runtime, finish or cancel all motion and run Relax at HOME (next section). If it fails, torque stays on. Cutting power away from HOME drops the arm, so hold the arm before using the power cutoff there. Runtime exit does not isolate power.
4. Return HOME and Turn Torque Off
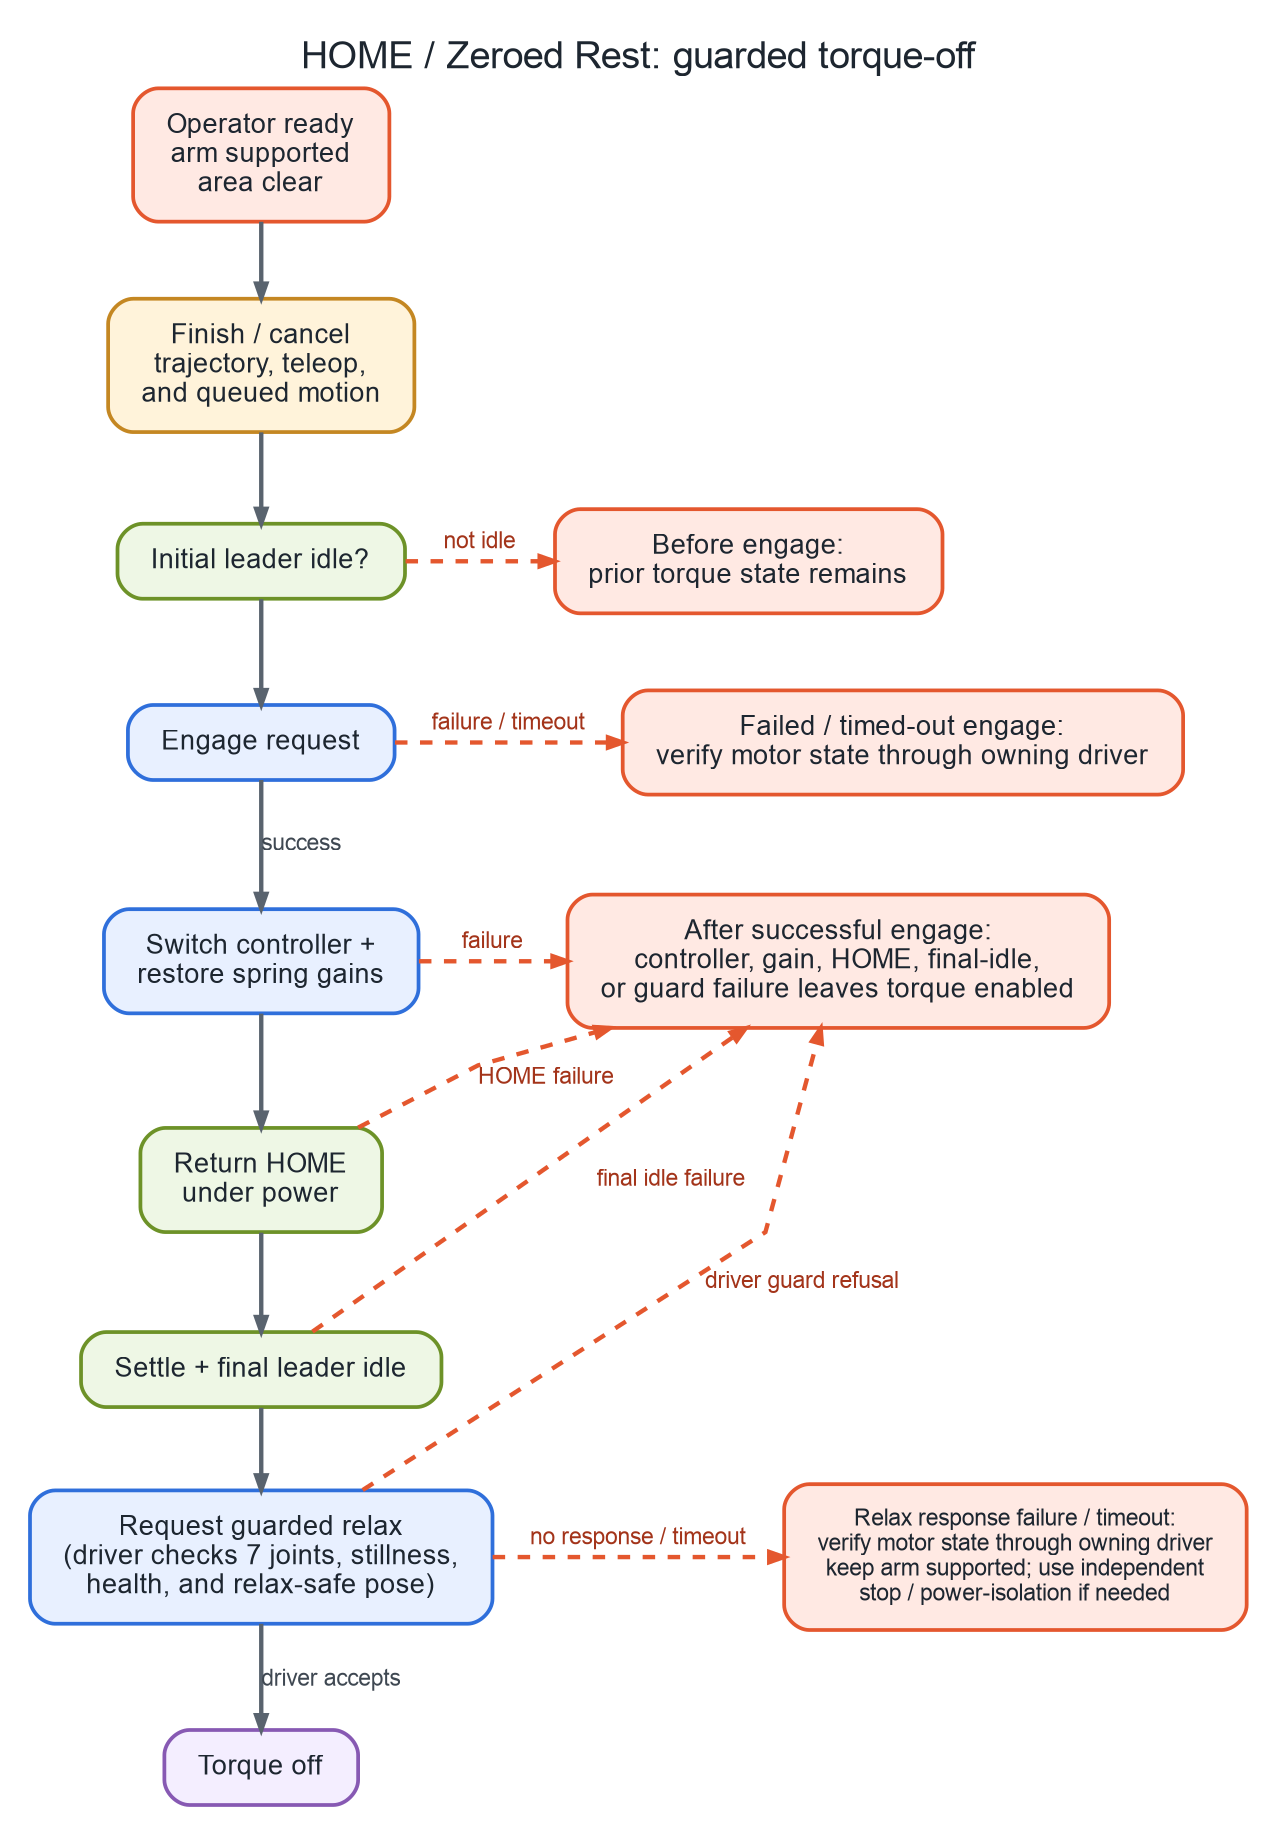
The flow summarizes the Relax at HOME guard and its outcomes before engage, after engage, and when the relax response is uncertain.
-
Finish or cancel every trajectory, teleoperation session, and queued motion.
Relax at HOMEdoes not inspect Objective or action queues. -
Run the
Relax at HOMEObjective to perform guarded torque-off. It ends any gravity-comp float by re-engaging torque at the measured pose and restoring spring gains, callsReturn reBot Leader Hometo return HOME under power, waits through its settle delay, verifies the leader is idle, then requests guarded relax from the driver.Return reBot Leader Homealone retains torque. -
Keep the area clear. Once the driver receives the guarded-relax request, it accepts torque-off only when all seven measured joints, including the jaw, match a named relax-safe pose, are still, healthy, and within measured bounds.
-
If the initial leader-idle check fails before the engage request, torque stays in its prior state. After a successful engage, a controller-switch, gain-restore, HOME, or final leader-idle failure leaves torque enabled. A driver guard refusal also leaves torque enabled. If the engage request or relax response fails or times out, verify motor state through the owning driver rather than assuming it. If the arm is away from HOME, hold it before using the power cutoff; do not bypass the guard with a direct torque command. Runtime exit and controller deactivation are distinct from physical isolation, and a configured driver can retain torque through clean deactivation.
5. Use the Wrist Camera
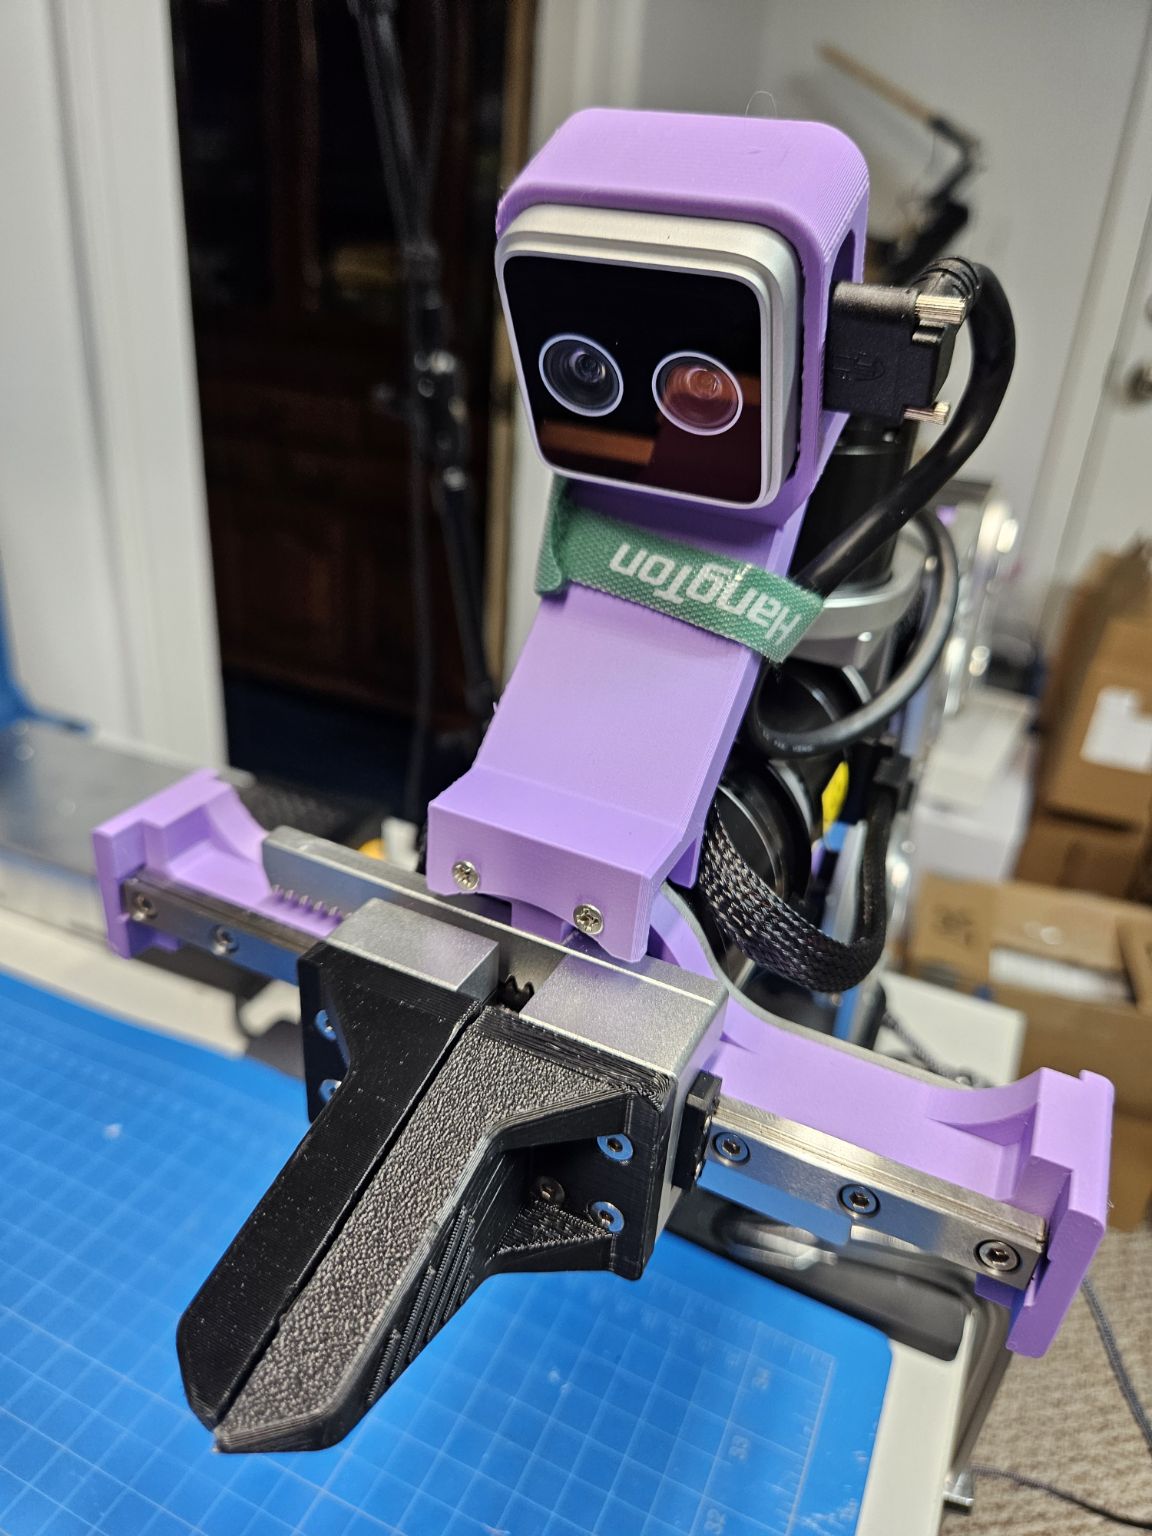
The stock physical launch enables a Gemini 305 camera by default only after it detects USB ID 2bc5:0840. The launched camera publishes color only at 1280×800 MJPG, 10 Hz in the /wrist_mounted_camera namespace, derives camera_info from the active device's factory calibration, and disables depth, infrared, point clouds, and driver TF publication.
- Set
enable_wrist_camera: falseinconfig/wrist_camera.yamlto skip probing and the camera driver, then rebuild and restart the physical Runtime. - Leave
wrist_camera_serial_numberempty for the first detected camera; set a serial only on a host with multiple cameras. - Attach or reconnect the camera before Runtime startup. The probe runs once; restart the physical Runtime after a connection change.
- The stock transform from
gripper_endto the camera optical frame comes from CAD. Calibrate hand-eye in your own robot configuration package before using the camera for perception.
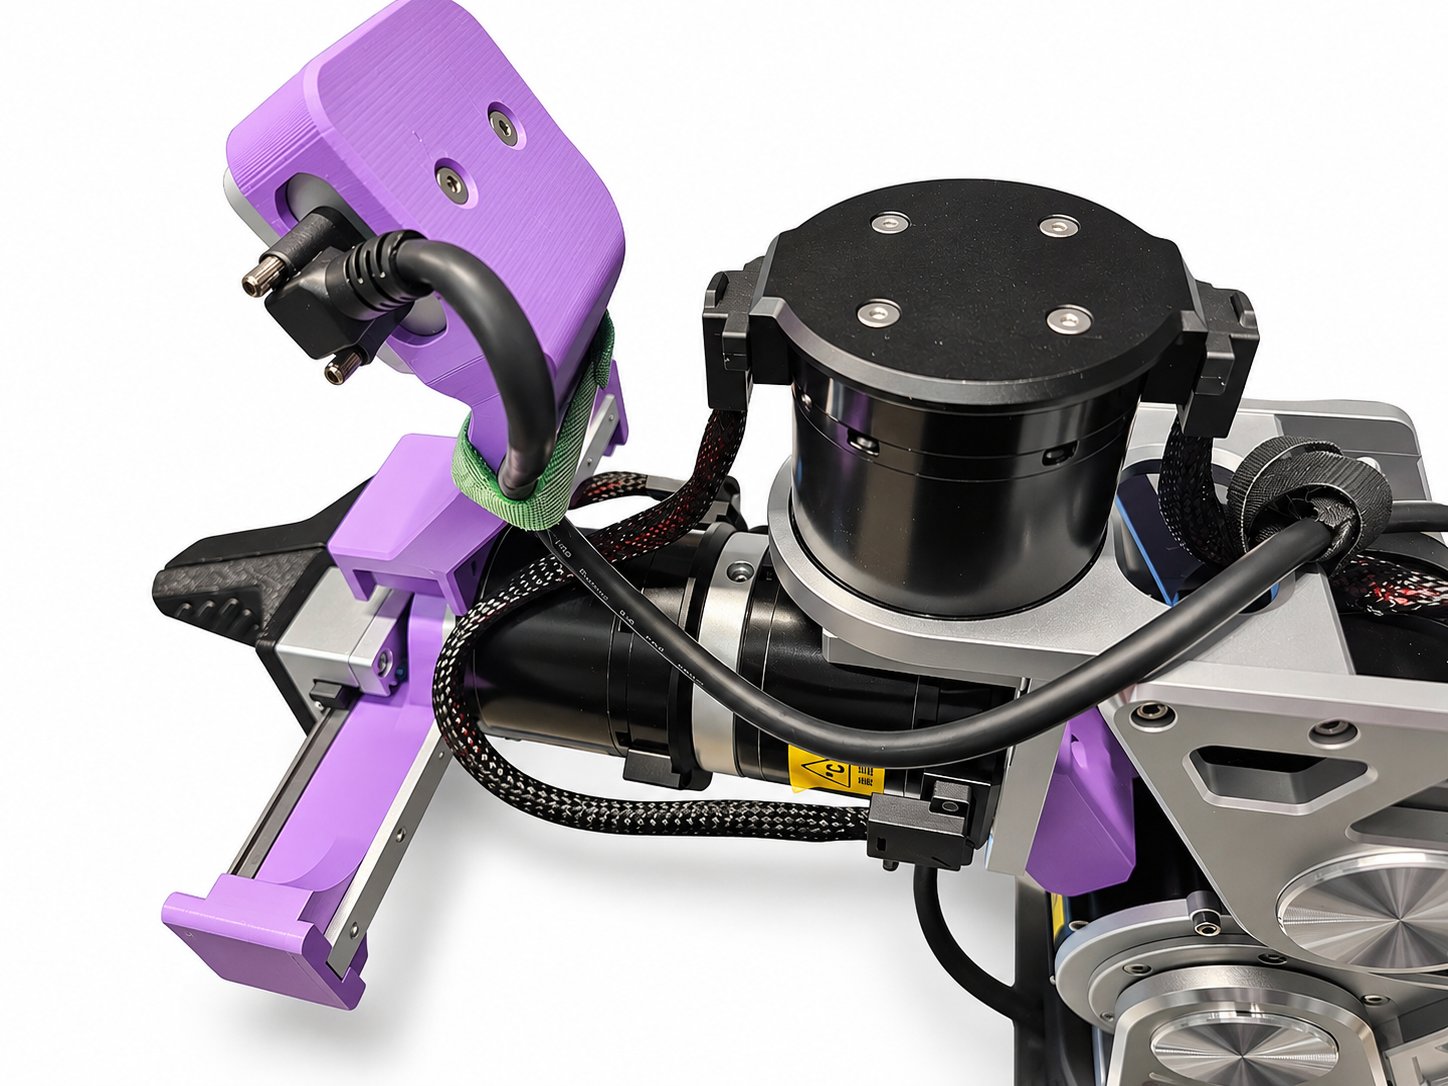
The camera USB cable is strapped to the mount and routed along the forearm. Check clearance and strain relief on your own cell.
6. Use Teleoperation
The Teleoperate Objective jogs the arm and gripper. It switches ownership among trajectory, arm-joint-jog, gripper-joint-jog, and Cartesian-jog controllers. Its mock contract uses /joint_jog/manipulator, /joint_jog/gripper, and /pose_jog/manipulator; the Open Gripper and Close Gripper Objectives use the trajectory controller.
Use the Simulator package first to learn the MoveIt Pro Desktop App and verify controller handoff.
The Star Arm 102 is optional hardware, not a prerequisite for mock, simulation, or standard Objective operation. Its separate workflow uses a manufacturer-specified 12 V supply and a USB serial connection to the host. The Star Arm leader-follower demo covers its own setup: leader calibration and a child robot configuration package.
7. Safety
- The physical robot configuration package includes a thermal guard configured with a 100 °C latch and 75 °C clear threshold. Its source sequence anchors measured pose, restores gains, cancels work, returns HOME, verifies stationary HOME, then turns torque off.
- Do not run other motor-control tools against an enabled arm: a vendor CLI can disable a motor when it exits. Use the MoveIt Pro driver while the arm is active.
- Do not hot-plug motor power or bus wiring. Power off before changing wiring.
Troubleshooting
The Wrist Camera Does Not Start
The physical package starts the camera driver only when it finds USB ID 2bc5:0840 at startup. Check what the camera reports:
lsusb -d 2bc5:
- Nothing listed: check the cable, then restart the physical Runtime. The probe runs once at startup.
2bc5:0841: Orbbec also labels this ID as Gemini 305, but the stock package starts only0840. An0841unit needs a workspace change before it can be the wrist camera.- Startup logs that
orbbec_camerais missing: the deployment image lacks the driver. Installros-jazzy-orbbec-camera, then restart. If you buildorbbec_camerafrom source, use thev2-mainbranch of the OrbbecSDK ROS2 Wrapper; itsmainbranch does not support Gemini 305.
The Camera Is Detected but Cannot Be Opened
Check that /etc/udev/rules.d/99-obsensor-libusb.rules exists, then unplug and replug the camera so udev applies the rule, and restart the physical Runtime.