Meta Quest for Teleop Setup Guide
The Meta Quest is a great tool for ML model data collection. This guide walks you through connecting it to MoveIt Pro and using its controllers to teleoperate your robot.
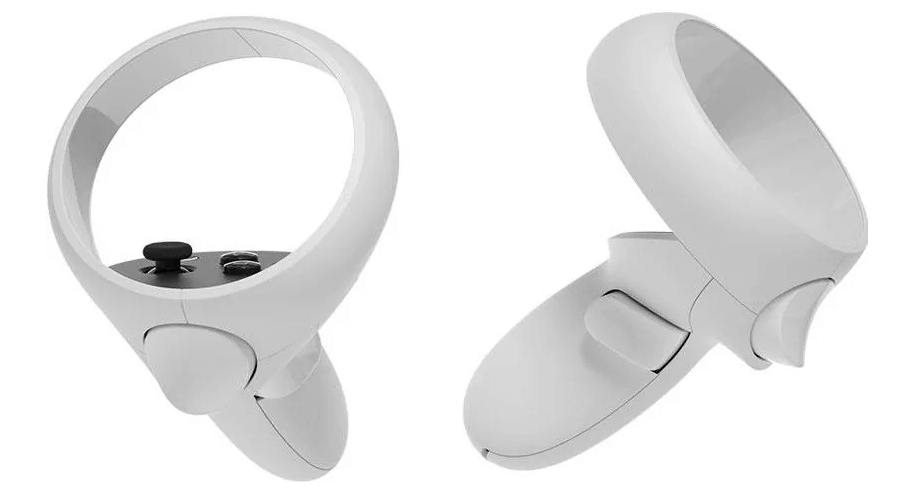
Enable Developer Mode
Before the headset can run the MoveIt Pro teleop application, you must turn on Developer Mode. This is toggled from the Meta Horizon phone app (formerly the Oculus app), not from the headset itself.
- Install the Meta Horizon app on your phone from the Apple App Store or Google Play.
- Open the app and log in with the Meta account you use on the headset. You must be logged in to reach the Developer Mode setting.
- Connect the app to your headset.
- Go to Headset Settings → Developer Mode and turn Developer Mode on.
Enabling Developer Mode requires a Meta developer account. If you do not already have one, the app prompts you to create one and set up a free "organization" before the Developer Mode toggle becomes available.
Connect the Meta Quest for teleop
- Plug the Meta Quest into the computer running MoveIt Pro with a USB cable.
- Put the headset on and accept the Allow USB debugging prompt. Check Always allow from this computer so you do not have to re-authorize on every reconnect.
- In the teleop sidebar, switch to Pose mode and open the Game Controllers panel. Select Quest (alongside Xbox and PlayStation) to reveal the Meta Quest switch and the Quest control mapping, then toggle the switch on. MoveIt Pro searches for the headset and, once it finds an authorized device, the toggle settles on.
The Quest option and its toggle only appear in Pose mode.
Each teleop mode uses a different controller, so the Quest is only active in Pose Jog mode. If you manually switch to Waypoint, IMarker, or Joint Jog mode, you must return to Pose Jog mode and toggle Meta Quest back on to reconnect the headset before you can use it again. A waypoint action mapped to a Quest button is different: MoveIt Pro temporarily switches modes for the move, then returns to Pose Jog and resumes Quest control automatically.
If the headset is connected but you did not accept the USB debugging prompt, the toggle reverts and warns "Meta Quest needs USB-debugging authorization." Accept the prompt on the headset, then toggle Meta Quest again.
To customize the controller buttons, click Configure Buttons in the Game Controllers panel. Each A/B/X/Y button can record or save an episode, stop recording, move to a waypoint, or take no action. The optional mapping is saved with the active robot configuration package.
Recording actions use the dataset and task already selected in the Training sidebar. If no valid dataset is selected, the action opens the Dataset tab; if the task is empty, it opens the Record tab for setup. It never creates a dataset automatically.
Get familiarized with the controller
Understand how the controller pose is reported
The controller pose is reported as an nav_msgs/msg/Odometry message in the /right_controller_odom topic. Its contents can be received in MoveIt Pro using the GetOdom Behavior.
The robot's initial controller pose is set near the VR world origin, adjusted for your height. You can visualize the target position relative to the world frame by selecting the View menu in the 3D visualization pane.
To manipulate this target position using the controller:
- Press and hold the clutch button to "grab" the moving target. The end-effector follows the controller only while the clutch is held.
- Release the clutch to "drop" the target at its current location.
For reliable tracking and intuitive control:
- Keep both controllers within view of the headset's cameras so they stay tracked.
- Stand so your frame of reference matches the robot's — generally facing the same direction it faces. The control frame may not line up automatically for every setup, so if the motion feels unintuitive, open the Quest Oculus pane and adjust the Control frame yaw: click a quadrant preset (−90° / 0° / 90° / 180°) for a quick turn, or drag the slider for fine adjustment, until controller motions map the way you expect.
Troubleshooting
Monitor teleop status in the Quest Oculus pane
Most connection and tracking problems can be diagnosed from the Quest Oculus pane, a read-only status view that subscribes to the teleop node. Open it before you troubleshoot anything else — it tells you exactly which link in the chain (headset, stream, or controllers) is broken.
To open it, open a view pane and, from the view dropdown, select Quest Oculus under the Teleoperation header. The view only appears once Meta Quest is toggled on.
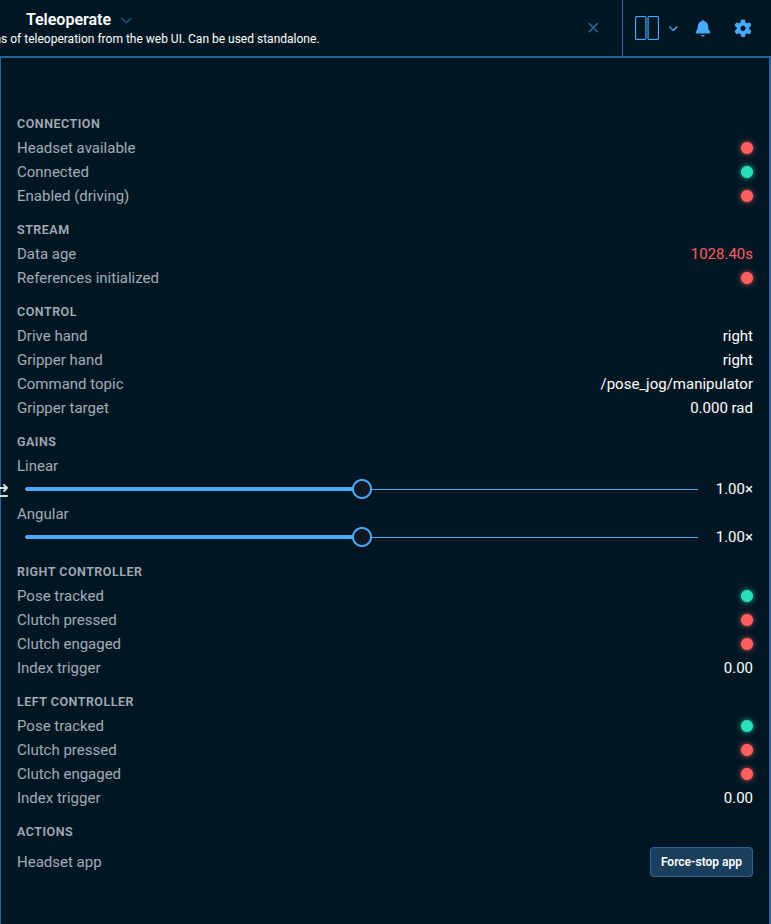
Each status light is green when on and red when off:
- Connection
- Headset available — the computer sees an authorized headset over USB (equivalent to
adb devicesshowingdevice). - Connected — a live pose stream is up.
- Enabled (driving) — the node is actively publishing robot motion.
- Headset available — the computer sees an authorized headset over USB (equivalent to
- Stream
- Data age — seconds since the last controller payload. It turns yellow, then red, as the stream goes stale (over ~1s). A low, green value means the app is running and streaming.
- References initialized — the teleop reference frames are set.
- Right controller / Left controller — per-hand status:
- Pose tracked — the headset is currently tracking that controller. If this is dark, the headset cannot see the controller; shake it or press its buttons in view of the headset cameras.
- Clutch pressed / Clutch engaged — whether the clutch button is held and whether it is driving the robot.
- Index trigger — the analog trigger value (0.00–1.00), useful for confirming gripper input.
- Gains — the Linear and Angular sliders scale Cartesian motion (0.00×–2.00×). Lower them for finer control, raise them for faster motion.
- Control frame — the Base frame row shows the robot link the teleop motion is aligned to. The Yaw slider and the quadrant preset buttons (−90° / 0° / 90° / 180°) rotate the control frame about that link's vertical axis, so you can line up controller directions with where you are standing. Use this if pushing the controller "forward" does not move the end-effector forward.
- Actions — the Force-Stop App button stops the teleop app on the headset so a stale session can be recovered (see Can't reconnect after restarting MoveIt Pro).
The Quest's proximity sensor pauses the teleop app when the headset is off your head, which stops the pose stream — you will see Connected / Enabled (driving) drop and Data age climb. If you need to run teleop with the headset set down (for example, during data collection or debugging), place a small piece of tape over the proximity sensor in the area between the two lenses, inside the headset — so the Quest believes it is being worn and continues streaming.
Confirm the headset is ready
When the teleop app is running and the headset is ready for teleoperation, Meta Quest 3S users should see a blue grid with a solid green background, as shown below. On other Meta Quest headsets, the appearance may differ, but you should still see a 3D teleoperation environment rather than the standard Quest Home screen or the app store.

If you do not see this, try toggling the Meta Quest switch under the Pose Jog menu.
The "Allow USB debugging" prompt never appears
If plugging in the headset does not surface the authorization prompt in the headset:
- In the Meta Horizon app, toggle Developer Mode off and back on (Headset Settings -> Developer Mode).
- Unplug the headset from the computer, then plug it back in.
The prompt should now appear in the headset. Accept it and check Always allow from this computer.
Check whether the computer sees the headset
You can confirm whether the headset is detected and whether it is authorized from inside the MoveIt Pro Desktop App:
-
Open a view pane and, under Terminal (beta), choose Docker Container.
-
Run:
adb devices
An authorized headset is listed as a serial number followed by device. If it shows unauthorized, accept the USB debugging prompt (see above). If nothing is listed, try re-plugging the USB cable.
The Meta Quest toggle won't stay on (or teleop doesn't move the robot)
If adb devices shows the headset as device (authorized) but the Meta Quest switch flips back off, or it stays on but the robot does not follow the controller:
The switch only settles on — and teleop only runs — while the headset is actively streaming controller poses. A paused or unfocused app reports no data, so the switch reverts. Check all of the following, then toggle Meta Quest again:
- Trick the proximity sensor. The Quest pauses the teleop app when it is off your head, which stops the pose stream. You can get around this by taping over the sensor.
- Make the teleop app the active app. You should see the ready screen (the blue grid on a solid green background shown above). If you are on the Meta home menu or the Store, the app is not streaming — open the teleop app so it is in focus.
- Keep both controllers powered on and in view so they stay tracked. The stream is the controller's pose, so an asleep or untracked controller produces no data.
Once the switch settles on, press and hold the clutch button to drive — the end-effector follows the controller only while the clutch is held. Releasing it "drops" the target at its current location.
The app is running but the robot won't drive when you hold the clutch
If the Meta Quest toggle is on and the teleop app is running in the headset (you see the ready screen), but the robot does not move when you press and hold the clutch:
The headset only drives the robot while it is actively tracking the controllers — the robot follows the controller's tracked pose, so a controller the headset has not acquired reports no pose and the clutch has nothing to move. A controller that was just powered on, or held still outside the headset cameras' view, is often not tracked yet. To get them tracked, shake both controllers or press buttons on them while they are in view of the headset cameras. Once both controllers are tracked, you should be able to press and hold the right clutch to drive.
Can't reconnect after restarting MoveIt Pro (app still running in the headset)
If you restart MoveIt Pro while the teleop app is still running in the Quest headset — that is, you still see the teleoperation app in the headset — you will not be able to successfully toggle on the Meta Quest switch to reconnect, because the old app instance is still holding the connection.
To recover, click the Force-Stop App button (under Actions) in the Quest Oculus pane to stop the app on the headset, then toggle the Meta Quest switch on again to relaunch it and reconnect. See Monitor teleop status in the Quest Oculus pane for how to open the pane.
The controls feel rotated or unintuitive (moving your hand goes the "wrong way")
If you are using quest teleoperation with hardware, try standing behind the robot: orient yourself so you are facing the robot's "forward" as shown in the 3D view.
If you are using quest teleoperation in sim or otherwise find the teleoperation unintuitive, try rotating the control frame from the Quest Oculus pane: click a Control frame quadrant preset (−90° / 0° / 90° / 180°), or drag the Yaw slider, until controller motions respond as desired.