Creating Custom View Panes in the MoveIt Pro UI
Custom View Panes allow you to add your own control panels, buttons, or web content as view panes in the MoveIt Pro canvas. You can embed external URLs or local HTML files to display your own custom interfaces alongside the built-in visualization and debugging tools. This is ideal for hardware-specific controls your robot might need, like monitoring actuator faults, temperatures, or other statuses. It can also be used for high-level application data like picks per minute, current job, etc.. This guide will walk you through creating your first custom view pane, from adding it through the UI to creating a simple static HTML page.
Add a Custom View Pane via URL
The simplest way to add a custom view pane is to use an existing URL. You can add any web page or HTML file that's accessible via HTTP.
To add a custom view pane, open the view selector dropdown in any canvas area and click the "Add Custom View Pane" button at the bottom of the menu.
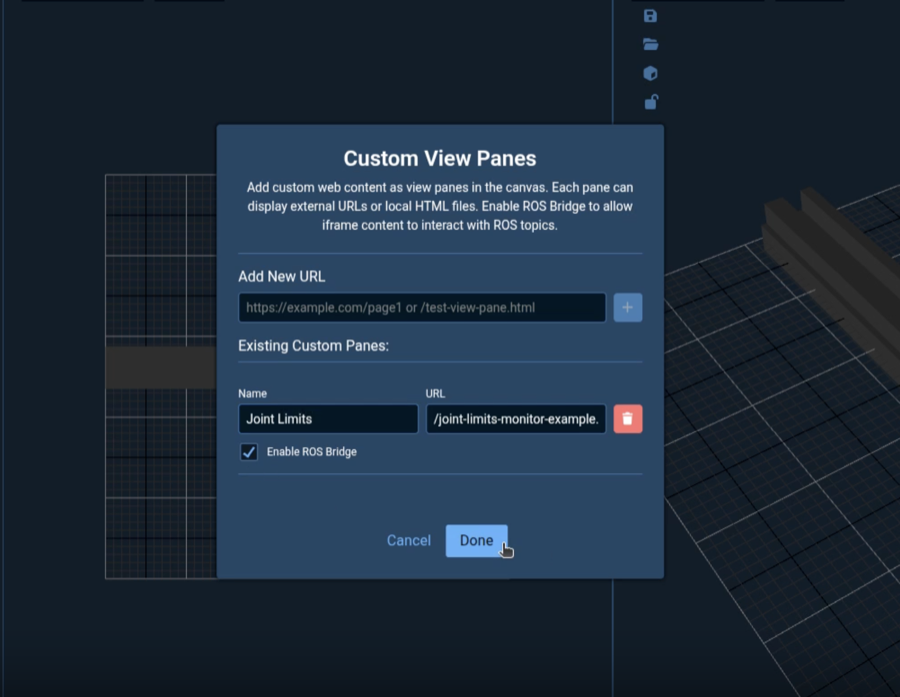
In the modal that appears, you'll see an "Add New URL" input field. To add a new custom view pane:
- Enter URL: In the "Add New URL" input field, enter the full URL to your HTML content (e.g.
http://localhost:8000/page.htmlorhttps://example.com/page.html) - Click the + button: Click the plus (+) button next to the input field to add the pane
- Configure the pane: After clicking the + button, the pane will appear in the "Existing Custom Panes" section where you can:
- Name: Edit the pane name (defaults to "Custom Pane N")
- URL: View or edit the URL
- Enable ROS Bridge: Toggle this option if you want your iframe content to interact with ROS topics (see ROS Bridge Integration for details)
- Save: Click "Done" to save your custom view pane. It will be available in the view selector dropdown and can be added to your canvas layout.
For example, you can add a world clock view pane by using the following URL:
https://www.clocklink.com/html5embed.php?clock=008&timezone=ACST&color=black&size=91&Title=&Message=&Target=&From=2026,1,1,0,0,0
Custom view panes are automatically saved to your browser's storage and will persist across browser sessions. You can manage (add, edit, or remove) custom panes at any time by opening the Custom View Panes modal again.
Built-in Example
MoveIt Pro ships with a built-in example custom view pane that displays live joint states. No extra hosting is required — it is served automatically when MoveIt Pro is running.
To try it out, add a custom view pane with the following URL:
/joint-states-monitor-example.html
Enable ROS Bridge for the pane so it can subscribe to ROS topics (see ROS Bridge Integration for details). Once added, the pane displays a live table of joint positions with slider visualizations and near-limit warnings.
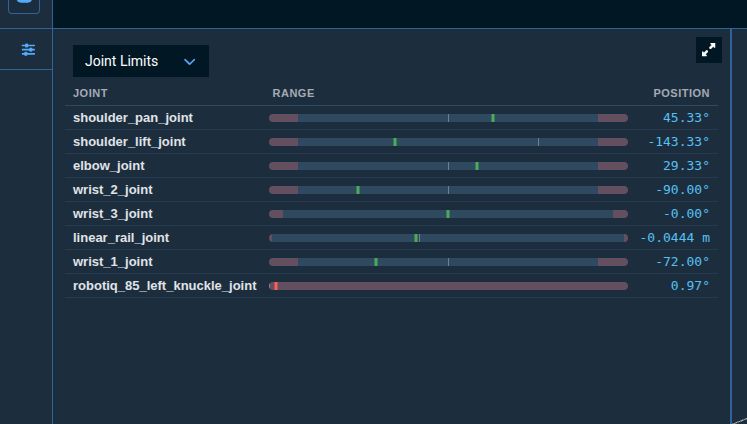
This example demonstrates several patterns useful for building your own panes:
- Subscribing to ROS topics (
/joint_states,/robot_description) using theIframeROSClientSDK - Parsing URDF data to extract joint limits
- Throttling DOM updates with
requestAnimationFrame - Styling to match the MoveIt Pro dark theme
- Using
padding-top: 52pxto avoid content being hidden behind the pane overlay bar
You can view the source at src/web/frontend/public/joint-states-monitor-example.html in the MoveIt Pro repository.
Create Your Own HTML File
If you want to create a custom HTML file for your view pane, you can create a simple static HTML page and serve it over HTTP.
Step 1: Create an HTML file
Create a file called my-custom-pane.html:
<!DOCTYPE html>
<html lang="en">
<head>
    <meta charset="UTF-8">
    <meta name="viewport" content="width=device-width, initial-scale=1.0">
    <title>My Custom Pane</title>
    <style>
        body {
            font-family: Arial, sans-serif;
            padding: 20px;
            background-color: #1a1a1a;
            color: #ffffff;
        }
        h1 {
            color: #4a9eff;
        }
    </style>
</head>
<body>
    <h1>My Custom Hardware Interface</h1>
    <button type="button">Reset Hardware</button>
</body>
</html>
Step 2: Serve the file over HTTP
From the directory containing your HTML file, start a local HTTP server:
python3 -m http.server 8000 --bind 127.0.0.1
Step 3: Add the pane in MoveIt Pro
Follow the steps in Add a Custom View Pane via URL using the full URL:
http://localhost:8000/my-custom-pane.html
URL Requirements
Custom view panes support the following URL formats:
- Absolute URLs:
http://orhttps://URLs pointing to any HTTP server (e.g.https://example.com/dashboard.html) - Root-relative paths: Paths starting with
/that are served by the MoveIt Pro web server (e.g./joint-states-monitor-example.html)
Do not use ./ or ../ relative paths. These resolve against the MoveIt Pro app URL, which will cause the app to load inside its own iframe in an infinite loop. For custom content, use a full absolute URL pointing to an HTTP server. Root-relative paths (starting with /) only work for files hosted by the MoveIt Pro web server itself.
Security Considerations
Custom view panes run in sandboxed iframes with the following security features:
- Sandbox Permissions: Iframes are created with
allow-scripts,allow-same-origin,allow-forms, andallow-popupspermissions - URL Validation: Absolute URLs must use
http://orhttps://protocols. Root-relative paths (starting with/) are also accepted for content served by the MoveIt Pro web server
When creating custom view panes:
- Only load content from trusted sources
- Validate and sanitize any user input in your HTML/JavaScript
- Use HTTPS when possible for external resources
Next Steps
Now that you've created your first custom view pane, you can:
- Add more complex HTML content with CSS styling
- Include JavaScript for interactive features
- Enable ROS Bridge integration to interact with ROS topics (see ROS Bridge Integration)