hardware Values
Hardware Configuration
If you are following this guide with example_robot_ws, your workspace should look like branch step2.
We are now editing example_robot_mock config.yaml.
hardware
Type: object (required)
Description: Defines robot description, hardware drivers, and simulation settings.
hardware.robot_description
Type: object (required)
Description: Defines the robot's URDF and SRDF files, plus optional parameters.
hardware.robot_description.urdf
Type: object (required)
Description: Location of the robot's URDF or XACRO file.
hardware:
  robot_description:
    urdf:
      package: "example_robot_mock"
      path: "urdf/r6_2f_proto1.urdf.xacro"
- package (
string, required): ROS package containing the URDF/XACRO file - path (
string, required): Relative path within the package
For the urdf key, either a XACRO or URDF file can be used.
If a XACRO file is used, the corresponding URDF file is generated with each launch.
Optional XACRO arguments can be provided below using the urdf_params key explained below.
Make your example_robot_mock/urdf/r6_2f_proto1.urdf.xacro
cd ~/example_robot_ws
git submodule add git@github.com:PickNikRobotics/ros2_robotiq_gripper.git src/external_dependencies/ros2_robotiq_description
<?xml version="1.0" ?>
<robot name="r6_2f_proto1" xmlns:xacro="http://wiki.ros.org/xacro">

  <xacro:arg name="hardware_interface" default="mock"/>

  <!-- R6bot Arm -->
  <xacro:include filename="$(find example_arm_description)/urdf/r6bot_urdf_macro.xacro"/>
  <xacro:r6bot_description
  />
  <!-- Mock arm hardware -->
  <xacro:if value="${'$(arg hardware_interface)' == 'mock'}">
    <xacro:include filename="$(find example_arm_hardware_interface)/urdf/r6bot_mock_ros2_control_macro.xacro"/>
    <xacro:r6bot_control />
  </xacro:if>

  <!-- Base -->
  <link name="world"/>
  <joint name="base_joint" type="fixed">
    <parent link="world"/>
    <child link="base_link"/>
  </joint>

  <!-- 2F Gripper -->
  <xacro:include filename="$(find robotiq_description)/urdf/robotiq_2f_85_macro.urdf.xacro"/>
  <xacro:robotiq_gripper name="r6_2f_proto1" prefix="" parent="tool0" include_ros2_control="false">
      <origin xyz="0 0 0" rpy="0 0 0" />
  </xacro:robotiq_gripper>
  <!-- Mock gripper hardware -->
  <xacro:if value="${'$(arg hardware_interface)' == 'mock'}">
    <xacro:include filename="$(find robotiq_description)/urdf/2f_85.ros2_control.xacro"/>
    <xacro:robotiq_gripper_ros2_control name="r6_2f_proto1" prefix="" use_fake_hardware="true"/>
  </xacro:if>

</robot>
hardware.robot_description.urdf_params
Type: array (optional)
Description: Xacro arguments passed to your specified urdf for use with Xacro generation. Each array element is a dictionary with argument name-value pairs.
hardware:
  robot_description:
    urdf_params:
      - hardware_interface: "mock"
Here we provide launch arguments that will be passed to our Xacro file.
hardware.robot_description.srdf
Type: object (required)
Description: Location of the robot's Semantic Robot Description Format (SRDF) file.
hardware:
  robot_description:
    srdf:
      package: "example_robot_mock"
      path: "config/moveit/r6_2f_proto1.srdf"
- package (
string, required): ROS package containing the SRDF file - path (
string, required): Relative path within the package
MoveIt Pro provides an easy method to generate the initial content for a SRDF from a URDF.
Generate the SRDF Allowed Collision Matrix (ACM)
moveit_pro dev
xacro src/example_robot_mock/urdf/r6_2f_proto1.urdf.xacro hardware_interface:=mock > robot_description.urdf
update_acm robot_description.urdf --output src/example_robot_mock/config/moveit/r6_2f_proto1.srdf
Teleoperation Requirements
- Your SRDF defines a "manipulator" joint group with all your arm joints, a "gripper" joint group with all your gripper joints, and an
end_effectortag linking them together. - For the
end_effectortag, thegroupshould be set to your "gripper" joint group andparent_linkshould be set a link the "manipulator" group (it does not matter which). - For the "manipulator" joint group, it should have a single tip link, which adheres to the following frame convention:
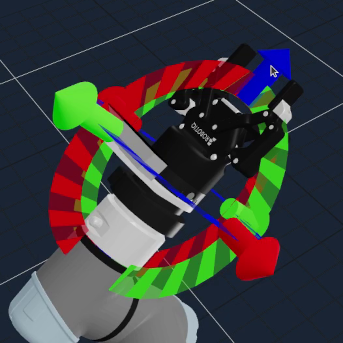
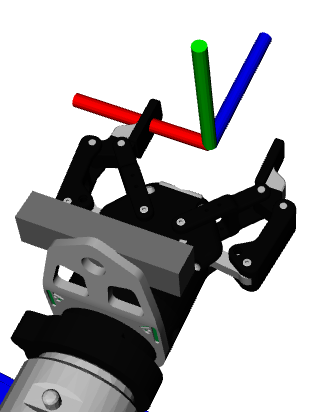
- Positive Z points out of the gripper.
- Positive Y points up towards the top of the gripper (where the wrist camera is, if present).
- Positive X points to the robots left and is parallel to the direction the fingers move.
For IMarker teleoperation:
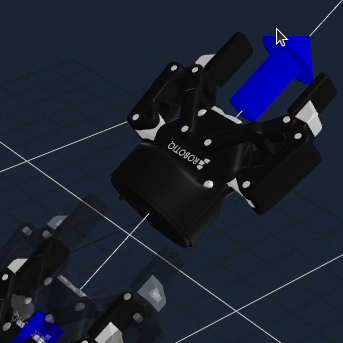
- The "IMarker frame" will spawn at the parent link of the "root" joint in the "gripper" joint group.
- The "IMarker ghost" will visualize the set of links in the "gripper" joint group.
For Pose Jog teleoperation:
- Pose jogging will be done relative to the tip frame of your manipulator joint group.
It is important to read the SRDF specification to understand how links are added to a group depending on if <link>, <joint>, <chain>, and/or <group> elements are used.
Incorrect specification can result in the IMarker frame appearing one link higher than you expect.
You can inspect the computed base and tip frames for the groups you create using ros2 service call /get_planning_groups moveit_studio_agent_msgs/srv/GetPlanningGroups.
If the joint group for your arm is not named "manipulator" you will need to duplicate the Teleoperate Objective and provide your joint group's name in the default_planning_group port exposed by Request Teleoperation.
Add the grasp_link to r6_2f_proto1.urdf.xacro
<?xml version="1.0" ?>
<robot name="r6_2f_proto1" xmlns:xacro="http://wiki.ros.org/xacro">
  ...
  <!-- Teleop grasp_link -->
  <link name="grasp_link"/>
  <joint name="grasp_link_joint" type="fixed">
    <parent link="tool0"/>
    <child link="grasp_link"/>
  </joint>
Add the manipulator and gripper planning groups and end_effector to r6_2f_proto1.srdf
<?xml version="1.0" ?>
<robot name="r6_2f_proto1">
    ...
    <!--GROUPS: Representation of a set of joints and links. This can be useful for specifying DOF to plan for, defining arms, end effectors, etc-->
    <!--LINKS: When a link is specified, the parent joint of that link (if it exists) is automatically included-->
    <!--JOINTS: When a joint is specified, the child link of that joint (which will always exist) is automatically included-->
    <!--CHAINS: When a chain is specified, all the links along the chain (including endpoints) are included in the group. Additionally, all the joints that are parents to included links are also included. This means that joints along the chain and the parent joint of the base link are included in the group-->
    <!--SUBGROUPS: Groups can also be formed by referencing to already defined group names-->
    <group name="manipulator">
        <chain base_link="base_link" tip_link="grasp_link"/>
    </group>
    <group name="gripper">
        <joint name="robotiq_85_left_finger_tip_joint"/>
        <joint name="robotiq_85_left_finger_joint"/>
        <joint name="robotiq_85_left_inner_knuckle_joint"/>
        <joint name="robotiq_85_left_knuckle_joint"/>
        <joint name="robotiq_85_right_finger_tip_joint"/>
        <joint name="robotiq_85_right_finger_joint"/>
        <joint name="robotiq_85_right_inner_knuckle_joint"/>
        <joint name="robotiq_85_right_knuckle_joint"/>
        <link name="grasp_link"/>
    </group>
    <!--END EFFECTOR: Purpose: Represent information about an end effector.-->
    <end_effector name="eef" parent_link="grasp_link" group="gripper"/>
Multi-arm, Mobile Manipulator, and Multi-tip Tool Teleoperation Considerations
You will need additional groups if you have a linear rail, multiple arms, or a mobile base and want to selectively use parts of the robot, such as only the rail, only the left arm, or only the base.
For a linear rail+arm configuration example, look at lab_sim. For a multi-arm configuration example, look at multi_arm_sim. For a mobile manipulator configuration example, look at hangar_sim.
hardware.launch_control_node
Type: boolean (optional, default: true)
Description: Whether to launch the ros2_control node. Set this to false if a non-MoveIt Pro process manages ros2_control.
hardware:
  launch_control_node: true
hardware.launch_robot_state_publisher
Type: boolean (optional, default: true)
Description: Whether to launch the robot state publisher node.
hardware:
  launch_robot_state_publisher: true
hardware.simulated
Type: boolean (optional, default: false)
Description: Whether the system is running in simulation mode. Affects which launch files are used.
hardware:
  simulated: false
hardware.robot_driver_persist_launch_file
Type: object (optional, default: blank.launch.py spins up no new processes)
Description: Launch files for non-simulated configs that should launch with the MoveIt Pro Drivers.
hardware:
  robot_driver_persist_launch_file:
    package: "example_robot_hw"
    path: "launch/additional_driver_nodes.launch.py"
In our example physical hardware configuration, we imagine what this driver launch file might look like.
hardware.simulated_hardware_launch_file
Type: object (optional, default: blank.launch.py spins up no new processes)
Description: Launch files for simulated configs that should launch with the MoveIt Pro Agent.
hardware:
  simulated_hardware_launch_file:
    package: "another_robot_sim"
    path: "launch/additional_agent_nodes.launch.py"
hardware.simulated_robot_driver_persist_launch_file
Type: object (optional, default: blank.launch.py spins up no new processes)
Description: Launch files for simulated configs that should launch with the MoveIt Pro Drivers.
hardware:
  simulated_robot_driver_persist_launch_file:
    package: "another_robot_sim"
    path: "launch/additional_driver_nodes.launch.py"
Your example_robot_ws workspace should now look like branch step3.