Tutorial 3 - Perception & Machine Learning
🕒 Duration: 1-2 hours
💪 Level: Intermediate
Tutorial Overview
This tutorial dives into the advanced perception and machine learning capabilities of MoveIt Pro. You'll learn how to use computer vision tools like AprilTags, point cloud registration, and ML-based segmentation to enable your robot to perceive its environment. You'll also explore how to structure complex task plans using Behavior Trees. Whether you're picking medicine bottles, registering CAD parts, or debugging planning failures, this tutorial will guide you through practical workflows and best practices.
Pre-reqs
You should have already installed MoveIt Pro. We will assume you have already completed Tutorial 1 and have basic familiarity with the software.
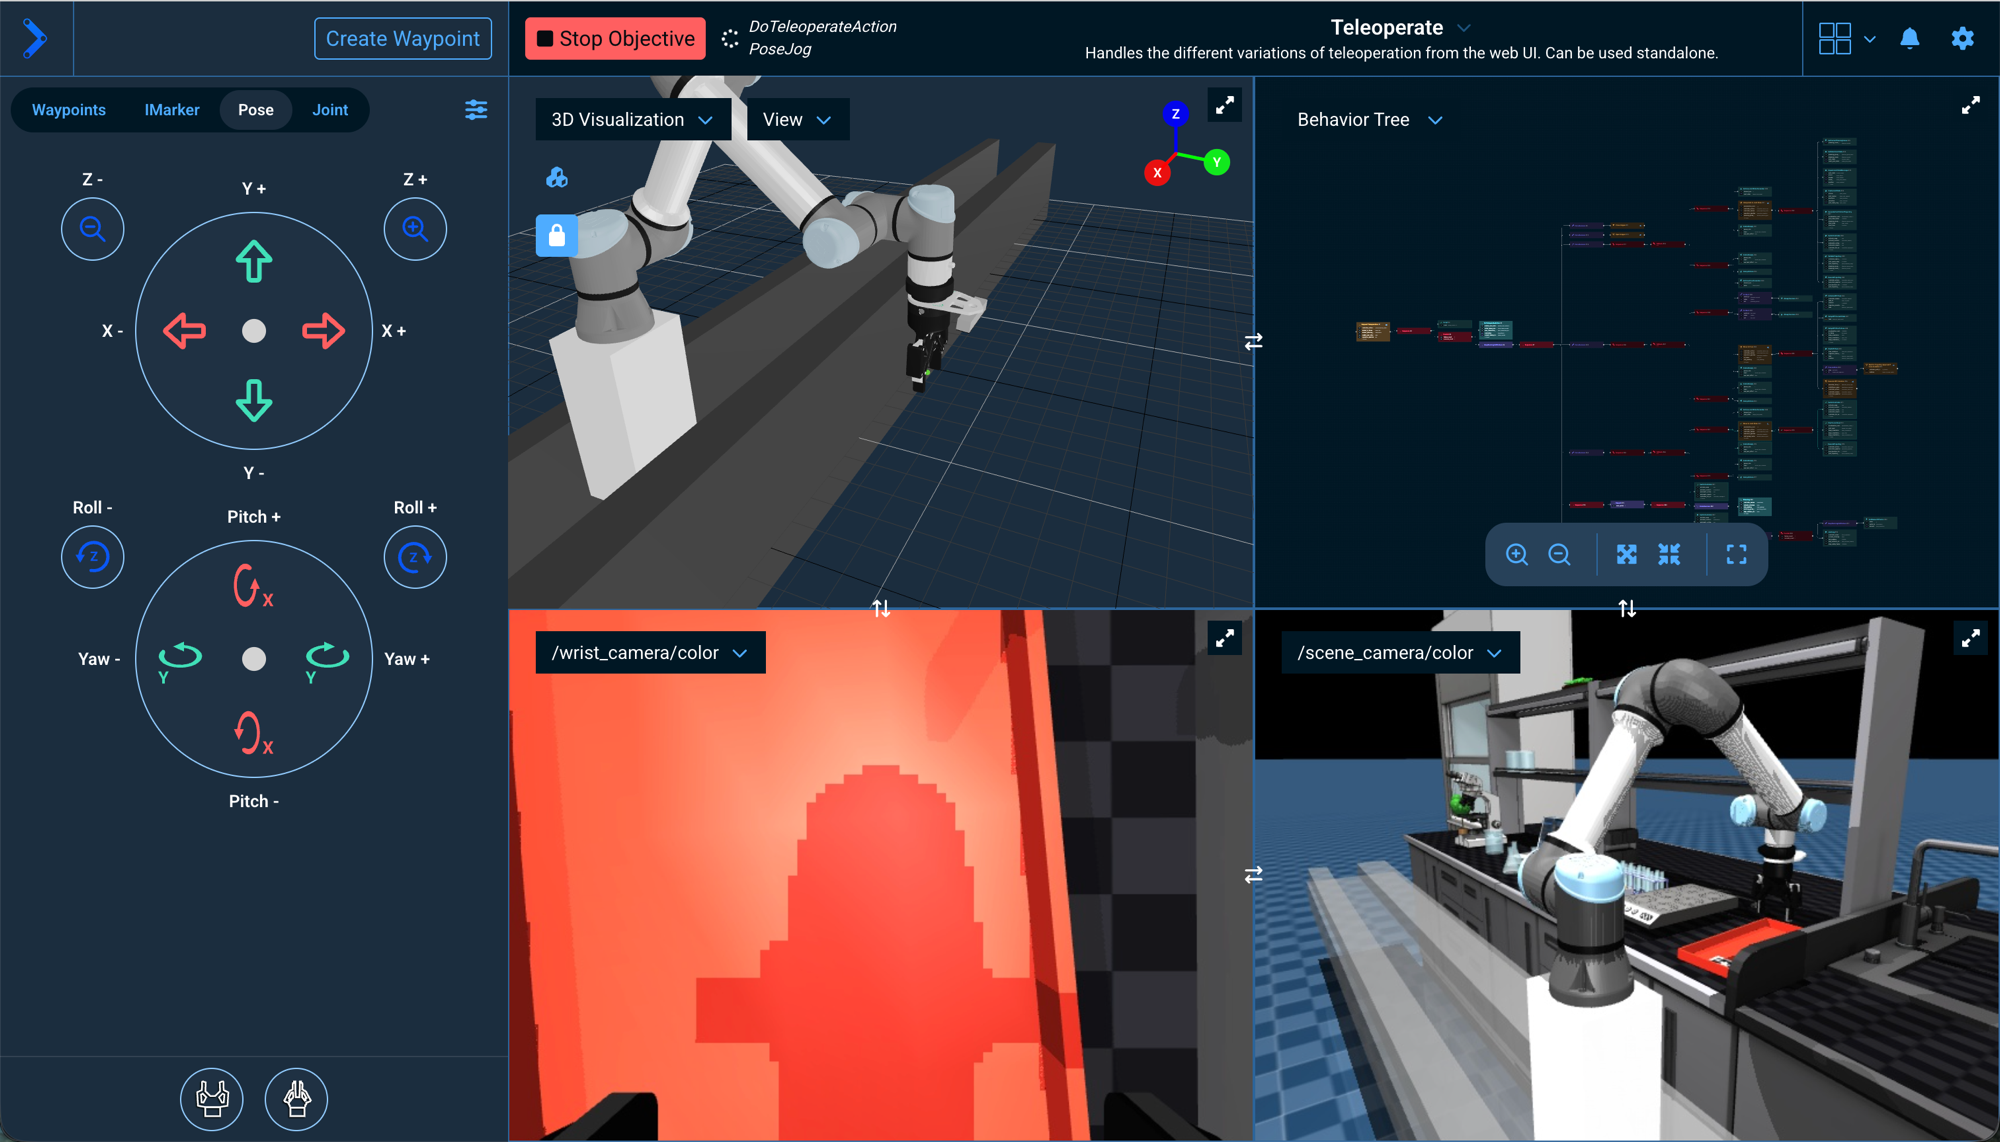
Start MoveIt Pro
Launch the application using:
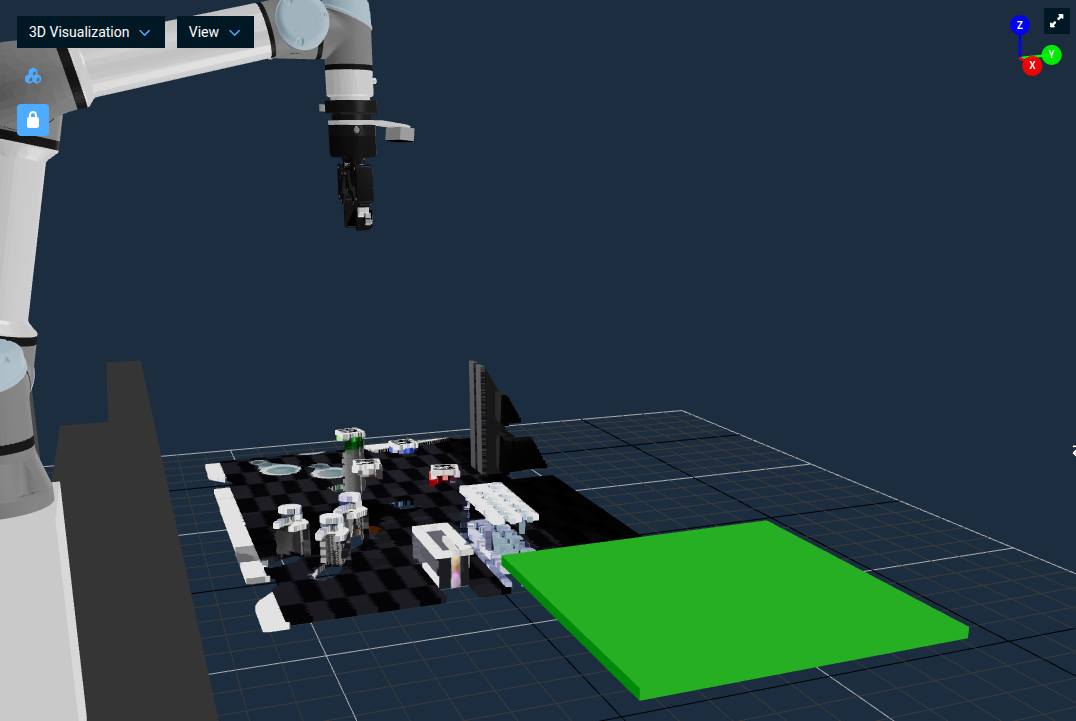
moveit_pro run -c lab_sim
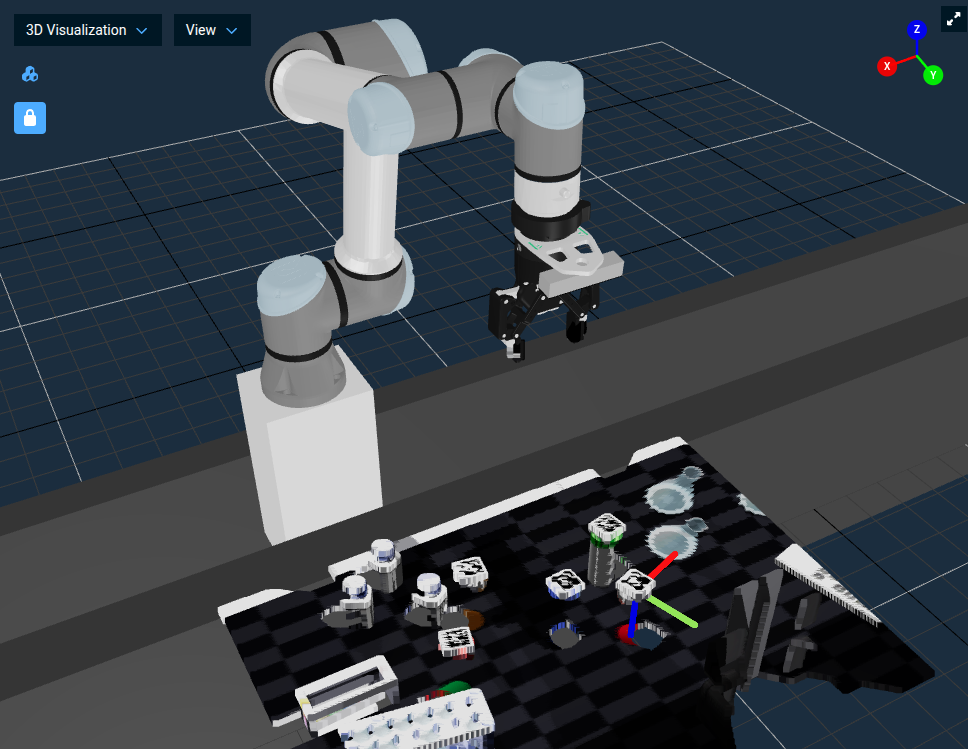
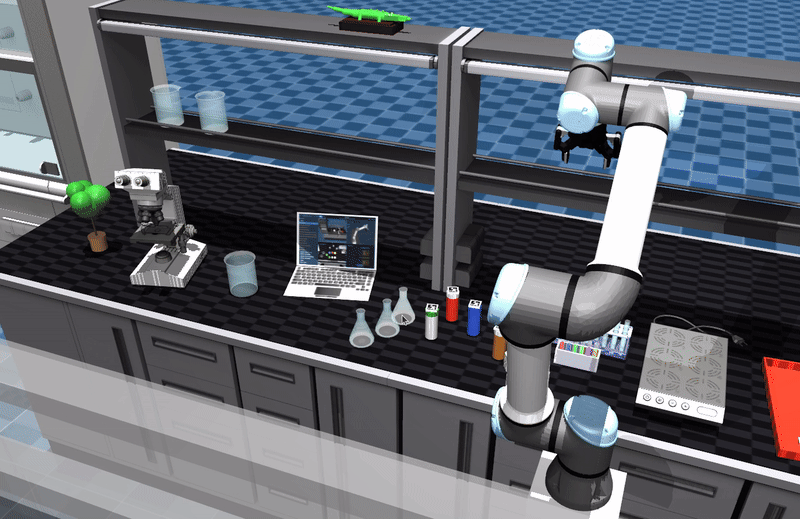
The lab_sim robot configuration package contains a table with several medicine bottles, each with an AprilTag on its cap, plus a placement tray. You'll use these bottles throughout the tutorial.
Perception Approaches In MoveIt Pro
In highly structured environments you might be able to program your robot arm to do things like basic pick and place without any perception. However, for most robotics applications today having cameras and computer vision is crucial.
In our world view of robotics there are roughly 4 main categories of perception:
- Fiducial Marker Detection (e.g. AprilTags - fiducial markers)
- Classic computer vision (e.g. OpenCV — Open Source Computer Vision Library)
- Point Cloud Registration (e.g. ICP — Iterative Closest Point)
- Machine Learning (e.g. SAM3 — Segment Anything Model 3)
MoveIt Pro no longer ships with examples of classic computer vision, due to the rapidly evolving AI landscape. However we do ship with many examples of the other three approaches to perception. We will introduce each individually and then put it all together in an Objective that fuses ICP with ML to pick up bottles in a loop.
Fiducial Marker Detection with AprilTags
In this exercise we will build a new Objective that uses AprilTags to detect a medicine bottle by the tag on its cap and pick it up.
AprilTags are a type of fiducial marker system commonly used in robotics and computer vision. They consist of black-and-white square patterns that can be easily detected and uniquely identified by a camera. In robotics, AprilTags are often used for precise localization and pose estimation of objects in the environment. AprilTags are particularly useful in applications requiring low-cost, reliable visual tracking without the need for complex sensors.
Initialize the Robot and Scene
First, create a new Objective. If you're unsure how to do this, please refer to the Tutorial 1.
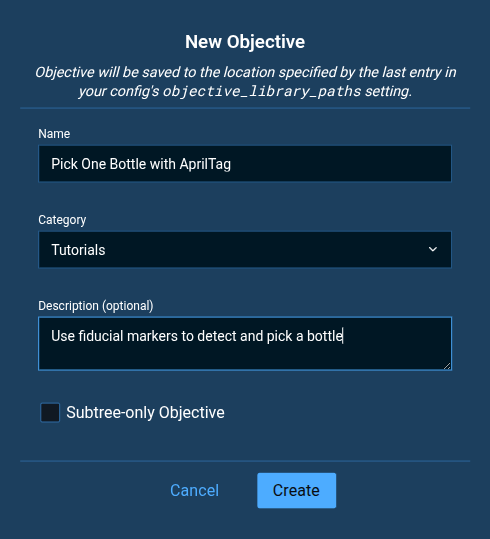
- Name the Objective
Pick One Bottle with AprilTag. - Choose or create the category
Tutorials. - Set the Description to
Use fiducial markers to detect and grasp a bottle.
Once created, remember to delete the AlwaysSuccess Behavior from your new empty Objective.
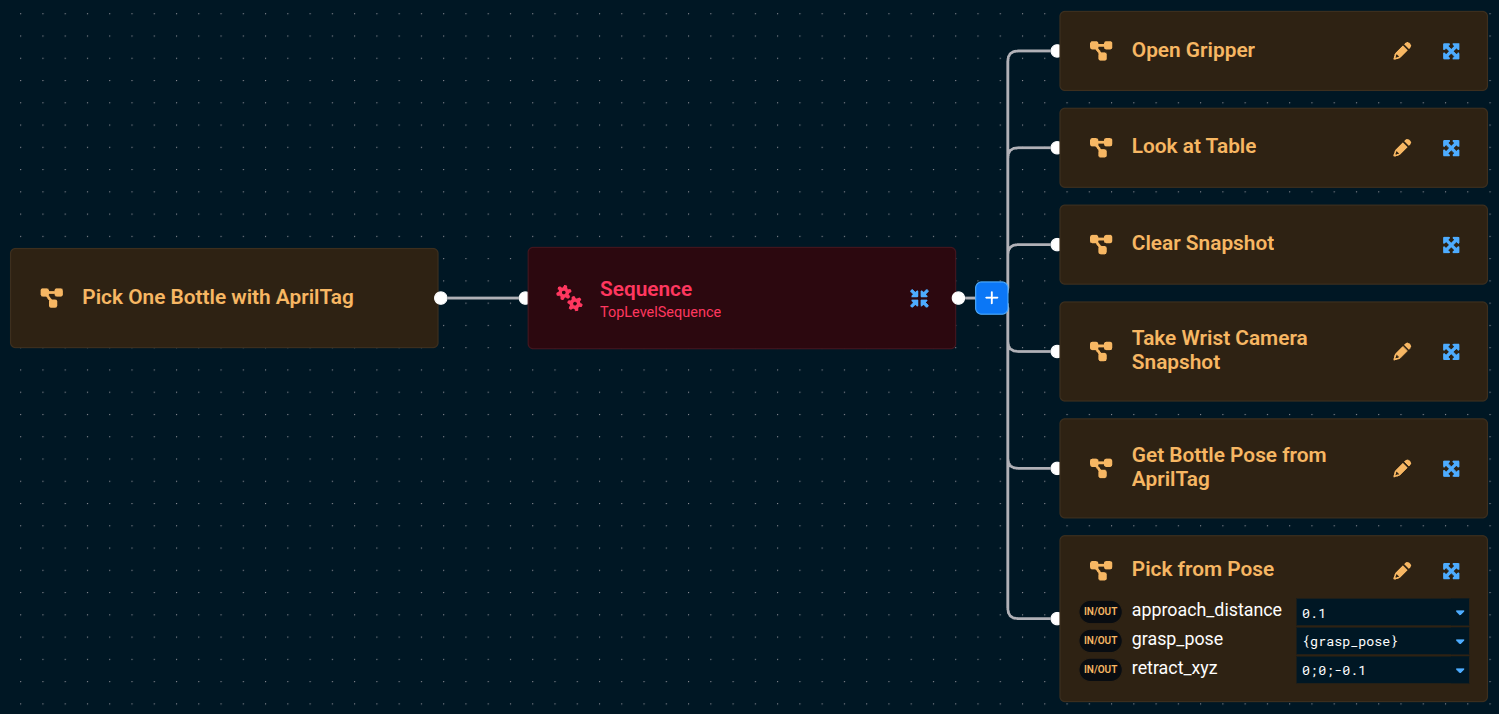
To make this tutorial quick and easy, we will use a lot of pre-built Subtrees that ship with MoveIt Pro. Add the following four Subtrees to the default Sequence using the blue + button:
Open GripperLook at TableClear SnapshotTake Wrist Camera Snapshot
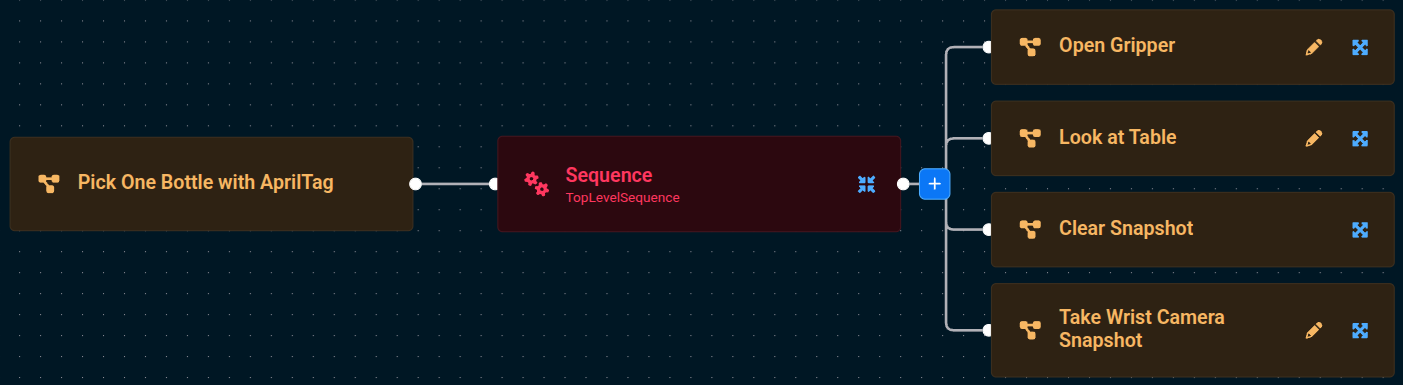
When finished, Run the Pick One Bottle with AprilTag Objective. You should see the robot open its gripper, move to a pose looking down at the table, clear out any previous depth sensor readings, then take a fresh depth sensor reading using its wrist camera (not the scene camera).
Get Object Pose from AprilTag
The next step for us in the Pick One Bottle with AprilTag Objective is to detect the pose of a bottle by reading the AprilTag on its cap.
- Edit the
Pick One Bottle with AprilTagObjective that you began above. - Add a
Sequencenode to help us organize our Behavior Tree as it grows.
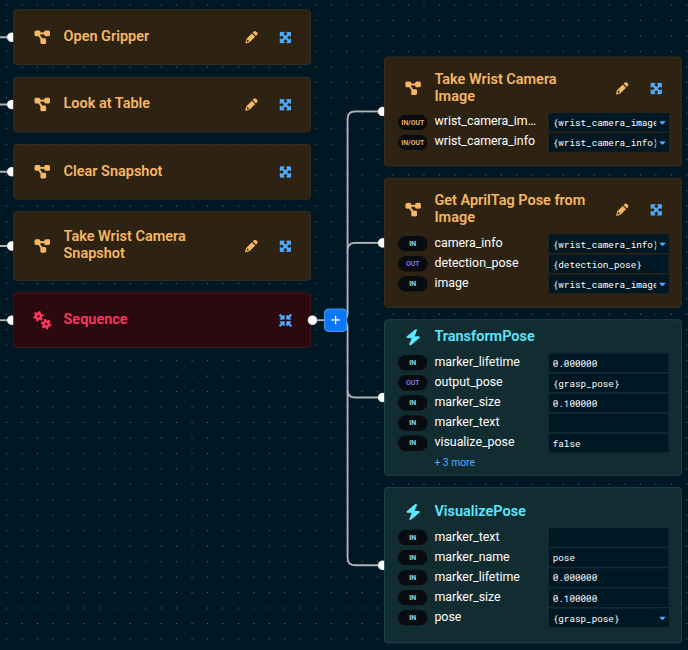
Add the following four Subtrees/Behaviors to the newly added Sequence, tweaking the parameters to some of the Behaviors as described below:
-
Take Wrist Camera Image -
Get AprilTag Pose from Image-
Set the
camera_infoto{wrist_camera_info}. -
Set the
imageto{wrist_camera_image}Using Parameter Dropdown SelectorsUse the dropdown selectors in the Behavior input ports to make building your Behavior Tree faster.
-
-
TransformPoseto align the detection pose with the end effector grasp frame.-
Set the
input_poseto{detection_pose}. -
Set the
output_poseto{grasp_pose}. -
Set the
quaternion_xyzwto1;0;0;0to rotate the pose 180 degrees about the X axis so the gripper approaches the cap from above.Orientation ConverterYou can instead use the Orientation Converter if you are not as comfortable with Quaternions. Click the Edit icon next to the
quaternion_xyzwparameter input and set theRollto180.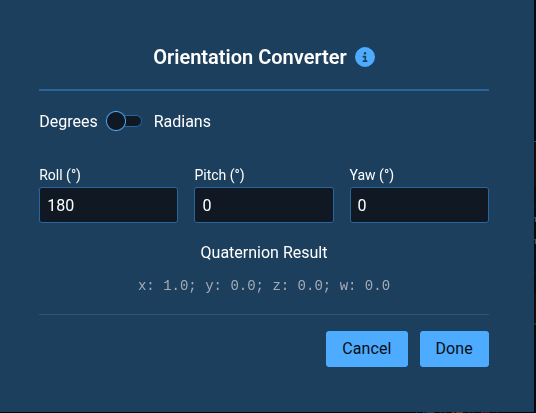
-
-
VisualizePose- Set the
poseto{grasp_pose}
- Set the
TransformPose has a built-in visualize_pose port you can set to true to publish a coordinate-frame marker for the output pose directly in the 3D view. This lets you skip the separate VisualizePose Behavior when debugging transforms. You can also set marker_text, marker_size, and marker_lifetime to customize the marker.
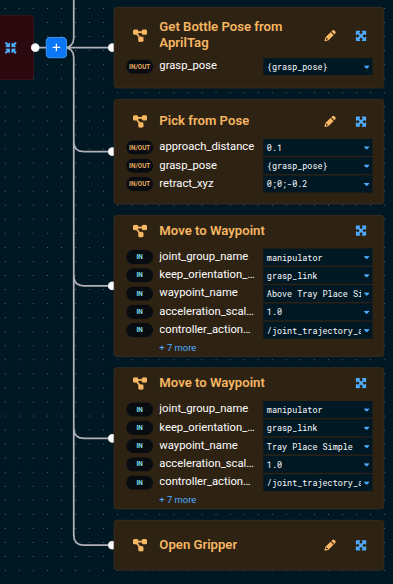
Your tree should look similar to this now (zoomed in):
If you want to know more about how each Behavior works, you can see the built-in descriptions in two locations. Either:
- When you hover over a Behavior in the left sidebar
- When you click on a Behavior and the parameter sidebar opens on the right. The right sidebar is also useful in that it shows you all the input and output ports, along with their port descriptions.
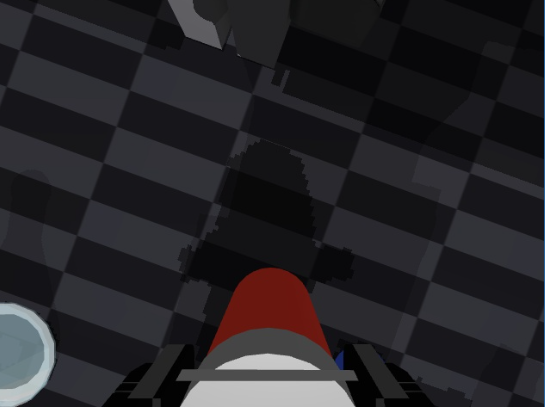
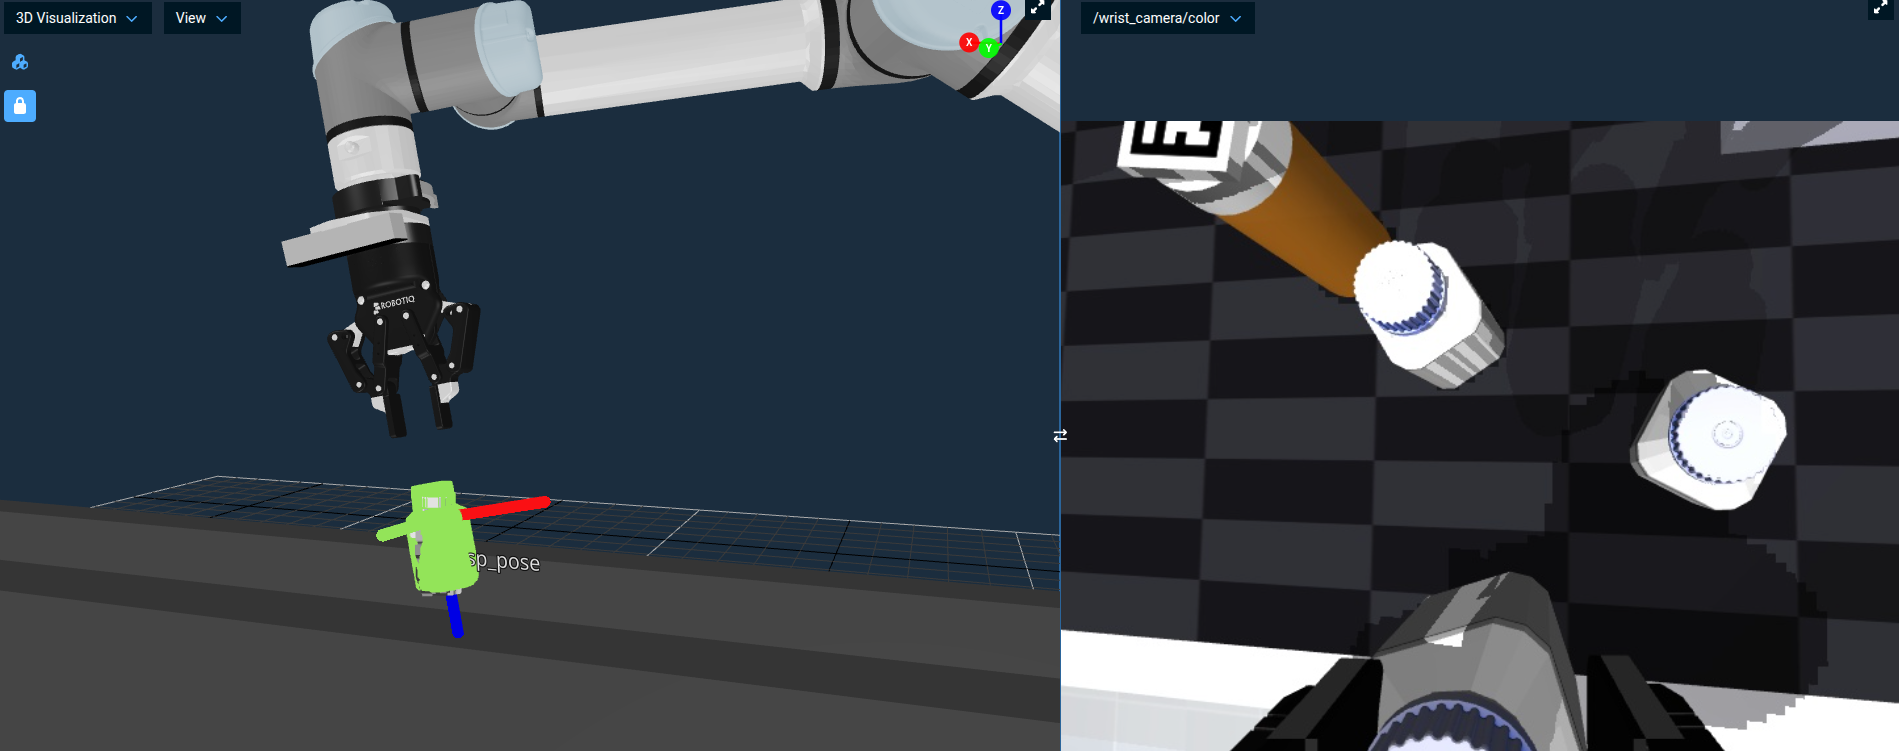
Now Run your Pick One Bottle with AprilTag Objective, and you should see a 3-axis colored pose marker appear on the cap of the detected bottle:
Your simple AprilTag perception approach is in-place, great job so far!
Pick from Fiducial Marker Detection
Next, to pick the bottle we detected with the Fiducial Marker Detection:
- Press the Edit button in your
Pick One Bottle with AprilTagObjective to begin editing again. - Add the
Pick from PoseSubtree to the bottom of the rootSequence(not the childSequence). - Run the Objective again
You can't really see if the grasp was successful in the 3D Visualization pane since we are not leveraging attached collision objects to add grasp information to the planning scene in this example, but if you look at the /wrist_camera/color view pane you should see that the bottle is between the robot's two fingers:
Yes — the defaults are tuned for performance on machines without a lot of available CPU. See Adjusting the Simulated Camera Resolution to bump it up.
Create a Subtree
At this point our Behavior Tree is becoming more complex, so let's convert the previous Sequence into a Subtree.
As your application gets more complex, we recommend you use sequences and Subtrees to manage the complexity with nicely labeled abstractions.
Subtrees were introduced in Tutorial 1. For a refresher, see the About Subtrees section.
Edit the Objective, then:
-
Click on the child
Sequence(not the parentSequence) -
Click on the
Create Subtreeicon that appears on top of the node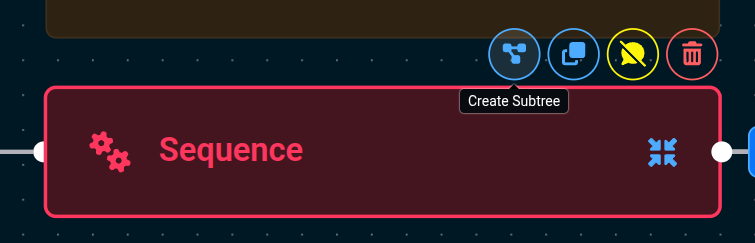
-
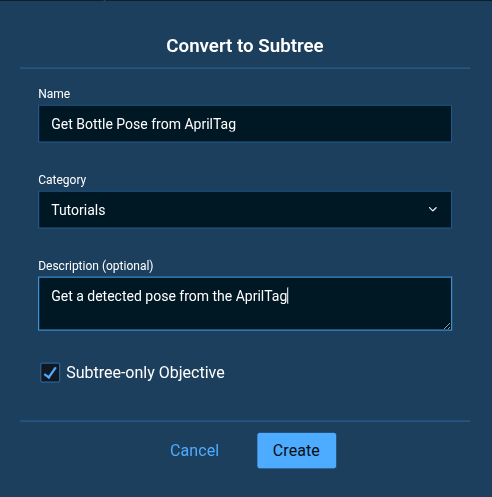
Name the Subtree
Get Bottle Pose from AprilTag -
Set the category again to
Tutorials -
Set the description to
Get a detected pose from the AprilTag -
Keep the Subtree-only Objective checkbox checked
-
Click Create
The Subtree-only Objective checkbox means that this Objective can only be run as a Subtree within another Objective, not as a stand-alone Objective.
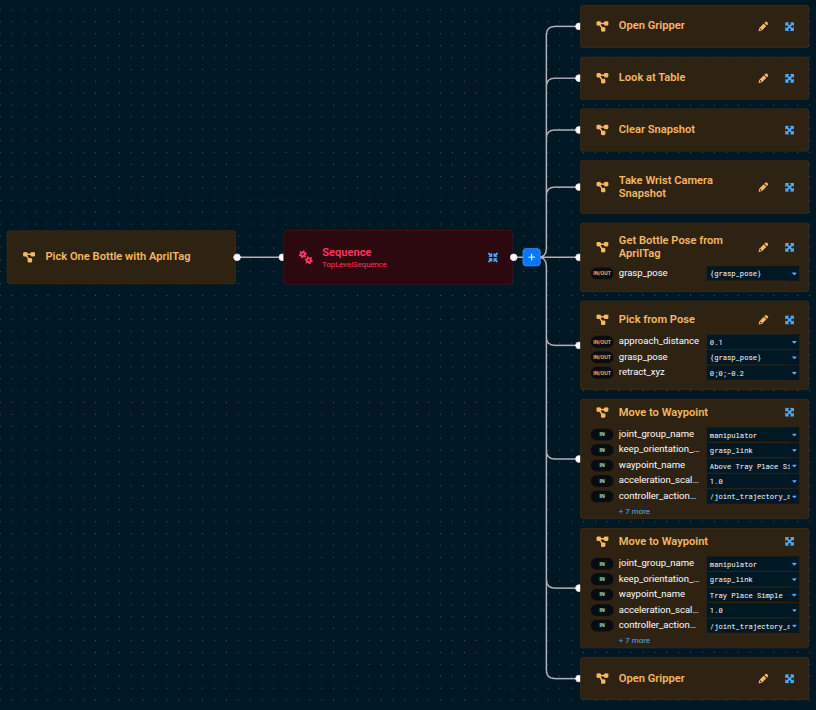
After converting to a Subtree, the Pick One Bottle with AprilTag Objective should look like:
Run the Objective to see if it works. Did we miss anything?
You should see an error message that looks like this:
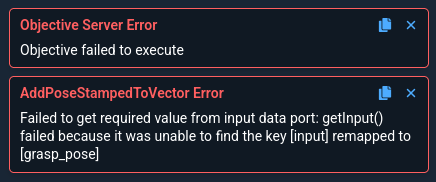
This is expected because we forgot to setup port remapping for our new Subtree. A great segue to our next lession.
Port Remapping
Port remapping in Behavior Trees allows you to reuse generic nodes by dynamically assigning their input/output ports to different blackboard entries, depending on the context in which they're used. This makes Behavior Trees more flexible and modular, enabling the same node or Subtree to be used in different contexts across various parts of the tree without changing its internal logic.
-
Go into edit mode of the
Get Bottle Pose from AprilTagSubtree- We recommend you do this by first editing the
Pick One Bottle with AprilTagObjective then clicking the pencil icon on theGet Bottle Pose from AprilTagSubtree. However you can also search for the Subtree directly in the left Objectives sidebar, you just won't be able to switch between the parent and child Behavior Tree as easily.
- We recommend you do this by first editing the
-
Choose the root node (also called
Get Bottle Pose from AprilTag). -
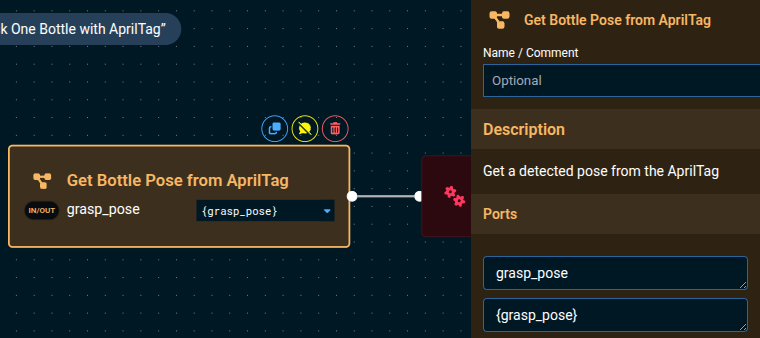
In the popup sidebar, click the + button to add an in/out port, to allow the sharing of the AprilTag pose that was detected.
-
Set the
Nameof the port tograsp_pose -
Set the
Default Valueof the port to{grasp_pose} -
Optionally, set the Type to
geometry_msgs::msg::PoseStamped.Why set the Type?Setting the Type makes
{grasp_pose}show up in othergeometry_msgs::PoseStampedinput port dropdown menus, which is more user friendly. To get the correct type string, click into a Behavior in the Editor that outputs{grasp_pose}and click the blue copy button next to the port type above the port value. -
Optionally add a description, e.g.
Target pose of the graspable object.
It should look something like this:
Click out of the sidebar, somewhere in the Behavior Tree editor area, to close the sidebar.
The Port Name is the blackboard variable name that will be passed to and from the inner contents of this Subtree.
For example, here we set it to grasp_pose (no brackets) so that it outputs the blackboard variable {grasp_pose} from its interior TransformPose Behavior.
The Default Value is the text that will initially populate this port's value whenever the Subtree is added to an Objective.
You can always change this default after adding the Subtree.
For example, the port's value does not need to match the port name, and can be changed in the parent Objective.
The following screenshot demonstrates that the port value and port name can be different, and this is still valid.

As long as the port name matches the desired blackboard variable name created by a Behavior within the Subtree, the output variable will be mapped correctly.
Now go back to editing the parent Pick One Bottle with AprilTag Objective by using the back button at the top of the MoveIt Pro window, in the center.

Another way to go back to editing the parent Objective is to use your browser back button.
The Pick One Bottle with AprilTag Objective should now look like this:
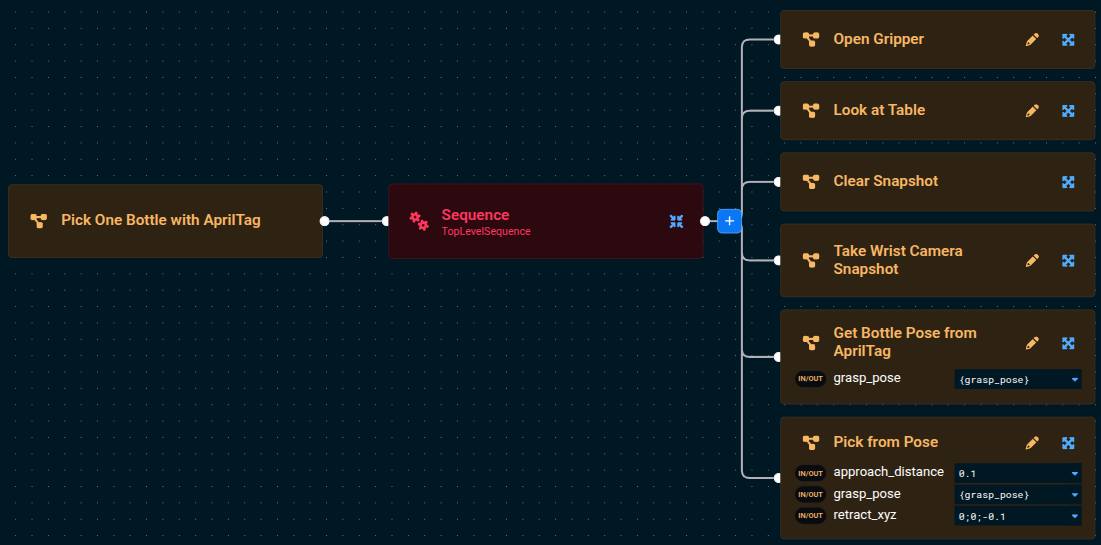
Notice the In/Out port icon next to grasp_pose. All ports that are remapped into a Subtree are always both in and out ports, because they are shared memory pointers between the parent Objective's and the Subtree's blackboard.
Place the Object
Finally, let's put the finishing touches on our Pick One Bottle with AprilTag Objective. We'll move the bottle to the tray in two stages — first to a hover pose above the tray, then down to the tray surface — using two Move to Waypoint Subtrees. Both consult the planning scene during planning, so any obstacles you've added (we'll add one in the next section) are respected automatically.
Two saved waypoints in lab_sim describe the place motion:
Above Tray Place Simple— the robot hovering above the tray, gripper pointing down.Tray Place Simple— the robot at the tray surface, gripper pointing down, ready to release.
Both already exist in lab_sim (see src/lab_sim/waypoints/ur_waypoints.yaml), so you can use them directly. If you want to record your own — for example to retune the hover height or fix the approach orientation — use the Pose then Waypoints features in the Teleoperation panel:
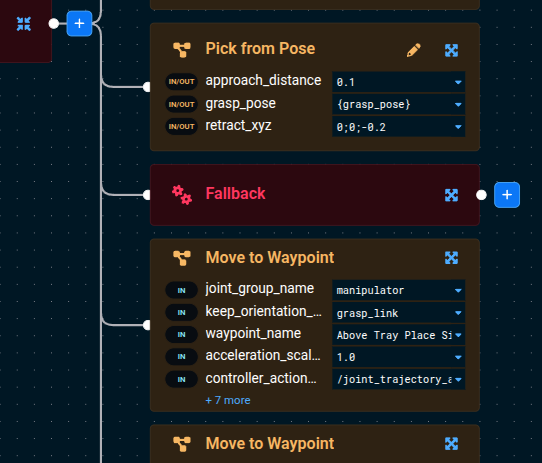
Now let's go back to editing the Pick One Bottle with AprilTag Objective then add the following Subtrees to the root Sequence after Pick from Pose:
Move to Waypoint— go to the hover pose above the tray.- Set
waypoint_nametoAbove Tray Place Simple.
- Set
Move to Waypoint— descend to the tray surface.- Set
waypoint_nametoTray Place Simple.
- Set
- Add
Open Gripper. - Duplicate the
Above Tray Place SimpleMove to Waypointand drag it to the bottom of the Sequence — this is the post-place retract motion that lifts the gripper back up off the tray.
Move to Waypoint is built on our planners, which check the planning scene for collisions during planning. If you add a keep-out zone or any other obstacle that blocks the path, the Behavior fails up front instead of needing a separate ValidateTrajectory step.
Click to see the completed Pick One Bottle with AprilTag Objective
Run the Objective and you should see the robot pick up a bottle, move to the hover pose above the tray, descend to the tray surface, and open the gripper to drop the bottle in.

You can see the bottle drop into the tray live in the simulated camera feeds, for example under /scene_camera/color and /wrist_camera/color.
For a more comprehensive reference, see the example Pick All Bottles with AprilTags Objective.
Adding Teleop Recovery to your Objective
In real-world environments, automatic motion planning doesn't always succeed — an unexpected obstacle, imprecise perception, or a cluttered workspace can cause a place motion to fail mid-flight. Rather than having the Objective simply stop, MoveIt Pro lets you add human-in-the-loop recovery so an operator can step in and manually guide the robot through the difficult part.
Force a Place Failure with a Keep-Out Zone
To force the place motion to fail, we'll add a keep-out zone between the bottles and the tray — same approach you used in Tutorial 1.
-
Run Reset Simulation from the settings menu (as you learned in Tutorial 1) to clear any leftover state from previous runs.
-
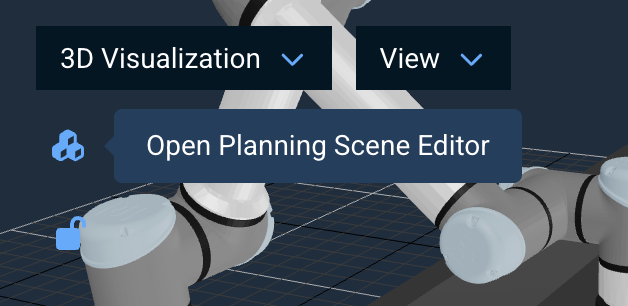
In the 3D Visualization pane, click the Keep-Out Zones icon at the top-left to open the Planning Scene Editor sidebar.
-
Click + Keep-Out Zone to add a new zone. A yellow planar surface (e.g. a wall) appears in the workspace.
-
Adjust the pitch to 90 degrees so the surface stands up as a wall.
-
Use the x, y, z position inputs to move the keep-out zone to be hovering over the red tray, in the path between the robot and its desired place location. Values around
x = 1,y = 0.6,z = 0.70work well inlab_sim.
Run your Pick One Bottle with AprilTag Objective.
- The pick succeeds, and the move to
Above Tray Place Simplesucceeds (the hover pose sits above the slab). - The second
Move to Waypoint(Tray Place Simple) fails.
The motion planner reports a PlanToJointGoal Error because the goal joint positions cause a collision between the gripper and the keep-out zone on the way down to the tray. You can also see the potential collisions as red spheres in the 3D Visualizer.
Without recovery, the Objective stops at this failure — exactly the situation we'll fix next.
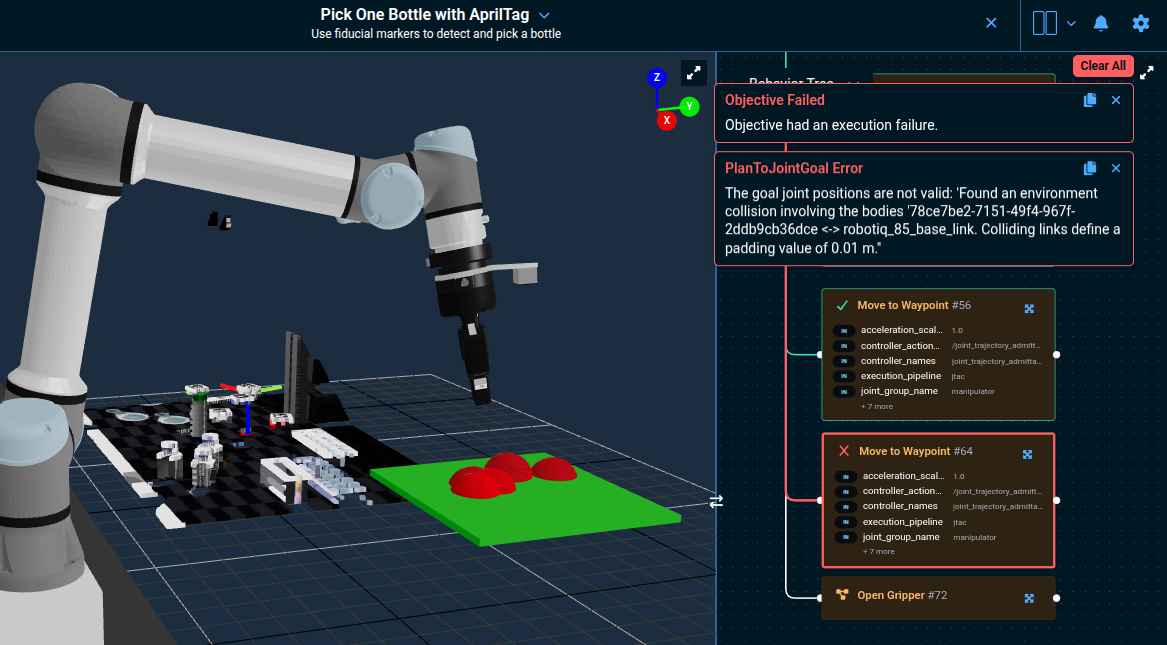
The Behavior Tree view also highlights which Behaviors are failing through the use of red lines and borders.
Once you're happy with the zone's position, click Export Scene in the sidebar to save it to a file.

For example, name it Keepout Zone Over Red Tray.
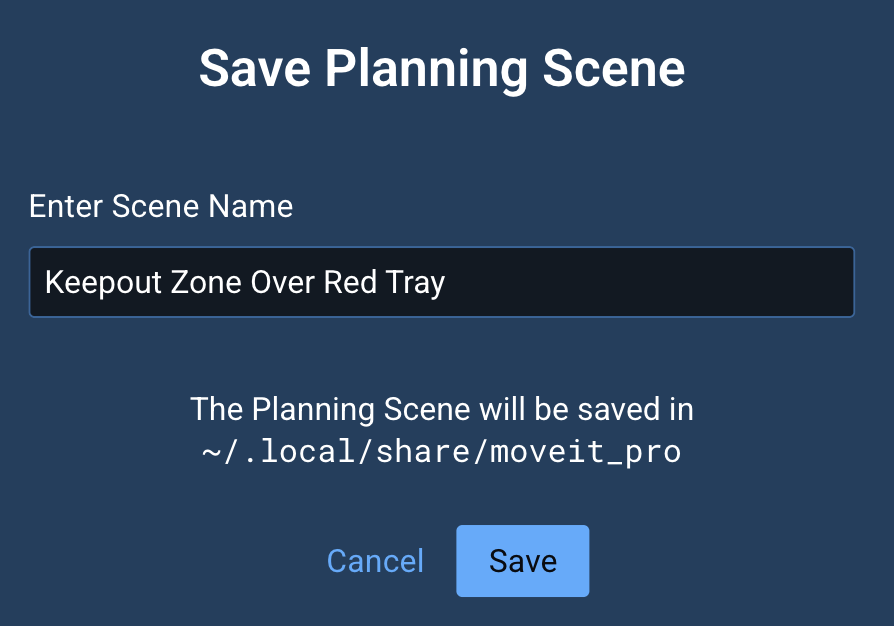
Re-running this exercise later just needs a single Load Scene click.
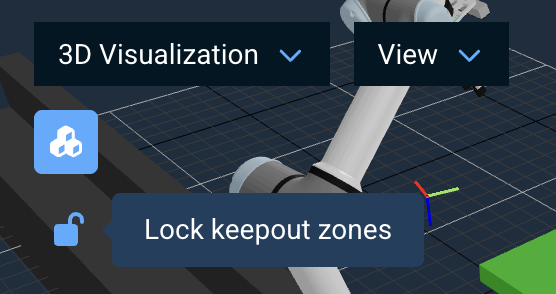
To avoid inadvertently editing a keep-out zone in the 3D Visualizer, click the lock icon to prevent mis-clicks.
Wrap the Place in a Fallback
Next, the place motion is two Move to Waypoint Subtrees. We'll wrap both of them in a Sequence, drop that Sequence into a Fallback, and add Request Teleoperation as the recovery sibling.
A Fallback node (also known as a Selector) tries each of its children in order. If the first child succeeds, it stops. If the first child fails, it moves on to the next child as a recovery strategy.
Here's an overview of the structure we're building:
TopLevelSequence
  ...pick steps...
  Pick from Pose
  Fallback
    Sequence (autonomous place attempt)
      Move to Waypoint (Above Tray Place Simple)
      Move to Waypoint (Tray Place Simple)
    Request Teleoperation
  Open Gripper
To build it:
- With the keep-out zone still in place, edit the Objective again.
- On the top-level
Sequence, click its blue + button to add aFallbackBehavior as a child, then drag theFallbackto sit just afterPick from Pose(and just before the firstMove to Waypointof the place sequence).
- Add a
Sequencenode as the first child of theFallback. - Move both of the below
Move to WaypointSubtrees into that new child Sequence — drag them so they hang off the inner Sequence instead of the top-level Sequence.

- Now add the
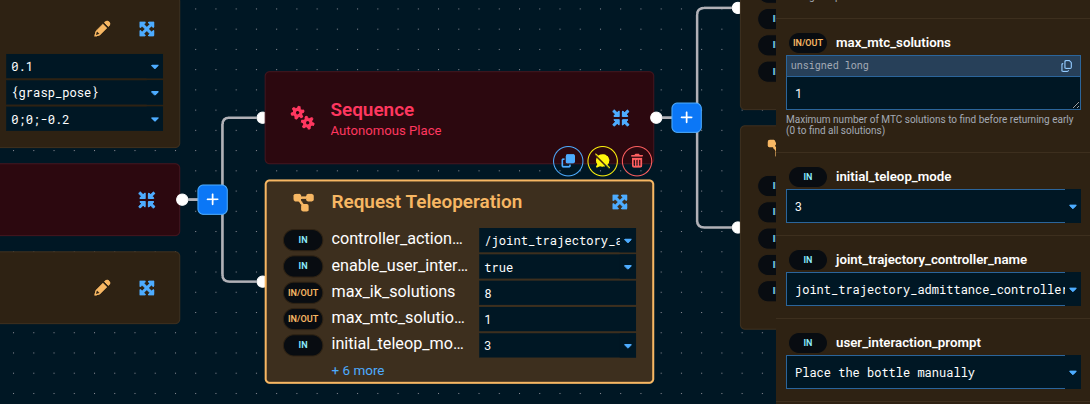
Request TeleoperationBehavior as the second child of theFallback. This is the recovery Behavior that will activate if the autonomous place sequence fails.
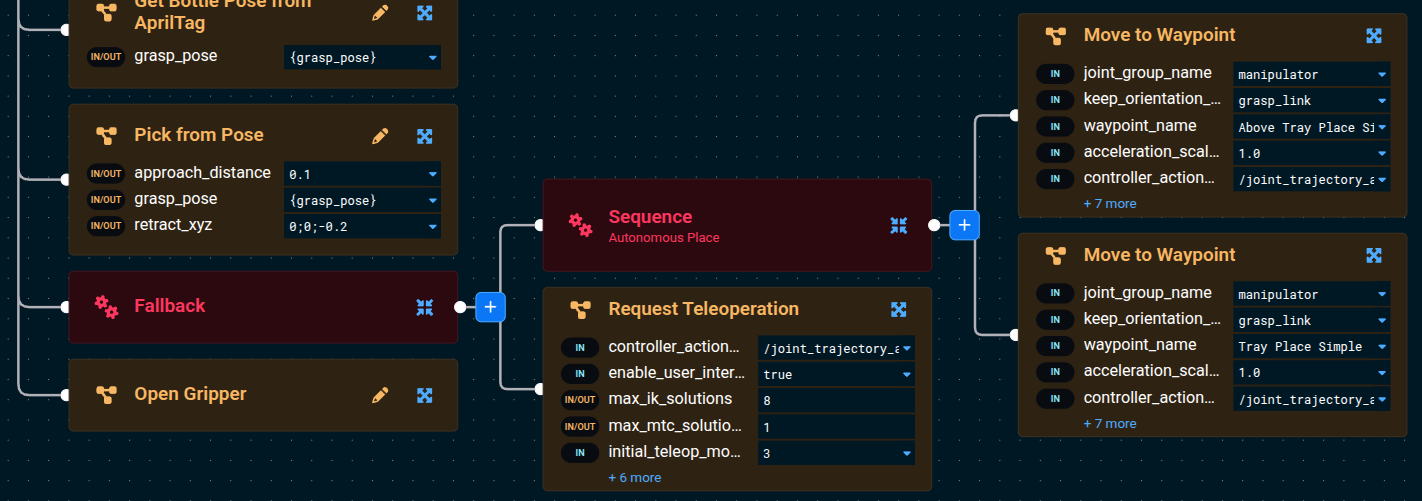
Make sure Open Gripper is still the last child of the top-level Sequence (not inside the Fallback). It should run after the Fallback succeeds, regardless of which branch ran.
- Click on the
Request TeleoperationBehavior and modify its parameters:- Set
enable_user_interactiontotrue - Set
user_interaction_prompttoPlace the bottle manually
- Set
Now when the place motion fails, instead of the Objective stopping, a Teleoperation menu will appear allowing you to manually guide the robot to a valid place position with the bottle still in its grasp:
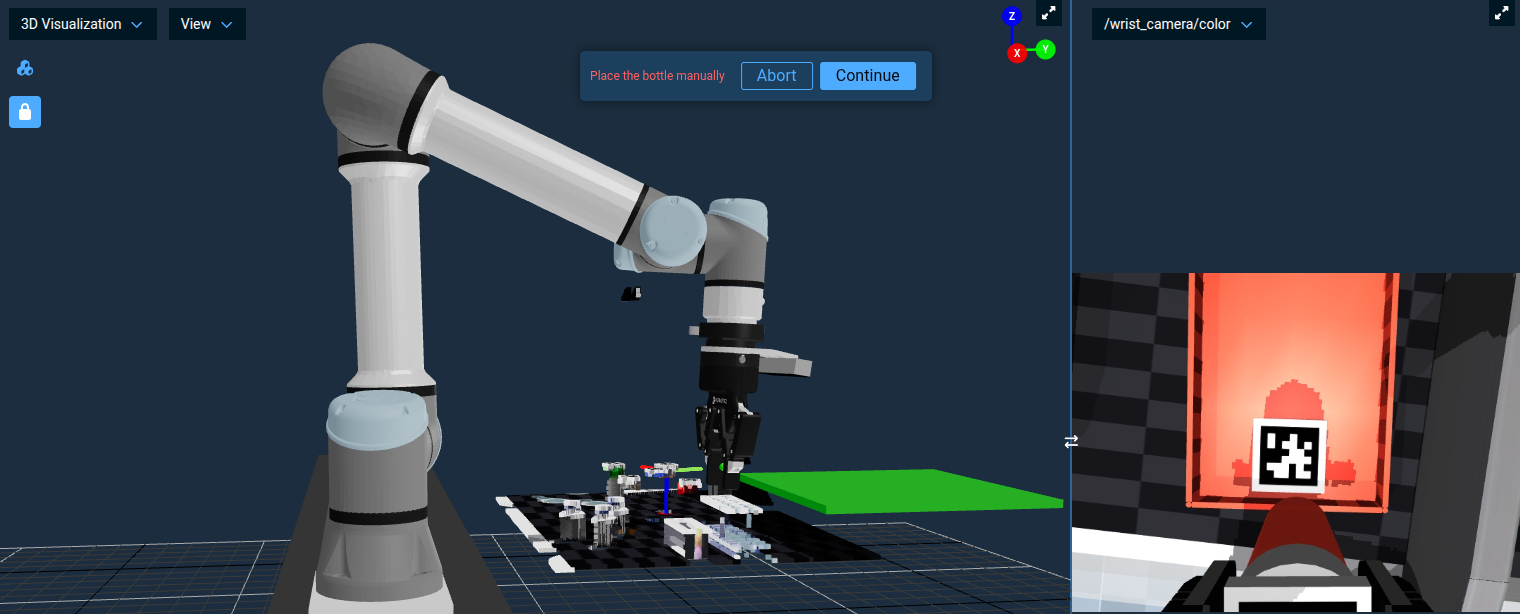
Once you've teleoped the robot to the desired place position, click the Continue button to resume the Objective. The final Open Gripper will run automatically and release the bottle into the tray.
This pattern of wrapping an action in a Fallback with Request Teleoperation as the recovery child is a powerful design pattern you can reuse throughout your Objectives. It gives autonomous execution a chance to succeed first, but seamlessly falls back to human guidance when needed.
The keep-out zone we added is purely a teaching aid — it lives only in the planning scene, not in the simulator. To restore the autonomous flow once you're done experimenting, open the Planning Scene Editor sidebar, select the zone, and press Delete (or use the delete button in the panel). The place motion will succeed on its own again.
Adding Comments to your Behavior Tree
As your Behavior Trees grow more complex, it becomes important to document what different sections do. MoveIt Pro provides a Comment Behavior that lets you add notes directly in the tree — similar to code comments.
Using the blue plus button, add a Comment Behavior above the Fallback node we just created. Click on it and set the text parameter to:
Teleop recovery: If the place motion fails due to obstacles or planning errors,
fall back to manual teleoperation so the operator can place the bottle.
The Comment Behavior has no effect on execution — it always returns SUCCESS immediately. It exists purely for documentation purposes, making your Objectives easier to understand for yourself and your teammates.
Get in the habit of adding Comment nodes to explain non-obvious logic in your Behavior Trees, especially around Fallback and Parallel patterns where the intent may not be immediately clear.
Now let's learn how to implement some more advanced perception to identify objects.
Point Cloud Registration with Iterative Closest Point (ICP)
There are many other perception capabilities within MoveIt Pro beyond AprilTags, and in this section, we’ll learn about point cloud registration.
Point cloud registration is the process of localizing an object within a point cloud, given a CAD mesh file as an input. This is used in robotics for locating a part within a workspace, or as an input to manipulation flows like polishing and grinding parts.
Typically, point cloud registration starts with an initial guess pose, which might be from an ML perception model, or based on where an object should be by the design of the robot workspace. This initial guess pose should be close to the object being registered, but does not have to be exact. The registration process then will find the exact pose using one of several algorithms, such as Iterative Closest Point (ICP).
Iterative Closest Point (ICP) is a foundational algorithm in robotics used to align 3D point clouds by estimating the best-fit rigid transformation between two sets of data. In robotic applications, ICP plays a critical role in tasks like localization, mapping, object tracking, and sensor fusion by helping a robot match its current sensor data to a known map or model. The algorithm works by iteratively refining the alignment based on minimizing the distance between corresponding points. While powerful, ICP requires a reasonable initial guess to avoid converging to an incorrect local minimum and is most effective when there is significant overlap between point clouds.
In MoveIt Pro, the RegisterPointClouds Behavior provides this capability:

See ICP in Action with Register CAD Part
Before we build our own, let's see ICP working end-to-end in an existing example of detecting a microscope.
- First, reset the simulation using the Reset Simulation button in the MoveIt Pro settings menu (as you learned in Tutorial 1) so the scene is in its starting state.
- Open the
Register CAD PartObjective to inspect its architecture.
Click to see the full Objective
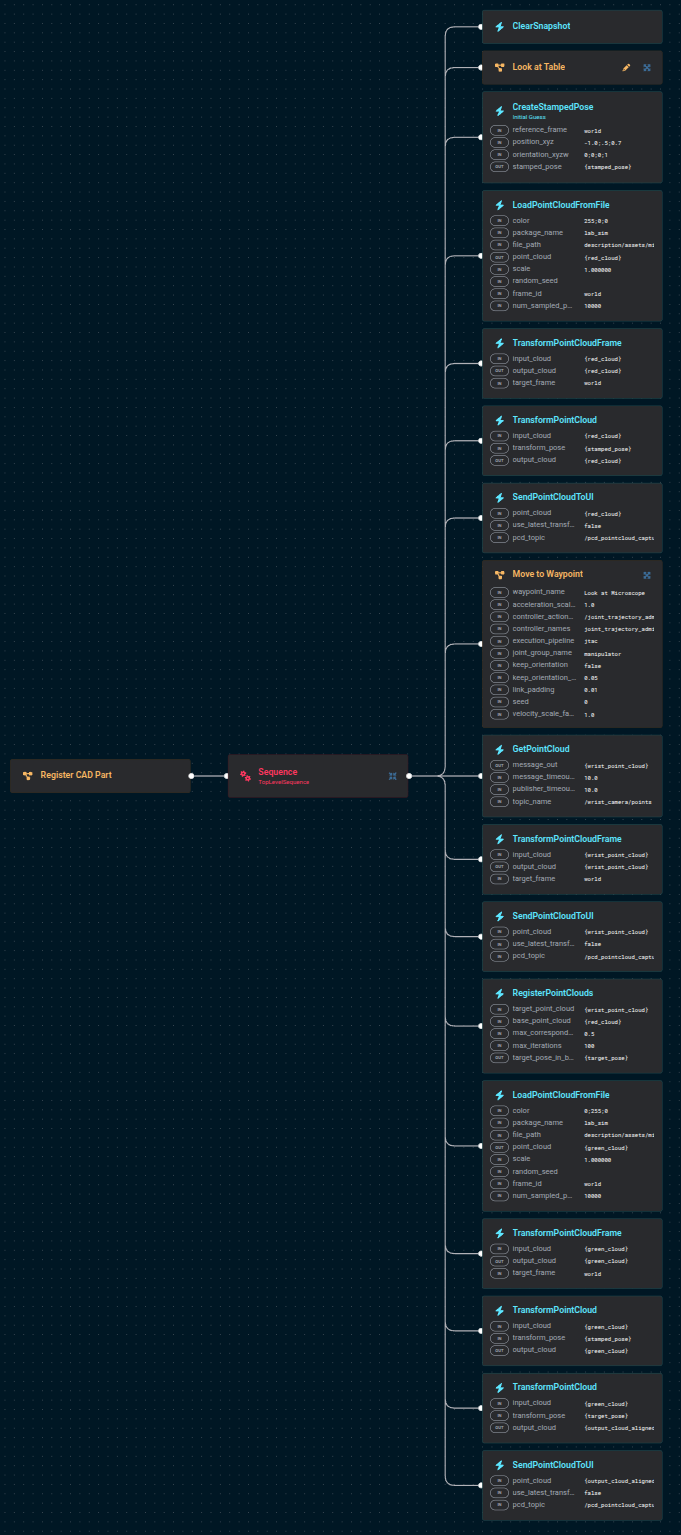
The overall flow is:
- Move the wrist camera to look at the area of interest and capture a point cloud.
- Create an initial guess pose.
- Load the microscope STL as a point cloud and visualize it in red at the initial guess.
- Register the microscope STL against the wrist camera point cloud using ICP.
- Load the microscope STL again and visualize it in green at the registered pose.
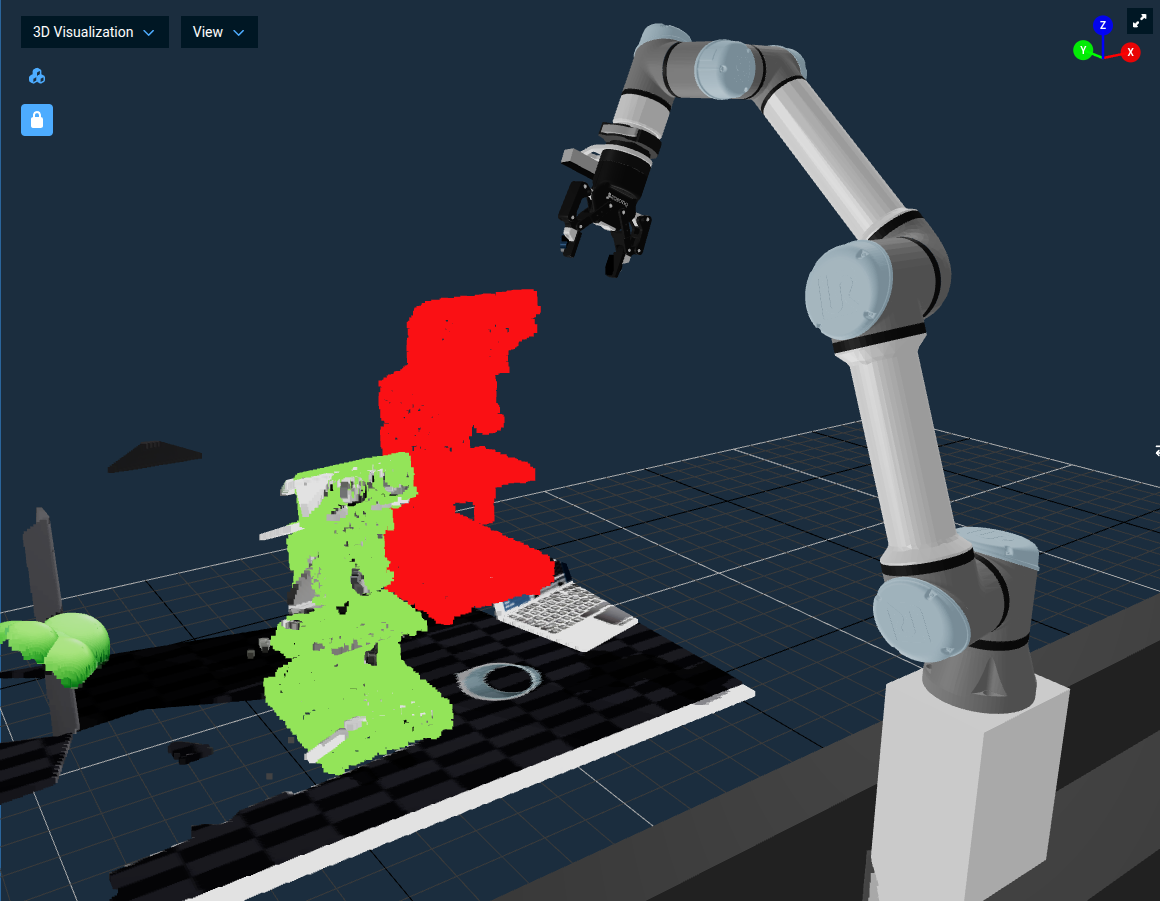
Run the Objective. You should see two point clouds appear: first a red one above the table (the initial guess), then a green one snapped onto the microscope on the table.
Try editing the Objective and shifting the CreateStampedPose x/y/z by 10 cm or so. A small change still converges; a guess that's too far off lands on the wrong feature or fails outright.
ICP is sensitive to the initial guess. In production Objectives, we typically use a fast detector — an AprilTag, an ML segmentation centroid, or a known workspace pose — to seed ICP, then let ICP nail down the final pose. We're about to use exactly that pattern.
Walk Through Fit Bottle Model Subtree
The reusable bottle-ICP block already exists in lab_sim as the Fit Bottle Model Subtree Objective. It takes a masked point cloud (just the bottle, no background) plus an initial guess pose, runs ICP against the bottle CAD model, and outputs a grasp pose ready for Pick from Pose.
See it in action first
Fit Bottle Model Subtree is a Subtree (not directly runnable), so to watch it execute, Run Pick 1 Pill Bottle with SAM3 now — that Objective calls this Subtree to fit the bottle CAD model after SAM3 segments the bottle. You'll see a red initial-guess cloud appear at the mask centroid, then a green aligned-model cloud snap onto the bottle when ICP converges. Both of those visualizations are published from inside this Subtree. (Don't worry about the rest of the Objective yet — the next section dissects it in detail.) Once you've watched ICP do its thing, come back here and walk through how the Subtree produces that result.
Open the Subtree in the editor
Open Fit Bottle Model Subtree from the Objective list and look at the root Sequence — the tree is organized into four collapsed groups that match the algorithm one-to-one.
1. Build initial-guess model cloud
Loads the bottle STL as a red point cloud and places it at the seed pose. The Subtree publishes this to the 3D Visualizer first, before ICP runs — visualizing the seed makes a bad initial guess obvious at a glance.
2. ICP fit and compose bottle pose
RegisterPointClouds runs ICP between the red model cloud and the segmented target cloud, producing the ICP delta. TransformPoseWithPose then composes that delta on top of the seed to give the bottle's full pose in world coordinates.
3. Render aligned model alongside masked cloud
Loads the STL a second time as a green cloud, transforms it by the fitted pose, and publishes both the masked target and the aligned model. Eyeballing green-over-segmented is the fastest way to confirm ICP converged on the right thing.
4. Compute grasp pose
Two TransformPose steps turn the bottle's world-frame pose into a gripper grasp pose: first a 0;0;0.057 translation shifts up from the STL origin (the bottle's centroid) to the base of the cap where the gripper closes, then a 180° flip about the local X axis points the approach axis world-down.
ICP gives you the bottle's pose at the CAD model's origin — which for bottle.stl sits at the geometric centroid. That centroid almost never coincides with where you actually want the gripper to close, so a fixed TransformPose offset takes you from "where the model is" to "where the gripper grasps." This is the common pattern: detection gives you a reference point on the object (centroid, AprilTag, mask centroid, …); a hand-tuned offset defines the grasp on top of that. Whenever you swap the perception layer, only the reference-point step changes — the offset stays the same.
Click to see the full Fit Bottle Model Subtree
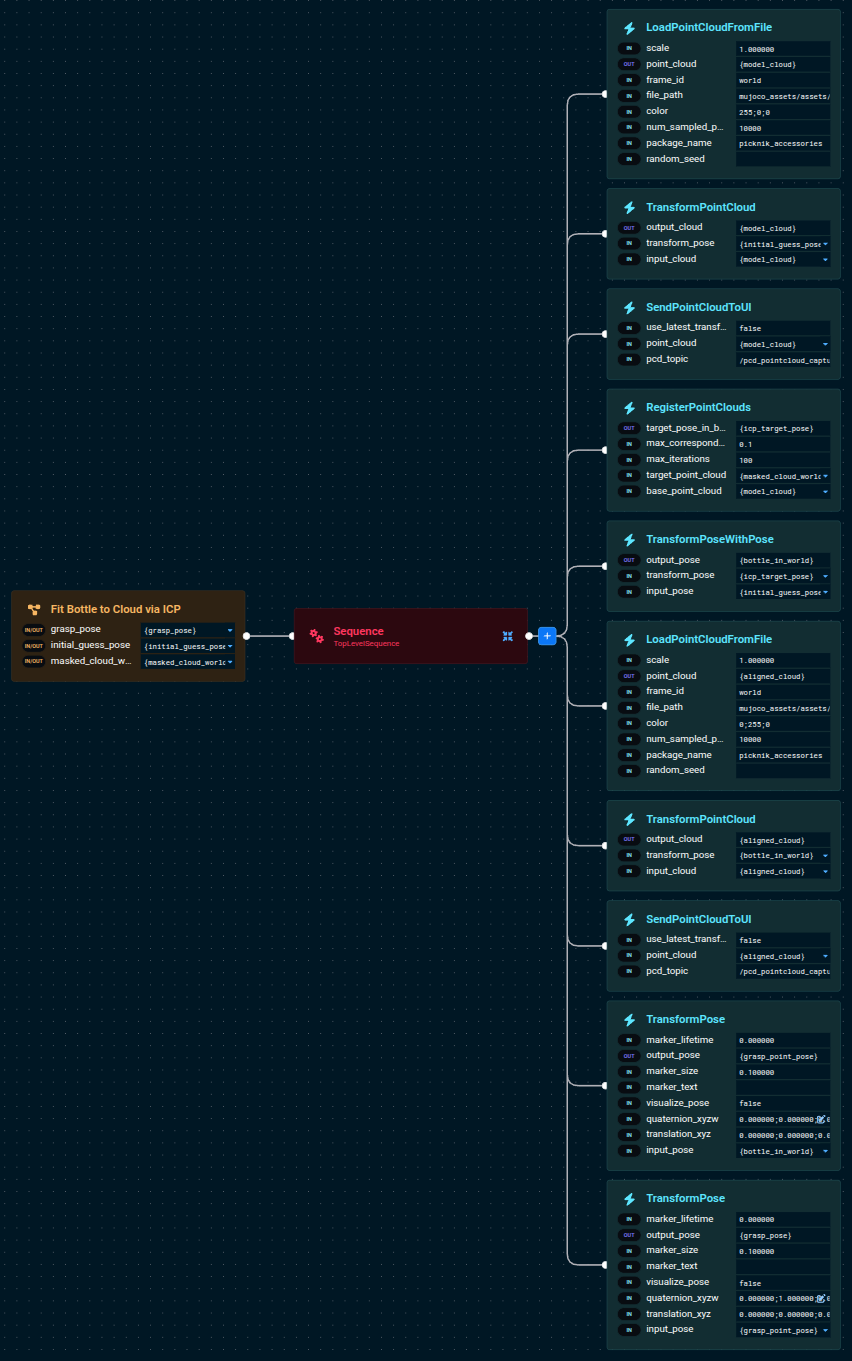
The Subtree exposes three ports: masked_cloud_world and initial_guess_pose come in from the caller, grasp_pose goes out. Anywhere upstream that can supply a segmented bottle cloud plus a rough seed pose can now reuse this block — the next section feeds it from SAM3.
Point Cloud Segmentation using ML
Point Cloud Segmentation with Machine Learning (ML) refers to the process of automatically dividing a 3D point cloud into meaningful regions or object parts based on learned patterns. Instead of relying solely on hand-tuned geometric rules (like plane fitting or clustering), ML-based segmentation trains models to recognize complex structures and variations directly from data. These models can classify points individually (semantic segmentation) or group them into distinct object instances (instance segmentation).
MoveIt Pro ships examples that use two generations of the Segment Anything Model:
- SAM2 — prompted with clicked points on an image. Best when a human is in the loop and can pick the object of interest interactively.
- SAM3 — prompted with a text prompt and/or an image exemplar. Best for autonomous flows where you know in advance what kind of object to look for.
| Aspect | SAM2 | SAM2 Automasking | SAM3 | CLIPSeg |
|---|---|---|---|---|
| Prompt types | Points + Boxes | None (grid-based) | Text + Boxes + Exemplars | Text |
| Text support | No | No | Yes | Yes |
| Models | 3 (encoder, prompt encoder, decoder) | 3 (same as SAM2) | 4 (vision, text, geometry, decoder) | 2 (CLIP encoder, CLIPSeg decoder) |
| Input resolution | 1024x1024 | 1024x1024 | 1008x1008 | 352x352 |
| Best for | Interactive point-click segmentation | Promptless scene discovery | Flexible multimodal detection | Legacy text segmentation |
For a deeper treatment of when to use each model, see the ML Exemplar Segmentation guide.
In this section you'll run a Subtree that combines SAM3 (text prompt) with the ICP fit you just walked through to create a fully autonomous bottle picker. After that we'll run two more existing examples that show SAM2 clicked-point segmentation and SAM3 image-exemplar segmentation.
SAM2 with Clicked Points
The ML Segment Point Cloud from Clicked Point Objective uses the GetMasks2DFromPointQuery Behavior to call SAM2. Instead of a text prompt, the model takes user-clicked points on the wrist camera image. This is the right tool when a human is in the loop and can pick objects interactively.
While clicking points by hand is convenient for demonstration, point prompts are most useful when another system generates the points automatically. Common upstream sources include the centroid of a region of interest from classical computer vision (color thresholding, blob detection), the center of a bounding box returned by an object detector, or pixel coordinates extracted from a vision-language model like Gemini. Anywhere upstream perception can produce a 2D pixel guess for "the thing I want to pick," SAM2 can refine that guess into a precise segmentation mask — no text prompt required.
Run this yourself:
- Run the
Look at TableObjective first to position the wrist camera over the work area. - Run the
ML Segment Point Cloud from Clicked PointObjective. - Ensure the view port
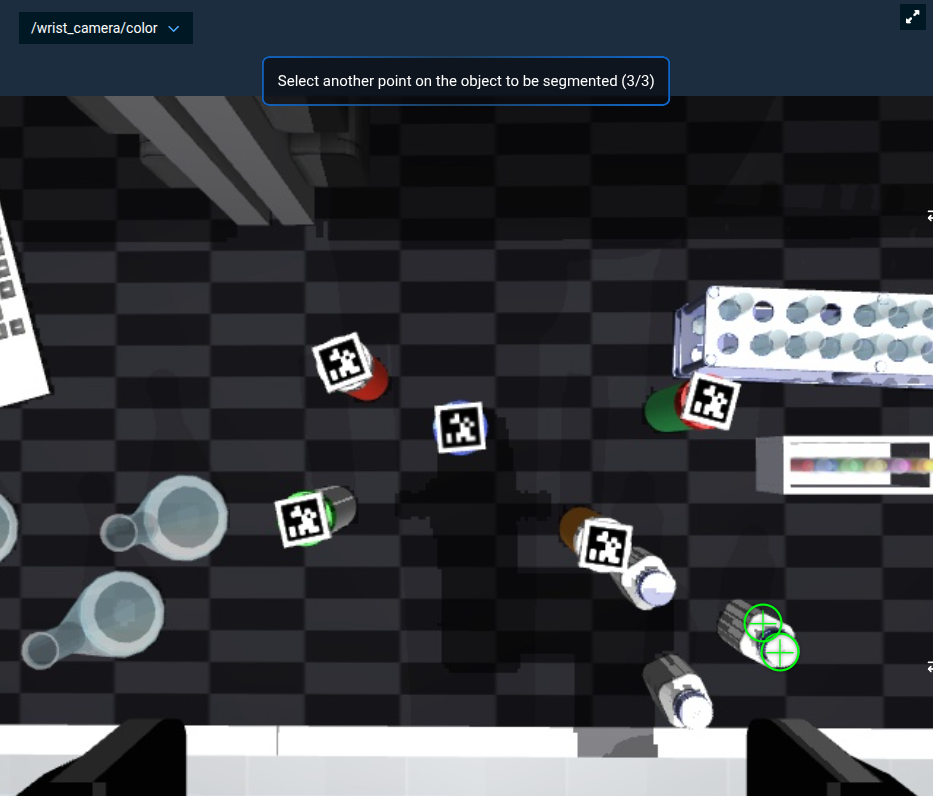
/wrist_camera/coloris visible. - When prompted, click three points on the pill bottle in the lower right.
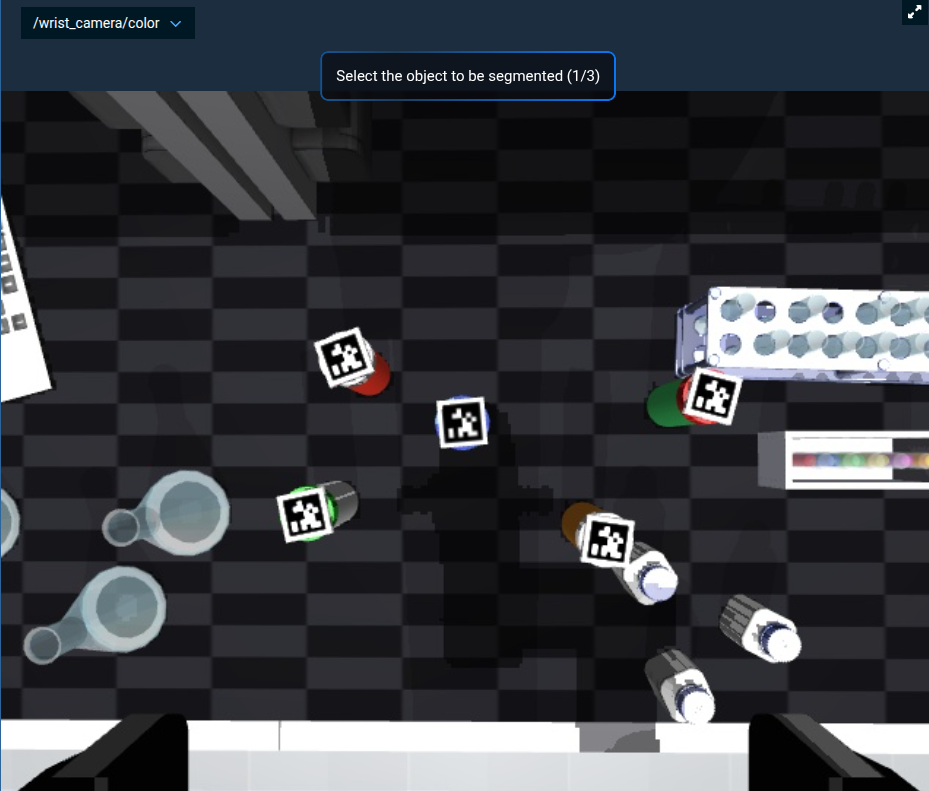
After your three clicks, the prompt should look like this, with green markers on the bottle:
The Objective then converts the 2D mask to 3D, applies it to the point cloud, and visualizes only the clicked object.
A 2D binary image where each pixel indicates whether it belongs to the segmented object (foreground) or the background, typically generated by models like SAM for isolating objects.
In this environment we model glass beakers and flasks the way real laser depth sensors perceive them — the simulated camera sees them as transparent glass, but the simulated depth sensor doesn't return points for their surfaces. If you click on a beaker instead of a bottle, the resulting point cloud will look flat for the same reason.
Walk Through Pick 1 Pill Bottle with SAM3
lab_sim ships Pick 1 Pill Bottle with SAM3 as the combined-perception example: SAM3 segments one bottle on the table, the ICP Subtree fits the bottle CAD to the mask, and the robot picks it up and drops it in the tray via a Cartesian up → over → down move.
Run it first
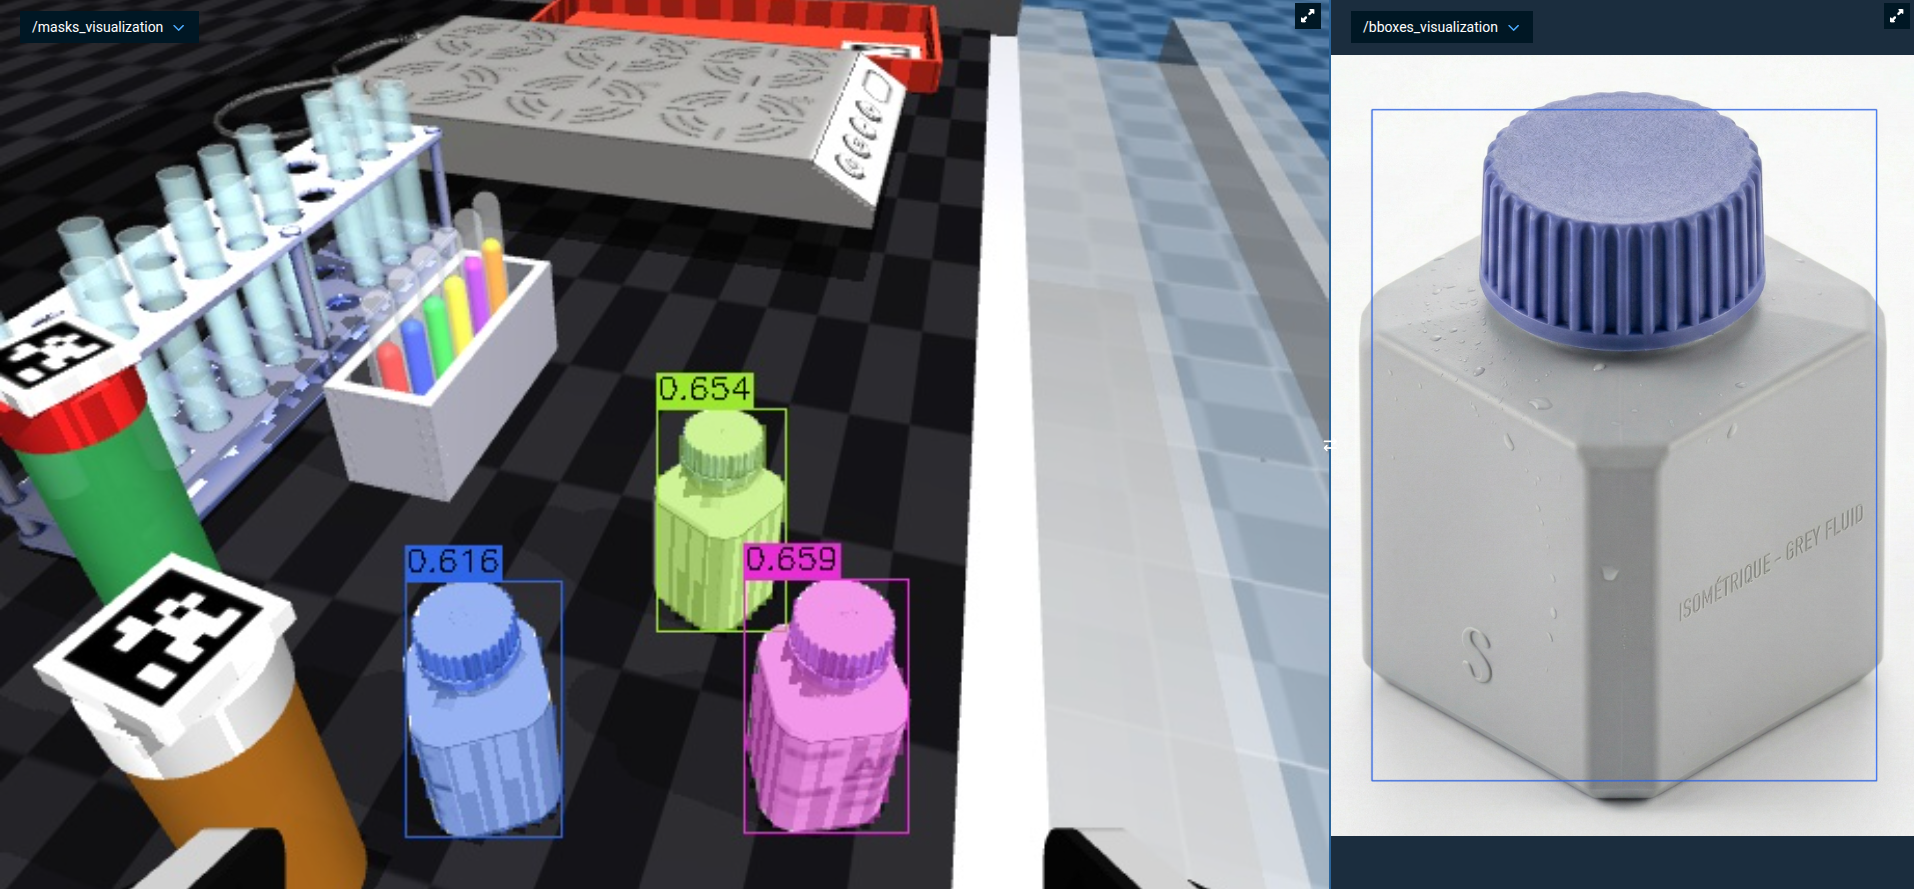
Run the Objective (or refer back to the run you did in the previous section). You should see:
-
The robot move to the look pose and capture an image.
-
SAM3 segment a bottle (visible as a colored mask on
/masks_visualization). -
The red model cloud appear at the mask centroid (initial guess).
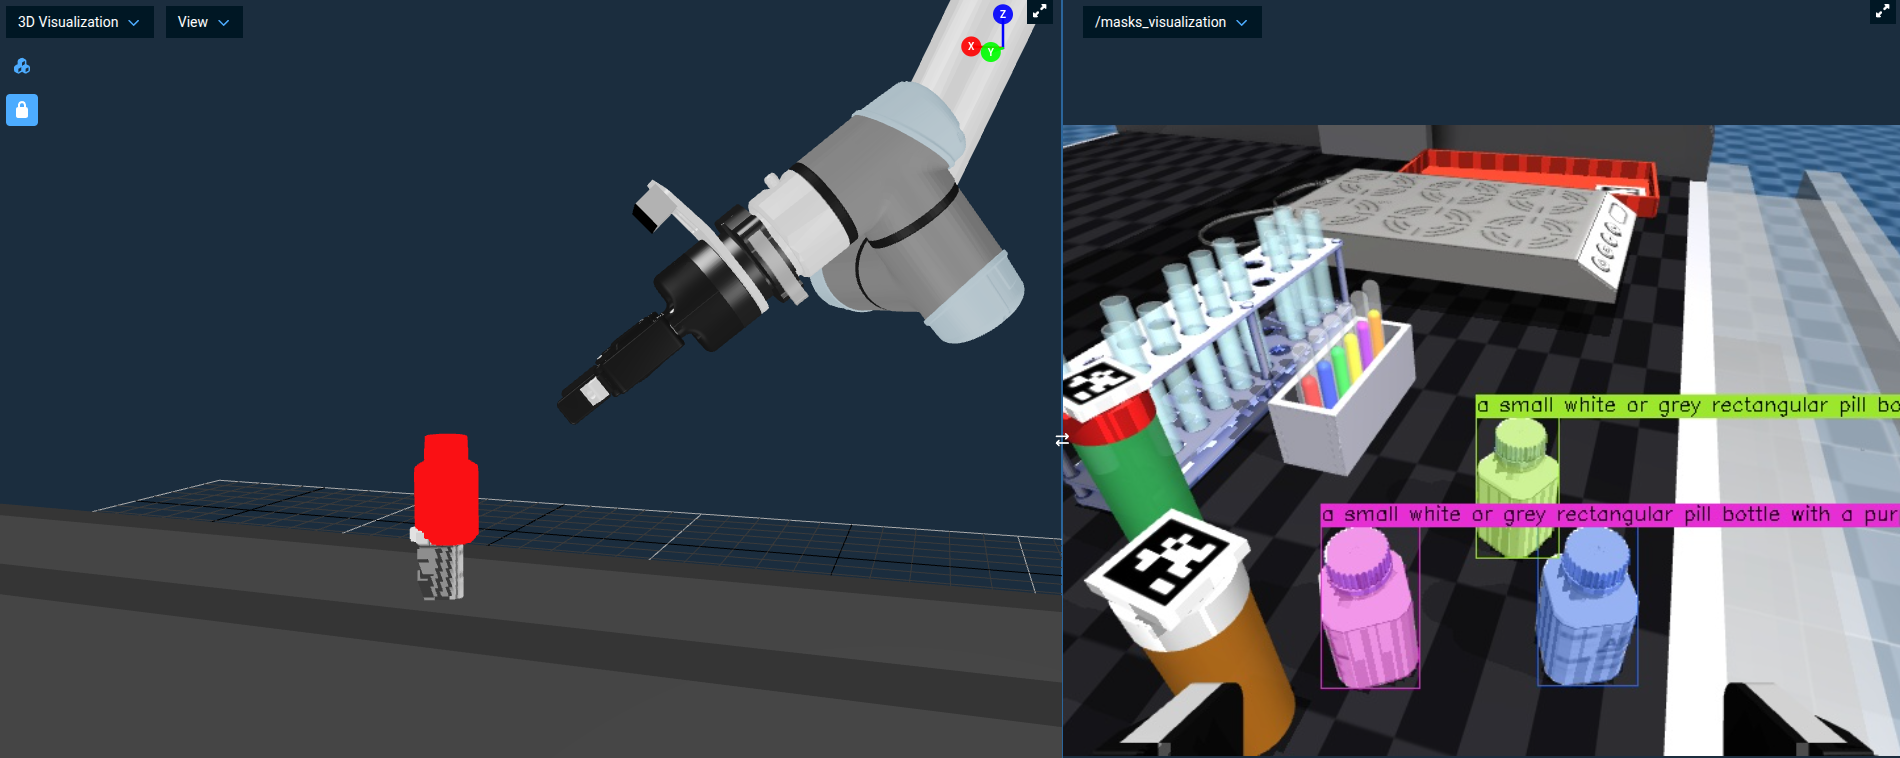
-
ICP snap the green cloud onto the bottle, and the labeled
grasp_poseaxis marker appear at the shoulder.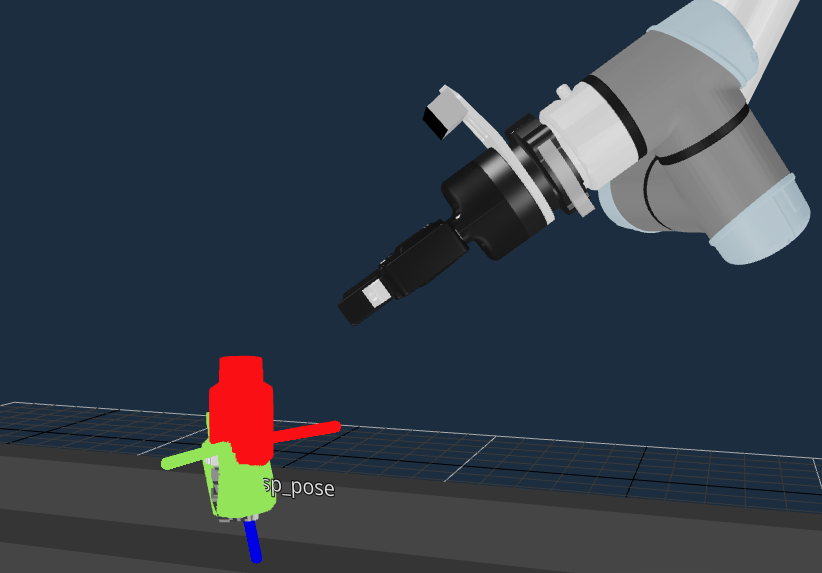
-
The robot grasp the bottle and lift straight up. The wrist camera view shows the bottle held between the gripper fingers.
-
The robot traverse over to the tray, descend, and open the gripper to drop the bottle in.
Open the Objective in the editor
The tree splits into two phases.
Phase 1: Perceive and pick
Open Gripper → Move to Waypoint (Look at Bottles Left) → WaitForDuration to let the admittance-controlled arm finish settling → Add Table to Planning Scene → Get Bottle Grasp via ICP Subtree → VisualizePose → Fan Pose About Tool-Z Subtree → Pick from Pose Vector.
Get Bottle Grasp via ICP Subtree is the perception block — it wraps the SAM3 segmenter, derives an ICP seed from the mask centroid, and then calls the Fit Bottle Model Subtree you just looked at. Its object_prompt port ("a small white or grey rectangular pill bottle with a purple blue top cap") is the text prompt SAM3 uses to find the bottle.
The segmenter inside this Subtree calls GetMasks2DFromExemplar under the hood. By passing only a text prompt (no exemplar image), SAM3 runs in pure text-prompt mode — no human input, no reference image, just a sentence describing what to find.
Segmentation alone gives you a bag of points, but the bottle's exact pose — and especially its grasp axis — needs the geometric constraint of the CAD model. ICP supplies that. The two complement each other: ML handles "where in the image" robustly, ICP handles "what 6-DOF pose, precisely."
Fan Pose About Tool-Z Subtree rotates the single grasp pose into a small fan of yaw-variant candidates. Pick from Pose Vector then picks the first one that has a collision-free plan — useful here because the bottle is rotationally symmetric and any approach yaw is acceptable.
Phase 2: Up → over → down drop
A naive Move to Waypoint to a placement pose can let the joint-space planner spin the wrist mid-flight, swinging the bottle. Going up, over, and down along an explicit Cartesian path keeps the gripper pointing down for the entire move.
The drop sequence resolves the gripper's current pose in world (CreatePoseStamped + TransformPoseFrame), then builds three waypoints — up (10 cm lift in the local gripper frame), over (hover above the tray at 0.95;0.5568;0.85), and down (drop pose just above the tray surface at 0.95;0.5568;0.605) — pushes them into a vector with CreateVector + three PushBackVector calls, plans the path with PlanCartesianPath, executes it, and opens the gripper to release the bottle.
Cartesian paths planned with full 6-DOF tracking can fail or replan when the planner thinks it can't hit every orientation along the way, which is what produces the wrist swing. position_only=true (the default on PlanCartesianPath) relaxes orientation to a soft nullspace task — the planner keeps the gripper close to the requested orientation but won't swing it 90° to chase a stricter constraint. Set the port to false if you need strict 6-DOF tracking. The Pick All Pill Bottles Objective uses the same default.
Optional: Rebuild it yourself with agentic coding
The Objectives in this tutorial are XML files in the moveit_pro_example_ws repo. If you have an agentic coding tool wired into that workspace (Claude Code, Cursor, or whatever you prefer), you can have it author this Objective from scratch as a hands-on exercise — and that workflow is closer to how customer engineers commonly build new Behavior Trees in modern engineering workflows than dragging nodes in the editor.
A prompt that has worked well for us:
Open the lab_sim package. Create a new Objective called
My Pick 1 Bottlethat picks one pill bottle off the table using SAM3 segmentation, ICP, and a Cartesian up–over–down drop into the tray at(0.95, 0.5568, 0.605). UseGet Bottle Grasp via ICP Subtreefor perception andPick from Pose Vectorfor the pick. Match the structure ofpick_1_pill_bottle_with_sam3.xml.
After the agent generates the XML, load it in MoveIt Pro, Run it, and compare what it produced to Pick 1 Pill Bottle with SAM3. The diff is usually a great prompt for the next conversation — port name typos, missing MetadataFields, an unnecessary ClearSnapshot, a too-large blending radius on PlanCartesianPath. Fixing those by going back and forth with the agent is the loop you'll be using on real customer work.
SAM3 with an Image Exemplar
A pure text prompt isn't always specific enough — sometimes you want SAM3 to find "things shaped like this" rather than "things matching this description." For that, SAM3 accepts an image exemplar: a small reference image of the target object, optionally with a bounding box around the relevant region.
The example ML Find Bottles on Table from Image Exemplar Objective:
- Loads a small reference image of a square pill bottle from disk.
- Wraps it in a bounding box with
CreateBoundingBoxFromOffset. - Moves the wrist camera to
Look at Bottles Leftand grabs a fresh image. - Calls
GetMasks2DFromExemplaragainst SAM3 with the exemplar plus the bounding box. - Publishes the resulting masks to
/masks_visualizationfor inspection.
Run this yourself:
- Run the
ML Find Bottles on Table from Image ExemplarObjective. - Switch the primary view to
/masks_visualization(the Objective also does this automatically). - You should see the square pill bottles highlighted with confidence scores. The exemplar reference image with its bounding box appears in
/bboxes_visualization.
The Objective in the next section feeds SAM3 both a text prompt and an image exemplar at the same time. The two prompts reinforce each other and produce more reliable masks than either alone.
Putting It All Together: Pick All Pill Bottles
The Pick All Pill Bottles Objective is the headline example of perception-driven manipulation in lab_sim. It scales the same SAM3 + ICP pattern from Pick 1 Pill Bottle with SAM3 into a full pick-and-place loop:
- SAM3 segmentation with both an image exemplar and a text prompt for higher-quality masks.
- ICP to refine the segmented point cloud against the bottle CAD model and produce a precise grasp pose.
- A loop that iterates over a list of placement poses loaded from
pill_bottle_place_poses.yaml, picks one bottle per iteration, and places it on the tray at the next location.
Open and Run the Pick All Pill Bottles Objective. The robot will:
- Load the placement grid and visualize a marker at every place pose.
- For each place pose: look at the bottles, segment one with SAM3, register it with ICP, pick it, and place it at the current target.
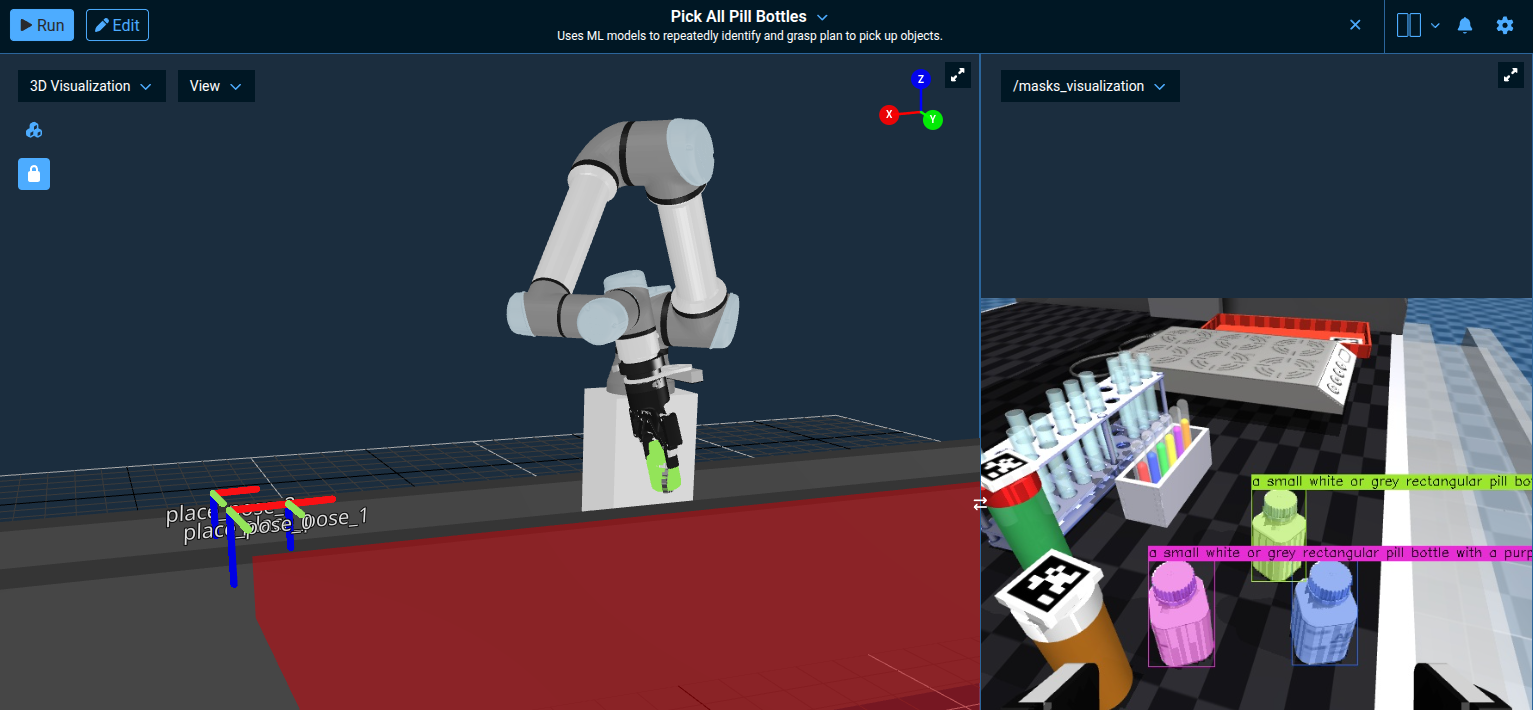
The 3D Visualization shows the labeled place_pose_* markers and the red collision-volume slab the Objective adds to the planning scene to keep the robot off the table; /masks_visualization shows SAM3's text-and-exemplar segmentation in action.
This Objective is in the Application - ML (GPU Recommended) subcategory. It will run on CPU but is dramatically faster with a GPU. See the ML segmentation guide for hardware recommendations.
Suggested Hands-On Exercises
- Open
Get Bottle Grasp via ICP Subtree. Notice it composes three pieces: a SAM3 segmentation step, aGetCentroidFromPointCloudto seed the fit, and theFit Bottle Model Subtreeyou walked through earlier. That's the reuse pattern — the perception block wraps the ICP fit instead of duplicating it. - Modify
pill_bottle_place_poses.yamlto add or remove a placement pose and re-run the Objective. - Duplicate
Fit Bottle Model Subtree, change the ICP parameters (trymax_correspondence_distance0.05 or 0.2), and swap it intoPick All Pill Bottlesto see how convergence and runtime change.
Resetting Your Robot Simulation
As you learned in Tutorial 1, you can reset the simulation from the MoveIt Pro settings menu.
For more advanced use cases, there are additional ways to reset the simulation:
- Programmatically: Use the
ResetMujocoKeyframeBehavior in your own Objective to reset the scene to the "default" keyframe. - Third party UI: Run the MuJoCo Interactive Viewer to reset the simulation (details in next section).
- Command line: Restart MoveIt Pro to completely reset the simulation scene and robot state.
To enable MuJoCo control in your own robot configuration package, you must do the following:
- Add
MujocoBehaviorsLoaderto the corebehavior_loader_plugins - Add
mujoco_objectivesto theobjective_library_paths
See the lab_sim config.yaml for an example.
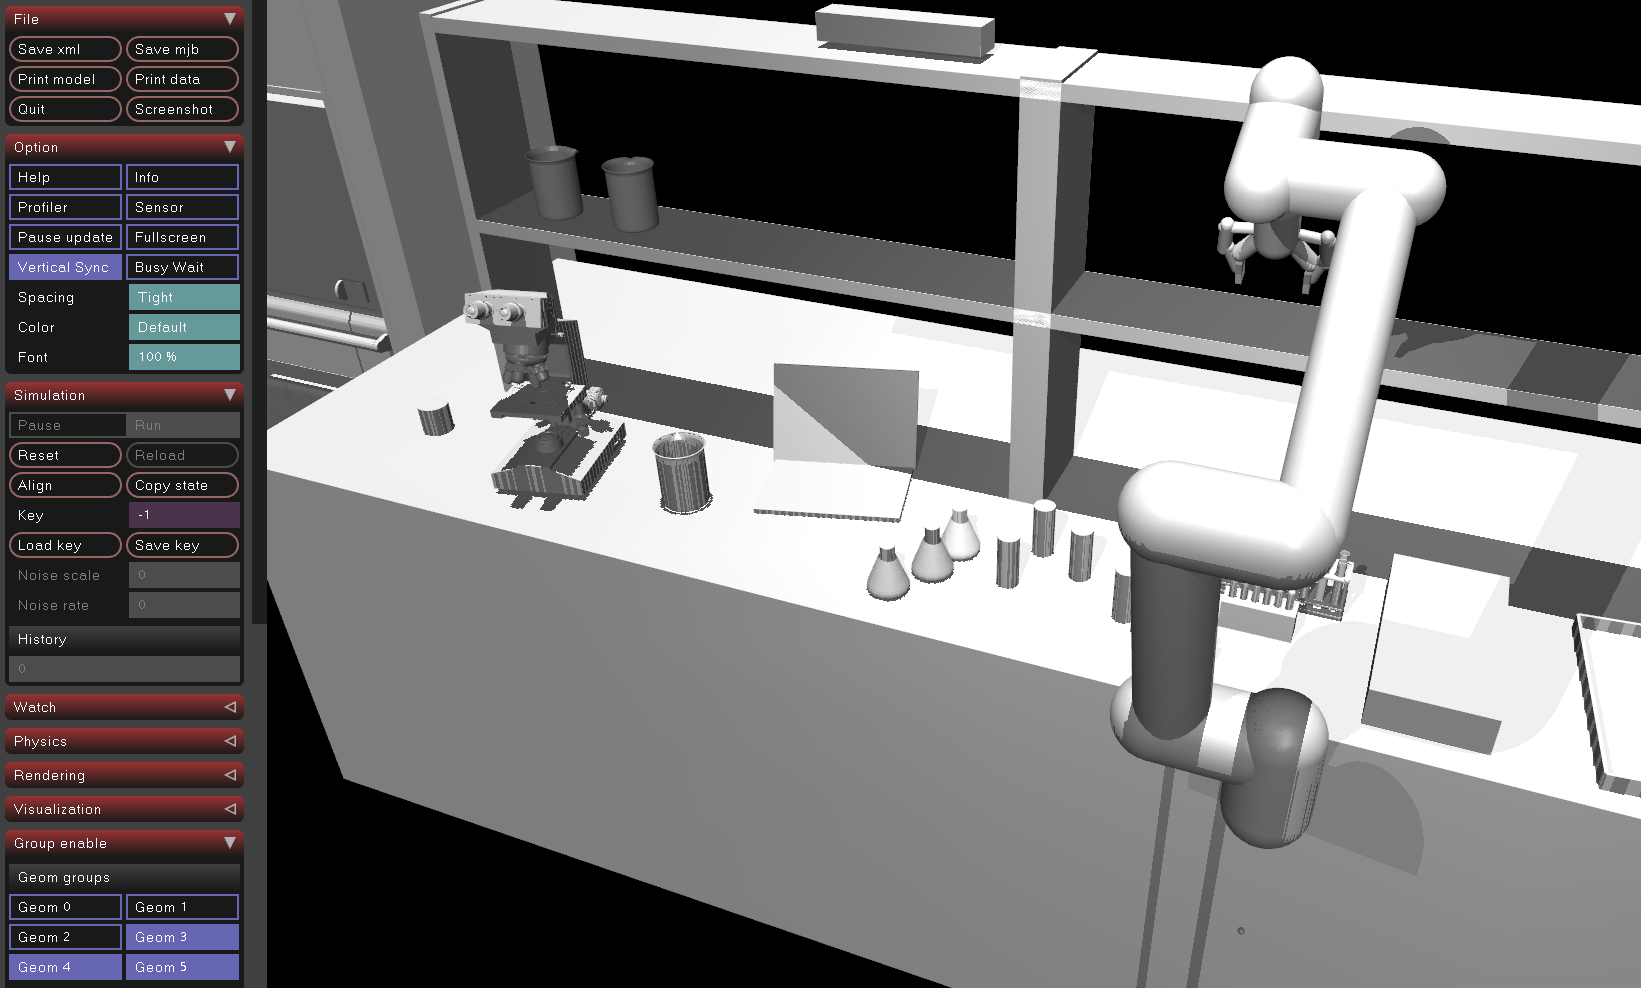
Interactive Manipulation of Sim
You can "reach in" and manually manipulate objects in the simulation using the MuJoCo Interactive Viewer. This is a graphical tool for visualizing, debugging, and interacting with MuJoCo physics simulations in real time.
Running the MuJoCo Interactive Viewer alongside MoveIt Pro can impact system performance, and may not be feasible for lower-powered systems.
The MuJoCo Interactive Viewer is only supported when MoveIt Pro is installed locally, not for MoveIt Pro Cloud, due to the need to access your terminal.
To enable the MuJoCo Interactive Viewer:
-
Exit MoveIt Pro using CTRL-C at the command line
-
Navigate through the command line to the
lab_simrobot configuration package folder:cd ~/moveit_pro/moveit_pro_example_ws/src/lab_sim/config/ -
Open
config.yamlusing your favorite editor / IDE. We recommend VS Code. -
Search for the
urdf_paramstag -
Find the line that says
mujoco_viewerand flip the boolean totrue.hardware:robot_description:urdf:package: "lab_sim"path: "description/picknik_ur.xacro"srdf:package: "lab_sim"path: "config/moveit/picknik_ur.srdf"urdf_params:- mujoco_model: "description/scene.xml"- mujoco_viewer: true -
Re-launch MoveIt Pro and the MuJoCo Interactive Viewer should launch alongside MoveIt Pro.
Within the viewer, you can move objects around manually with a "hand of god"-like functionality:
- Double-click the object you want to move
- To lift and move: CTRL+Right Mouse
- To drag horizontally: CTRL+SHIFT+Right Mouse
You can reset the simulation within the Interactive Viewer using the Reset button on the bottom left menu under the section "Simulation".

Finally, you can see useful debug information about the collision bodies by switching the "Geom Groups" under the section "Group enable":
- Toggle off Geom 0-2
- Toggle on Geom 3-5
- Under the Rendering tab, enable Convex Hull
Once you've toggled those settings, we can visualize the collision geometry, instead of the visual representation.
Learn more about configuring the simulator at the MuJoCo configuration guide
Recording Training Data with ROS Bag
The Pick All Pill Bottles Objective autonomously picks and places bottles, which makes it a useful oracle policy — an automated demonstration generator — for collecting training data for machine learning models such as Diffusion Policy.
An oracle policy is simply a scripted or planned Objective that performs the task correctly, as opposed to a human teleoperating the robot. The advantage is that you can collect large amounts of consistent training data without manual effort.
Recording a ROS Bag
To record the robot's joint states and camera feeds while the Objective runs, open a terminal inside the MoveIt Pro container and run:
ros2 bag record --max-cache-size 32000000000 --snapshot-mode -s mcap \
  /robot_description \
  /joint_states_synchronized \
  /joint_commands_synchronized \
  /demonstration_indicator \
  /wrist_camera/color_synchronized \
  /scene_camera/color_synchronized \
  -o ~/rosbag_training_data
This records all the key topics needed for training an end-to-end model:
- Joint states and commands for learning the robot's motion
- Camera feeds (wrist and scene cameras) for visual perception
- Demonstration indicator for marking the start and end of each demonstration
With the ROS bag recording running, start the Pick All Pill Bottles Objective. You are now recording training data for your end-to-end model as the robot performs the task autonomously.
While training a model from this data is beyond the scope of this tutorial, you could follow the full Diffusion Policy how-to guide to learn how to train and deploy a neural network policy from your recorded demonstrations.
Summary
By completing this tutorial, you've gained hands-on experience with the perception tools in MoveIt Pro that drive real manipulation work: AprilTag fiducial detection, ICP-based point cloud registration, and SAM2/SAM3 ML segmentation — and how they combine in the Pick All Pill Bottles Objective. You also explored teleop recovery and recorded training data for ML.
For grasping novel or deformable objects without a CAD model or fiducial, MoveIt Pro also ships Learning to Grasp (L2G) — an ML model that proposes candidate grasp poses directly from an object point cloud, exposed as the GetGraspPoseFromPointCloud Behavior. See the ML Grasping guide for a full walkthrough.
🎉 Congratulations, we're now ready to move to the next tutorial!