Franka Research 3 (FR3) Hardware Setup Guide
This guide covers how to use MoveIt Pro with actual Franka Research 3 (FR3) robot arm hardware, including physical installation.
Required Hardware
Before beginning, ensure you have the following components and tools ready:
- FR3 Arm – 7-DoF robotic arm.
- FR3 Control Box – The main control and power unit for the arm. This will be mounted or placed near the arm's base and provides power and network interfaces.
- FR3 Connecting Cable – The multi-pin cable that connects the arm to the control box.
- Emergency Stop Device – The standard emergency stop button that came with FR3, with its attached cable.
- Franka Hand – The default end-effector.
- PC or Laptop – A computer to control the robot.
- Ethernet Cable – To connect the FR3 control box or arm to your PC (or network switch).
- Power Supply – A mains power source (100–240 V) for the control box.
- Mounting Hardware for Arm Base – Four bolts to secure the arm's base to your table or mounting platform. Refer to the drilling template in the manual for exact positions.
1. Unboxing and Mounting the Arm
First, unbox the arm and control box. Next, secure the arm's base to the table. Using the appropriate bolts, attach the base firmly to the table or an intermediate adapter plate.
Identify the connection ports at the base of the arm: here you will attach the main power cable, the E-stop, and an Ethernet cable to configure the robot through its web interface.
2. Positioning the Control Box
Unbox the control box. This contains the robot's main computer, power supply, and other electronics. Choose a location for the control box near the arm.
Typically, the control box will have: the connector for the arm's main cable, an Ethernet port, and the AC power inlet.
Verify that all cables can reach: the arm's cable to the control box, the control box to the power outlet, and an Ethernet cable from the control box to your PC.
3. Wiring and Electrical Installation
Double-check that the control box is powered OFF or unplugged before making these connections.
-
Main Robot Cable: Connect the large multi-pin cable from the control box to the base of the arm.
-
Emergency Stop Device: Plug in the emergency stop (E-stop) button to the designated safety port on the robot.
-
Ground: If your setup includes a separate grounding cable, connect it now. This helps eliminate electrical noise and ensures safety in case of a fault.
-
Network Connection: Connect an RJ45 Ethernet cable between the system and your PC (or network switch). The control box provides a network interface for communication (used for the Desk web interface and for the Franka Control Interface). Plug one end of the Ethernet cable into the control box's Ethernet port, and the other end into your PC's Ethernet port. If the PC is on a LAN or you prefer using a network switch/router, that is also fine – just ensure the PC and robot will be on the same network.
-
Power Connection: Now, connect the control box to AC power. Plug the provided power cable into the control box's AC inlet, and the other end into a wall outlet or power strip. Do not turn the power on yet.
4. Attaching the Franka Hand
To use the Franka Hand (two-finger gripper) as the end-effector, follow these steps to mount and connect it.
-
Prepare the Flange: The arm's wrist flange has a connector port for the Hand's electrical plug. It also has threaded holes for mounting.
-
Align the Gripper: The Franka Hand has a corresponding flange with matching bolt holes and a plug connector.
-
Attach the Hand with Screws: Position the Franka Hand against the robot's flange, aligning the pin and holes. Secure it with the screws provided (one on each side of the flange).
-
Connect the Hand's Cable: Plug the Hand's connector into the port on the robot's flange. The Franka Hand has an integrated cable that ends in an 8-pin connector. This connection provides power and communication to the gripper.
5. Power On and Initializing the Robot
With everything wired, it's time to power on the arm and perform the initialization.
-
Turn on the Control Box: Locate the power switch on the control box and flip it to the ON position. You should see indicator LEDs light up on the control box. The system will boot its internal computer – give it a minute or so to start up.
-
Release Arm Brakes via Franka Desk: The arm uses a web-based interface called Desk for user control and configuration. Using a web browser on your connected PC, navigate to the robot's address. When you connect, you'll reach the Franka Web Interface. Log in with the default credentials. See the robot's manual for more information.
Once in Desk, there should be an option like "Unlock" or "Open" the brakes. Desk will then release the arm's motor brakes, allowing the robot to be moved.
-
Switch to Execution Mode: To control the robot from an external application (like a ROS driver or your own code via FCI), you need to put the robot in Execution mode. In the Desk UI, look for the mode selector and choose Execution.
-
Activate FCI: The arm provides the Franka Control Interface (FCI) – a real-time interface for external control. The FCI is not automatically enabled on boot for safety reasons. To activate it, go to the Desk UI's system menu and click Activate FCI. This will allow your PC to send real-time commands to the robot.
At this point, the hardware is powered and initialized.
6. Connect to MoveIt Pro
For the best hardware performance, we recommend setting up the control computer to run Debian Bookworm. We use this OS to take advantage of the real-time kernel for commanding the robot hardware.
The following process differs slightly from what is described in our software installation guide. For the Franka configuration, we need to remove two COLCON_IGNORE files and recompile the example workspace.
To use MoveIt Pro, you must install Docker. If you don't have Docker installed, you can install it by downloading and running a convenience script.
curl -fsSL https://get.docker.com -o get-docker.sh
sudo sh get-docker.sh
To operate Docker as a non-root user, run the following commands. Then, log out and log back in so that your group membership is re-evaluated.
sudo groupadd docker
sudo usermod -aG docker $USER
To install MoveIt Pro, run the commands:
sudo apt install curl
curl -Lo /tmp/moveit-pro-8.4.0-any.deb https://github.com/PickNikRobotics/moveit_pro_deb/raw/main/picknik/moveit-pro-8.4.0-any.deb
sudo apt install /tmp/moveit-pro-8.4.0-any.deb
Download the example workspace. You may be prompted to enter your license during setup.
moveit_pro setup_workspace
When asked to select a configuration package, skip this step for now by pressing enter (which selects the default robot config).
List of available robot configs:
- factory_sim
- grinding_sim
- hangar_sim
- kinova_sim
- lab_sim
- mock_sim
- multi_arm_sim
- space_satellite_sim
- space_satellite_sim_camera_cal

Note that not all configs might be shown due to MOVEIT_PRO_IGNORE files.

Please enter your desired MoveIt Pro robot config package: ...press enter here...
Remove the following files from the user workspace:
rm ~/moveit_pro/moveit_pro_example_ws/src/moveit_pro_franka_configs/COLCON_IGNORE
rm ~/moveit_pro/moveit_pro_example_ws/src/external_dependencies/franka_config/COLCON_IGNORE
Recompile the user workspace and restart MoveIt Pro using the Franka franka_mujoco_config.
moveit_pro build
moveit_pro run -c franka_mujoco_config
This will run a simulation of the Franka arm.
To run on real hardware, you must first update the hardware configuration file and set the IP address of the arm.
gedit ~/moveit_pro/moveit_pro_example_ws/src/moveit_pro_franka_configs/franka_hw_config/config/config.yaml
According to the FR3 Product Manual, the robot's default network configuration uses the IP address range 192.168.0.0/24. The robot itself can be reached at IP address 192.168.0.1. The robot's built-in DHCP server automatically assigns IP addresses in the range 192.168.0.100 to 192.168.0.150 to connected clients.
Your PC will automatically receive an IP address once the control box is powered on. You can access the robot and update its settings (including its IP) through the web interface at https://robot.franka.de.
Finally, you can run MoveIt Pro on Franka hardware with the following command:
moveit_pro run -c franka_hw_config
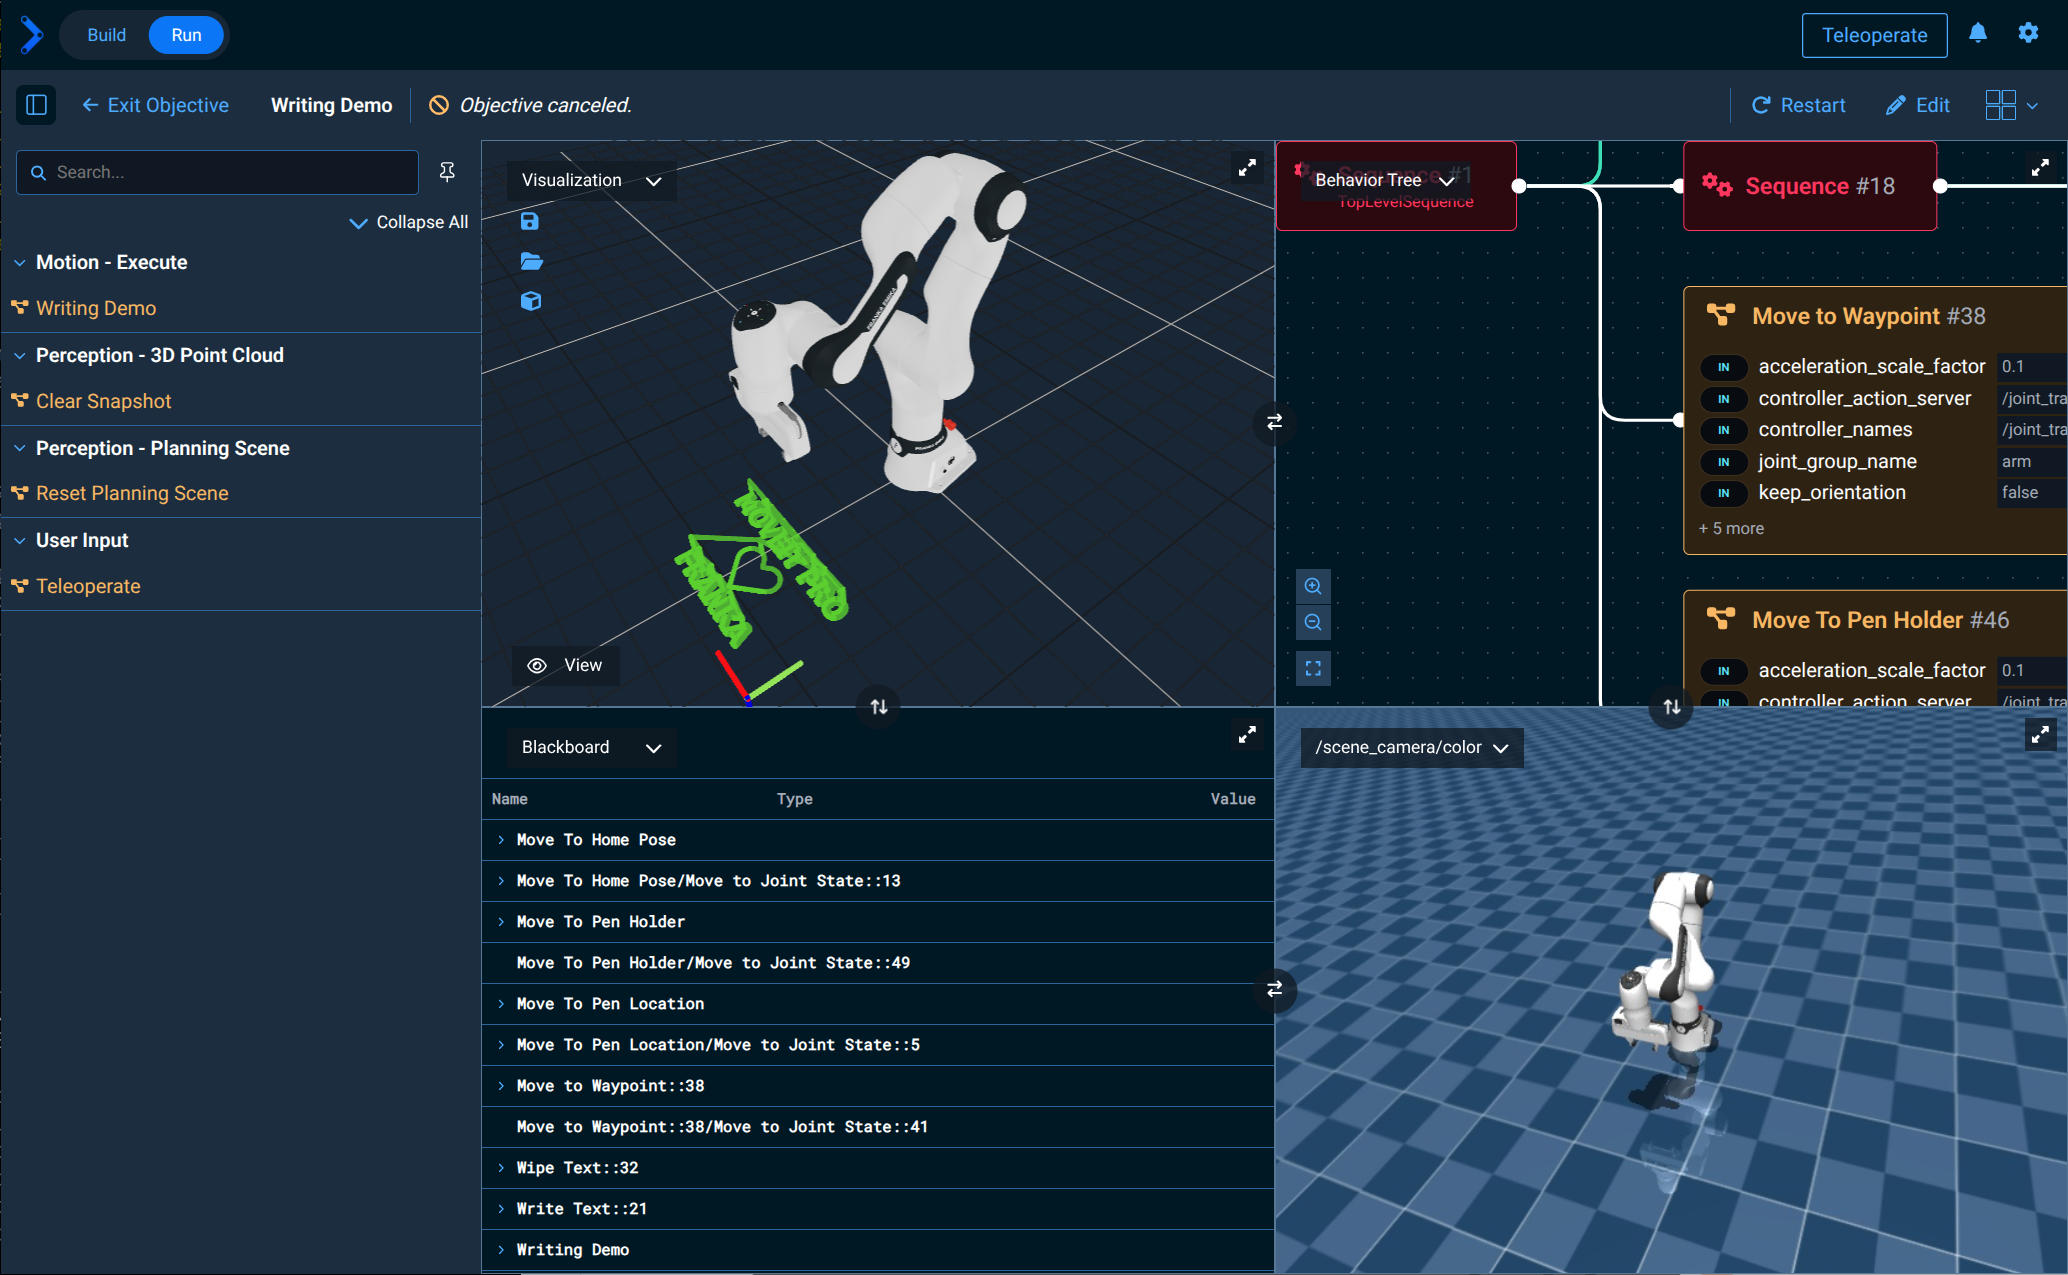
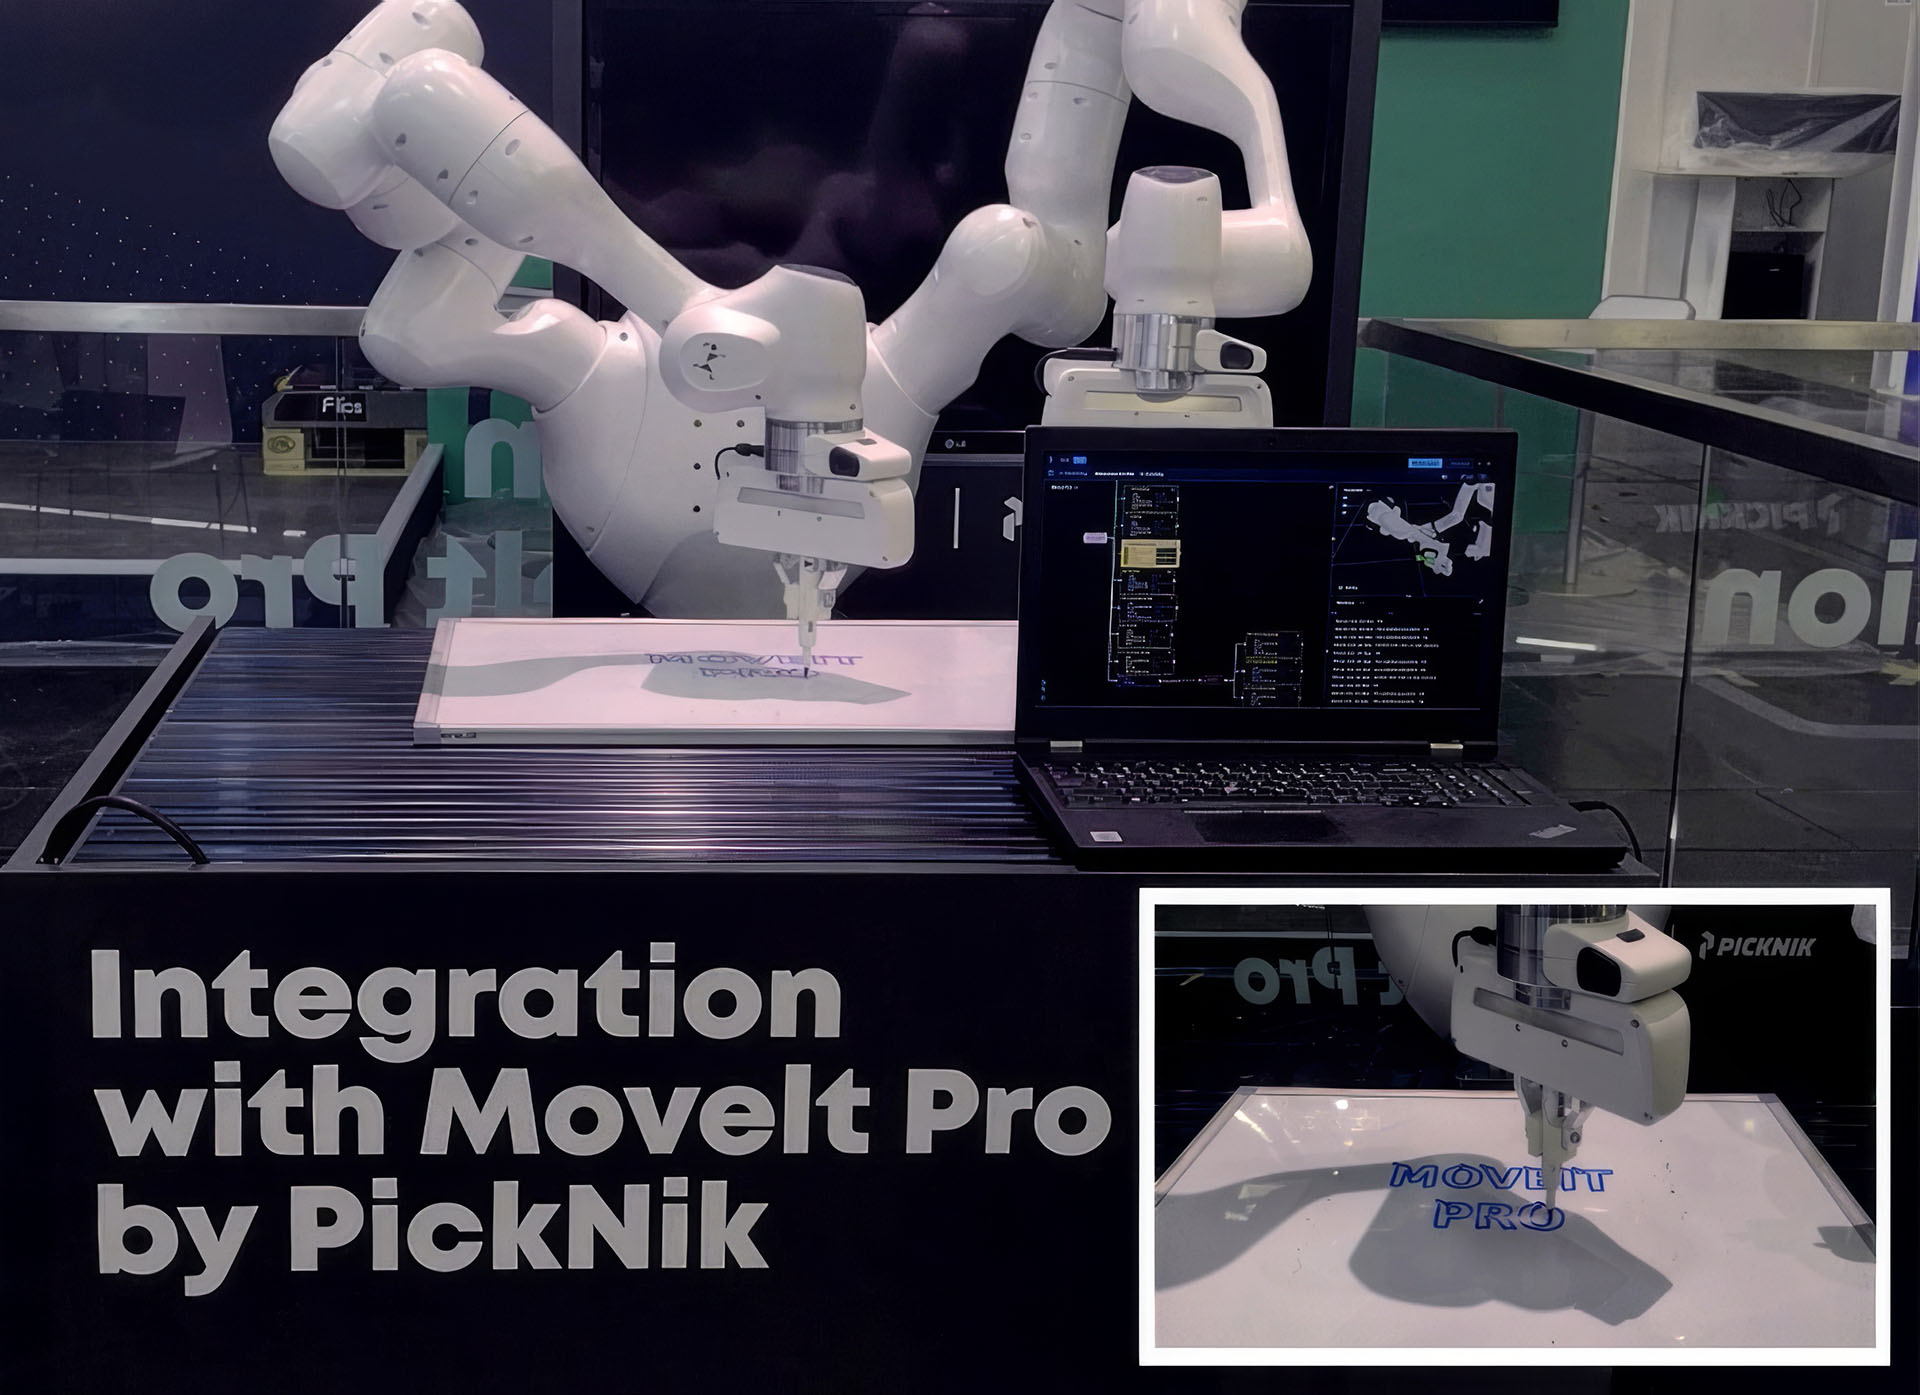
7. Demo
The Franka package franka_mujoco_config comes with a sample Objective called Writing Demo, which writes text in front of the robot, following a predefined trajectory loaded from a YAML file.
8. Dual-Arm Setup
We also provide configuration packages for dual-arm setups: franka_dual_arm_sim for virtual simulation and franka_dual_arm_config_hw for real hardware. In this setup, one arm writes text while the other arm erases it.
This dual-arm setup works on the same principles as the single-arm setup, with both arms mounted on a special angled mounting platform.
Resources
FR3 Product Manual
FR3 Quick Guide for Installation
Quick Guide for Service Box
Franka Hand Product Manual
Franka Hand Quick Guide for Installation