Adding Machine Learning Based Perception to Objectives
In this tutorial, you will learn about integrating machine learning (ML) for perception into MoveIt Studio. This kind of perception can enable applications like pick-and-place, opening doors, pressing buttons, part inspection, and more. This tutorial will cover the system architecture, including containerization, ROS interfaces, and creating custom MoveIt Studio Behaviors.
Motivation
Some of the Objectives in MoveIt Studio require user input, such as clicking a point on an image to identify an object in the scene. In contrast, this tutorial will show how to use machine learning to detect and estimate the pose of objects in the scene so that your Objectives can execute fully autonomously. These capabilities are useful in applications where a user or operator is not always present.
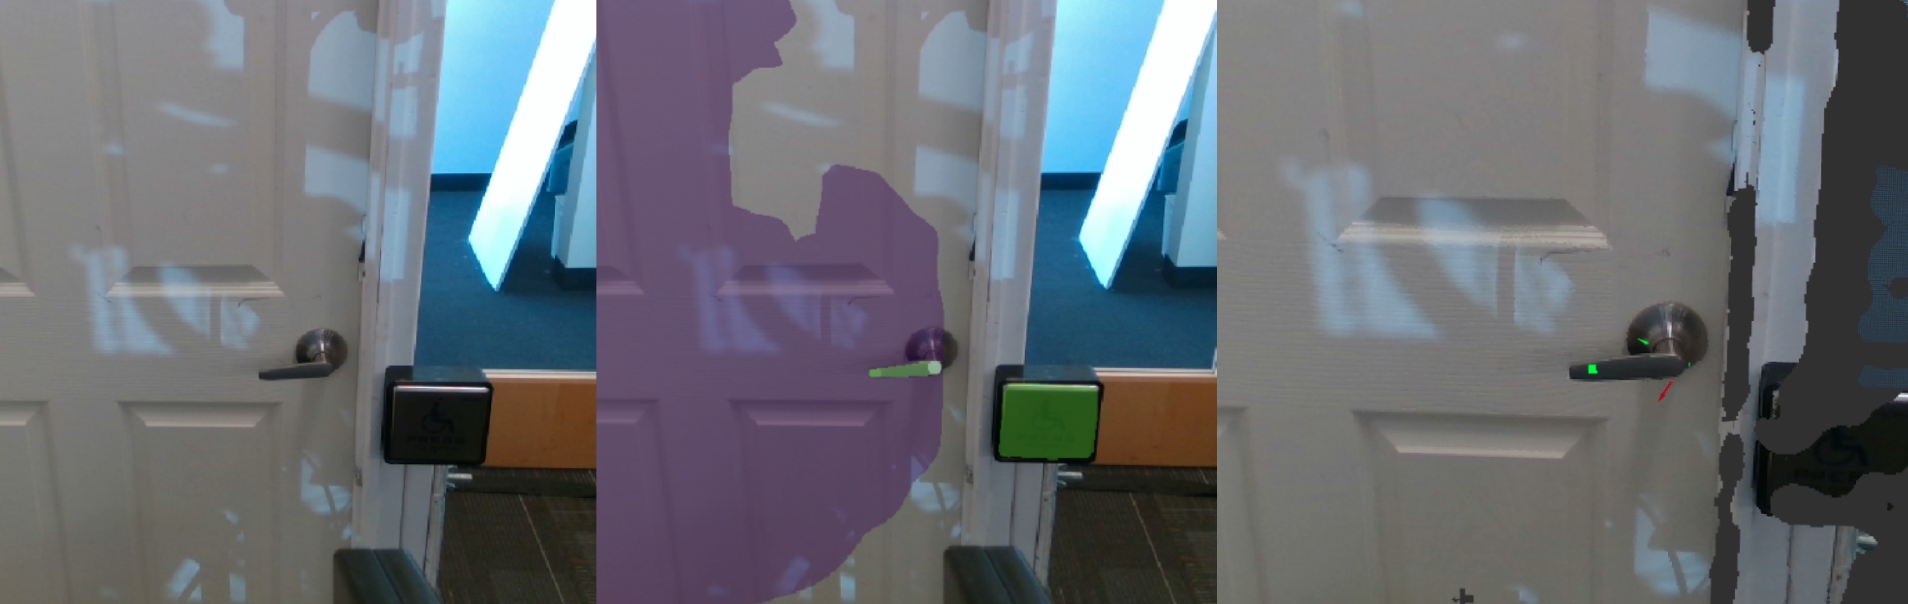
The type of ML we will be using here is instance segmentation, which is a type of image segmentation that identifies and classifies each object in the image. The output of the segmentation is a mask for each object, which can be used to extract the 3D pose of the object. See this tutorial for additional information on instance segmentation.
System Architecture
In this example, the ML pipeline we want to integrate two related capabilities:
Instance segmentation.
Pose estimation for the lever handle of a door, which uses the output of segmentation.
The two main components of this system are the Behaviors which are built and run in MoveIt Studio, and a separate Docker container which runs the ML code. Separating the two means we do not need to share dependencies between the two, and allows the ML pipeline to be run on separate hardware, such as GPUs in the cloud. Each component is run inside a Docker container. Running the ML container inside Docker is one way to create an isolated development environment or runtime, but it not a strict requirement.
The figure below illustrates how the packages, Docker containers, and ROS nodes are related. Text in blue is the name of ROS a package.
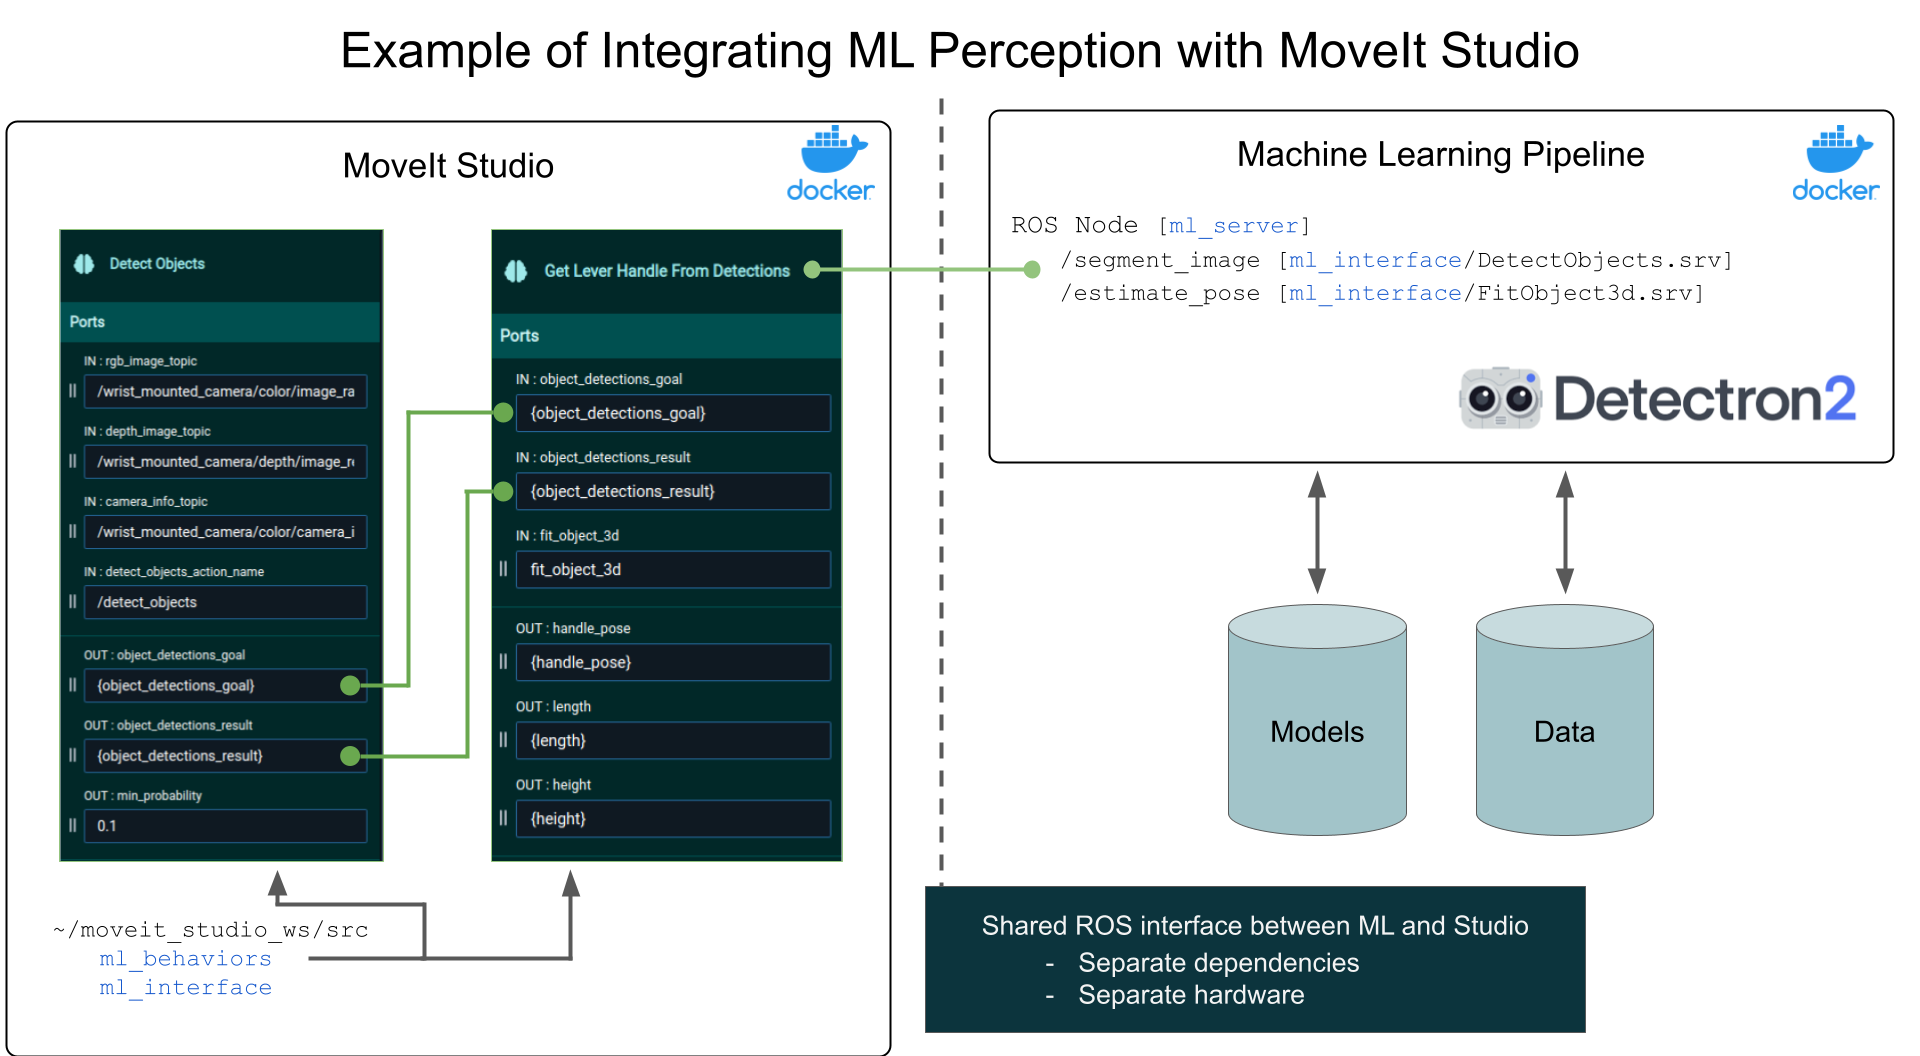
Suppose you’re creating three new ROS packages:
ml_behaviorswill define new MoveIt Studio Behaviors that call the ML pipeline as ROS services.ml_serverwill host the ML pipeline as a ROS service, which runs in a separate container with GPU compute capabilities.ml_interfacewill define the ROS message and service files which describe the interface between the ML and the MoveIt Studio container.
The two containers communicate via ROS.
The package ml_interface containers ROS interface definitions for two ROS Services, segment_image and estimate_pose.
Inside the ML container, there is a ROS Node that provides these services.
On your host system, create a User Workspace at a chosen location (for example, ~/moveit_studio_ws/).
This will contain both the ml_interface package, and another package ml_behaviors which calls the ROS services provided by the ML container.
This workspace will be mounted into the MoveIt Studio Docker containers.
The ml_behaviors package contains two behaviors:
- Detect Objects
Detects Objects in the RGB image and outputs instance segmentation masks and bounding boxes with class names and confidence scores.
- Get Lever Handle From Detections
Takes the output of Detect Objects and outputs the 3D representation of the lever handle.
For information on how to create your own custom behaviors, see the Objective Building Examples tutorials.
When building an Objective, we use the Detect Objects Behavior followed the Get Lever Handle From Detections Behavior.
As illustrated by the green lines in the figure above, the ports detect_objects_goal and detect_objects_result are passed from the Detect Objects Behavior to the Get Lever Handle From Detections Behavior.
These behaviors call the ROS services segment_image and estimate_pose to perform the ML tasks.
Building custom behaviors that call ROS services or actions can be done by inheriting from the Built-In Behaviors ActionClientBehaviorBase or ServiceClientBehaviorBase.
Elsewhere on your host system, create a ROS workspace for the ML code (for example, ~/ml_ws).
This new workspace will contain ml_server and ml_interface.
ROS Interface Definitions
The ROS interface definitions for the segment_image and estimate_pose services might look like this:
# segment_image.srv
#
# Request
sensor_msgs/Image source_rgb_image
sensor_msgs/Image source_depth_image
sensor_msgs/CameraInfo source_rgb_camera_info

---
# Response
# Contains class ID and probability score
vision_msgs/ObjectHypothesis[] result_hypothesis
sensor_msgs/Image[] masks

bool success
string error_message
# estimate_pose.srv
#
# Request
# original inputs plus the outputs from /segment_image
sensor_msgs/Image source_rgb_image
sensor_msgs/Image source_depth_image
sensor_msgs/CameraInfo source_rgb_camera_info
vision_msgs/ObjectHypothesis[] result_hypothesis
sensor_msgs/Image[] masks

---
# Response
vision_msgs/ObjectHypothesis[] result_hypothesis
geometry_msgs/PoseStamped[] poses

bool success
string error_message
Launching the ML Pipeline along side MoveIt Studio
To run the ML alongside MoveIt Studio, the ML Docker container needs to be launched.
Launch the pipeline in with a one-line command by creating a service in a docker-compose.yaml file that builds and launches the ROS nodes.
These Docker files could be placed in the ml_server package inside the ~/ml_ws ROS workspace.
For example:
docker compose up detect_and_fit
# docker-compose.yaml
# an example Docker Compose file
services:
base:
    image: ml_base
    build:
    context: .
    dockerfile: .docker/Dockerfile
    # Interactive shell
    stdin_open: true
    tty: true
    # Networking and IPC for ROS 2
    network_mode: host
    ipc: host
    # add GPU capabilities
    environment:
        - ROS_DOMAIN_ID
        - RMW_IMPLEMENTATION
        # Allows graphical programs in the container
        - DISPLAY=${DISPLAY}
        - QT_X11_NO_MITSHM=1
        - NVIDIA_DRIVER_CAPABILITIES=all
        - NVIDIA_VISIBLE_DEVICES=all
    volumes:
        # Mount the ROS workspace containing the source code
        - ../../:/ml_ws/:rw
        # Allows graphical programs in the container
        - /tmp/.X11-unix:/tmp/.X11-unix:rw
        - ${XAUTHORITY:-$HOME/.Xauthority}:/root/.Xauthority
        # Mount the host's DDS config(s)
        - ${CYCLONEDDS_URI:-/dev/null}:/opt/.ros/cyclonedds.xml
    deploy:
        resources:
            reservations:
            devices:
                - capabilities: [gpu]
        # command gets passed to the ros_entrypoint.sh, which ends by executes it
    command: /bin/bash

# build the ROS 2 workspace in a separate service,
# so we ensure the workspace is built before we launch the nodes.
workspace_builder:
    extends: base
    entrypoint: /opt/.ros/ros_entrypoint.sh
    command: bash -c "source /ml_ws/src/ml_behaviors/.docker/build_ws.sh"

# add a service that runs the ROS launch command to start the ML pipeline
# this service will be named `detect_and_fit`
detect_and_fit:
    extends: base
    depends_on:
    workspace_builder:
        condition: service_completed_successfully
    entrypoint: /opt/.ros/ros_entrypoint.sh
    command: ros2 launch ml_server detect_and_fit.launch.xml
Then, MoveIt Studio can be launched as usual:
./moveit_studio run
Video Demonstration of Opening Lever Handle Door
The video below shows the result of integrating a custom ML pipeline for detecting lever handles into MoveIt Studio.
The behaviors Detect Objects and Get Lever Handle From Detections are used to detect the lever handle,
then built-in behaviors are used to plan and execute a trajectory to open the door.
Conclusion
This tutorial showed an example of how an ML pipeline can be integrated into MoveIt Studio. From here, you can apply these ideas to your own ML pipeline.