Creating an Objective
Tutorial Level: Beginner
This tutorial will walk you through how to use the objective builder to create a basic pick and place application.
Configure your workspace using moveit_pro configure to use the lab_sim configuration in the default user workspace ("moveit_pro_example_ws").
Launch MoveIt Pro
We assume you have already installed MoveIt Pro and configured it to use the user workspace. Launch the application using:
moveit_pro run -c lab_sim
Adding -c lab_sim to the moveit_pro run command allows you to select a different robot configuration without using moveit_pro configure.
MoveIt Pro will launch the most recently used configuration if one is not provided.
1. Create New Objective
In the "Build" screen click the "+ Objective" button to create a new Objective.
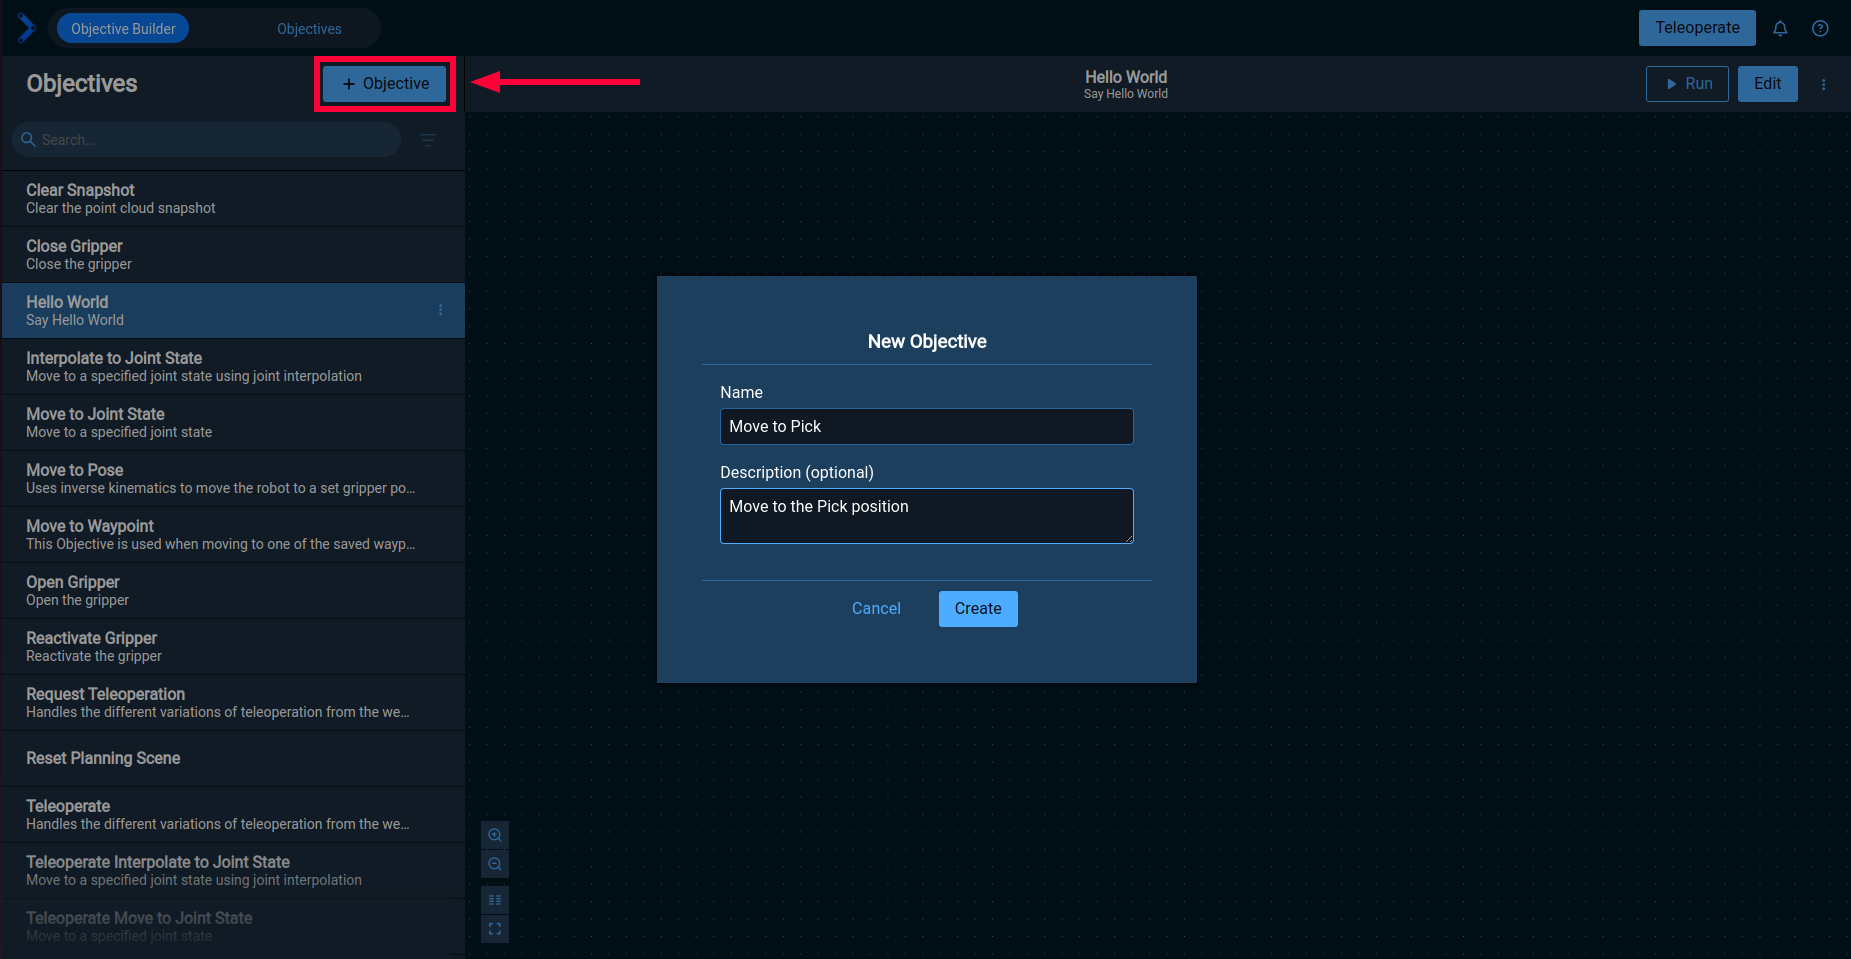
Enter the following information and click the "Create" button.
- Name: Move to Pick
- Description: Move to the Pick position
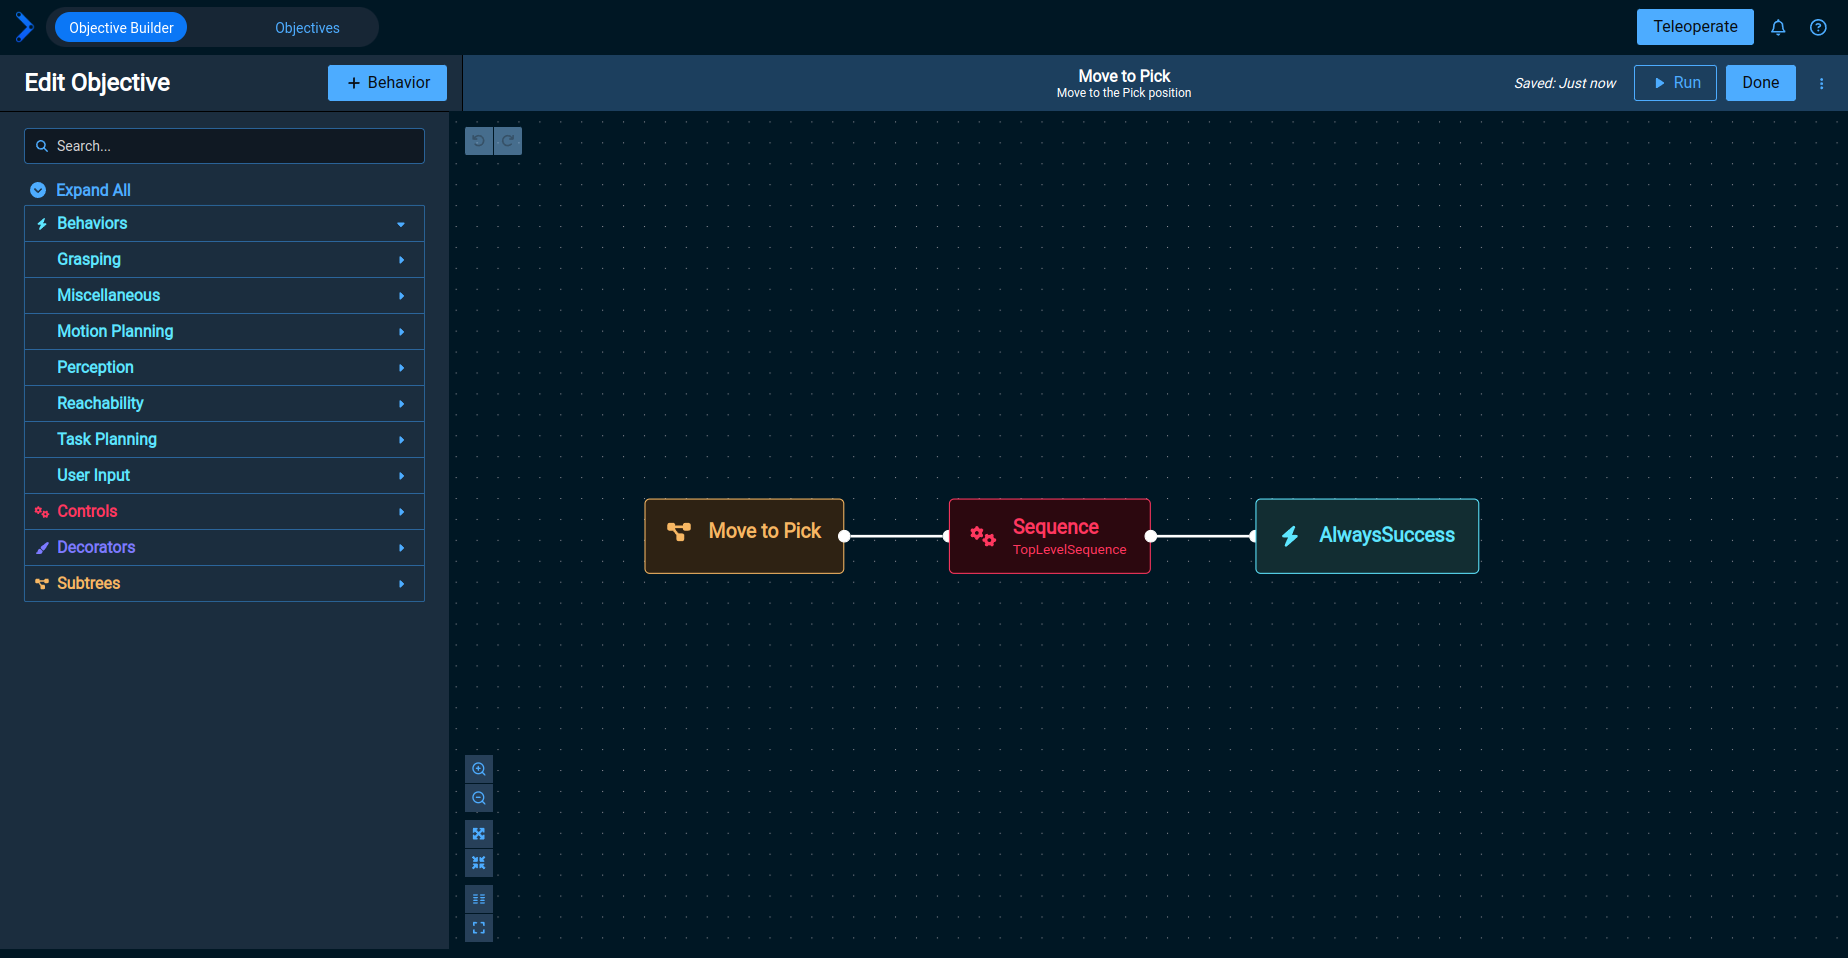
The Objective has been created and can now be edited or executed. By default, a simple behavior tree that will always succeed is generated.
2. Modify the Objective
While editing an Objective in the Objective Builder, the full list of Behaviors available for inclusion is provided in the left panel. Additional information about each Behavior is available by hovering the cursor over the name.
The first Behavior needed is Create Stamped Pose, which allows us to place a geometry_msgs/PoseStamped ROS 2 message on the blackboard.
It can be found under the Miscellaneous heading or using the search bar on the left panel.
Drag the Behavior on to the editor canvas and release it.
Move it above the Always Success Behavior, near the Sequence control node, and a dotted line indicating a connection between the two is shown.
When the cursor is released the behavior will be connected with a solid line.
You can manually remove connections by selecting it and pressing delete, as well as connect existing Behaviors by dragging from one to the other.
The next step of this objective is to move to the given pose.
We will use a Subtree (a behavior tree within a behavior tree) to minimize repeated information.
From the Subtrees section, drag Move to Pose on to the canvas and attach it to the Sequence node.
You can now remove the Always Success behavior from the objective.
Press the Auto layout button to align your behaviors.
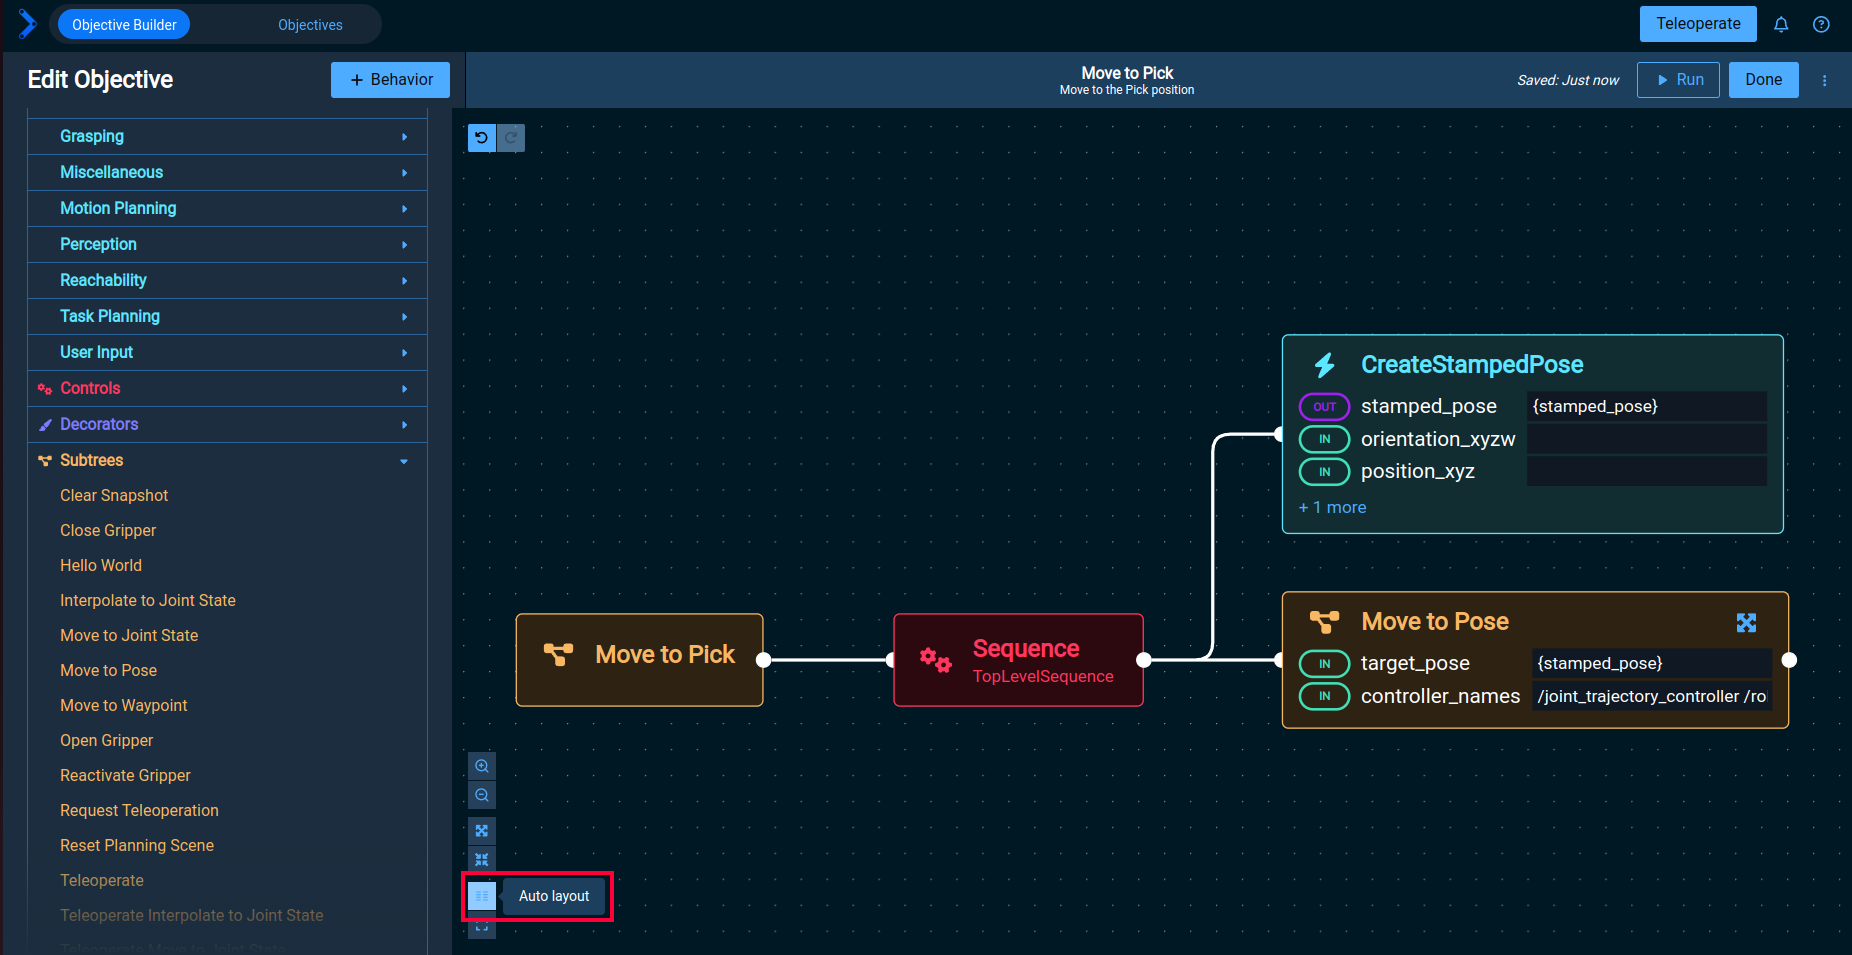
Ensure that the Create Stamped Pose behavior is above the Move to Pose Subtree.
A behavior tree executes from top to bottom, so we must ensure the goal pose is created and placed on the blackboard for the Move to Pose Subtree before it runs.
The blackboard is a behavior tree concept.
It is a location to store runtime data in the form of a key/value pair.
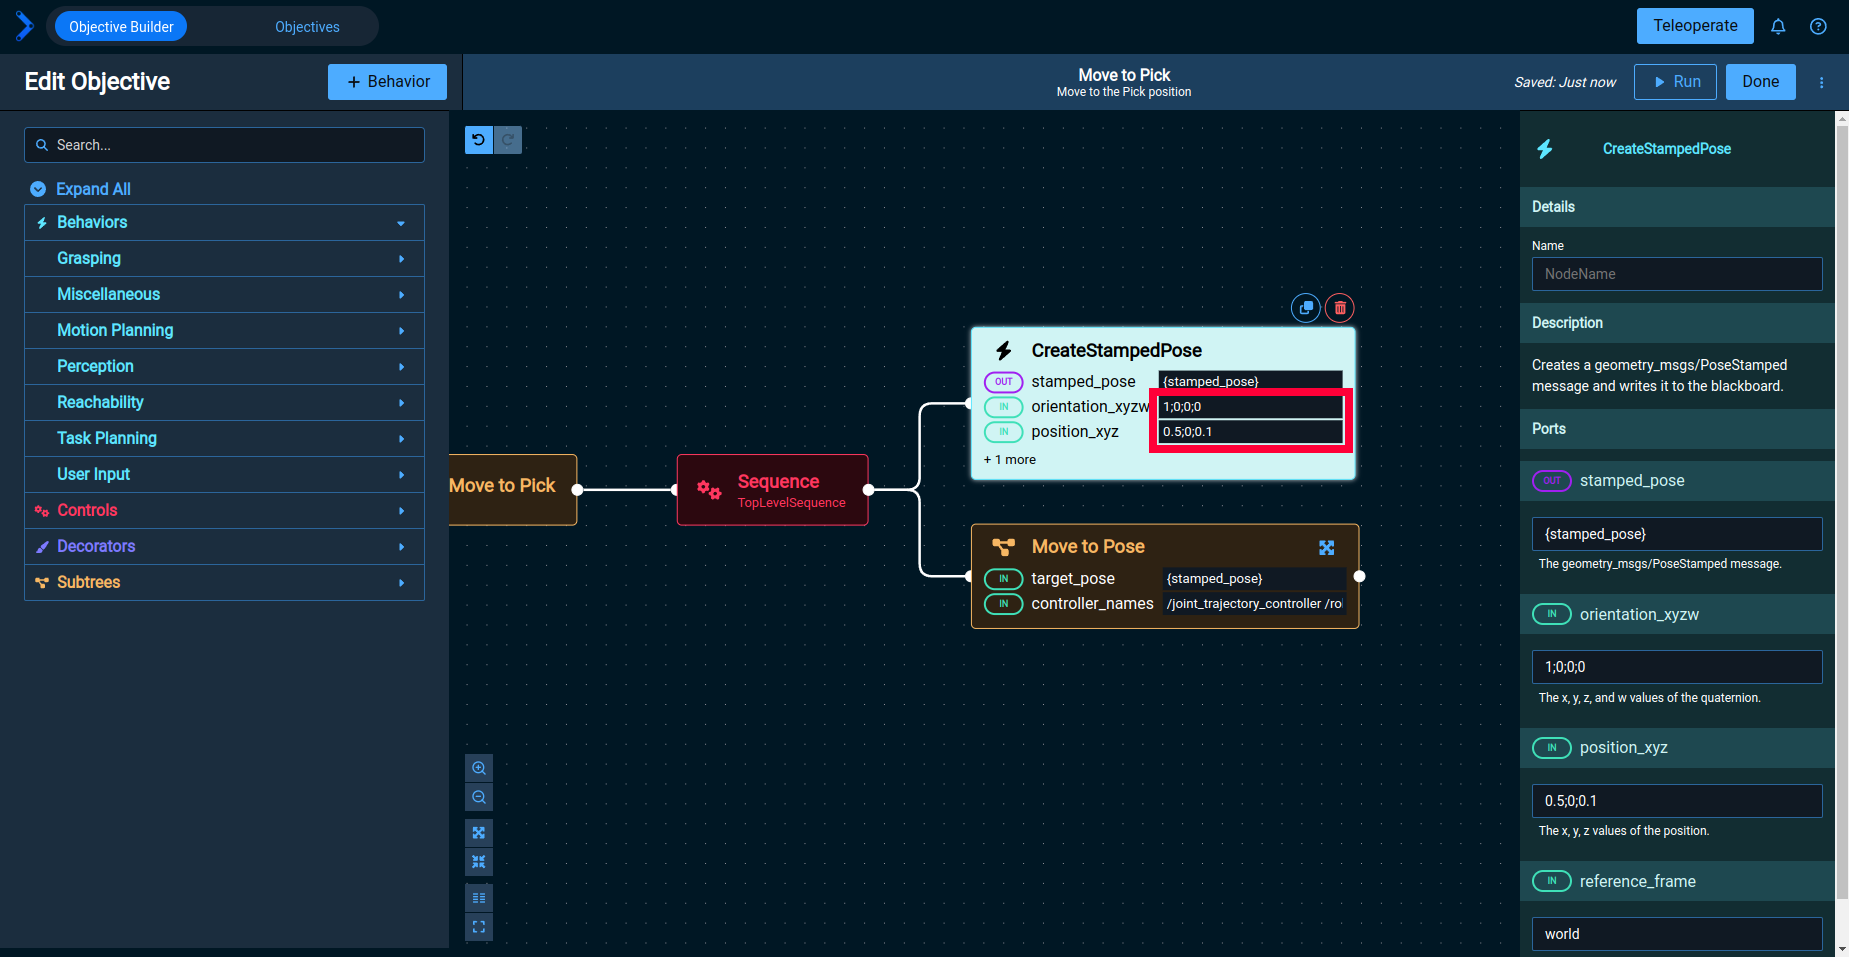
Create Stamped Pose has an out port that places a pose on the blackboard using the key stamped_pose.
Move to Pose has an in port that reads the key off the blackboard. Ensure that this in port also reads {stamped_pose}.
A value wrapped in braces like {stamped_pose} points to an object or variable, otherwise the value's type is determined by the contents (string, int, bool, etc.)
Finally we can specify the Pick location using an orientation quaternion and position vector defined in the reference frame of our choosing.
In this example we will choose a location over the middle block. Using semicolons to separate values we will define the quaternion as 0;1;0;0 and the position vector using 0;0.75;0.725.
Click "Done" in the top right to finish editing the objective.
3. Run the Objective
From the Build tab, select Move to Pick and click the Run button in the top right. You will be transitioned to the Run tab where you can see a visualization of the robot state along with the behavior tree. The currently running behavior (and its parent nodes) are highlighted during execution.
You will need to approve the trajectory in the Visualization window due to the Wait for Trajectory Approval if User Available behavior in Move to Pose. Since we will go over failure recovery in more detail in the next tutorial, you can delete this behavior from within the Move to Pose Subtree to skip this approval step.

4. Create a Pick and Place Objective
Now that we have created a Move to Pick Objective we can use it within a larger Pick and Place Objective.
Navigate back to the Build tab to create a new Objective, and name it "Pick and Place".
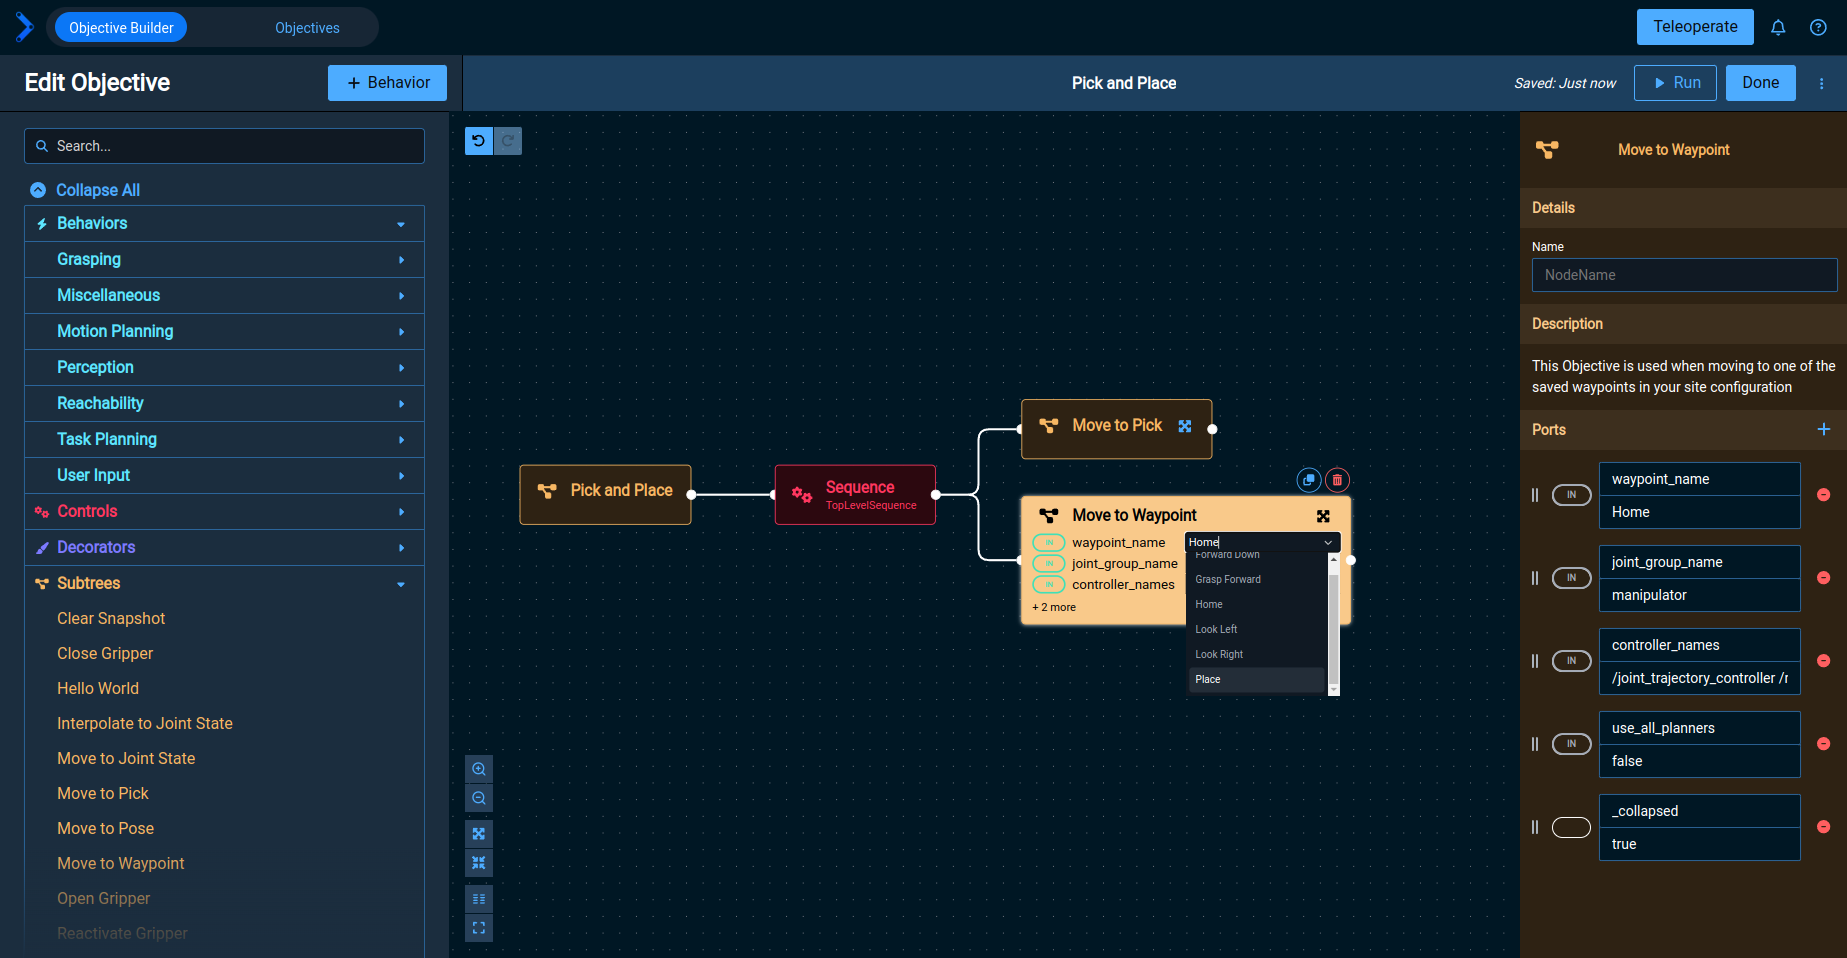
From the Subtrees section add the Move to Pick and Move to Waypoint Subtrees as shown:
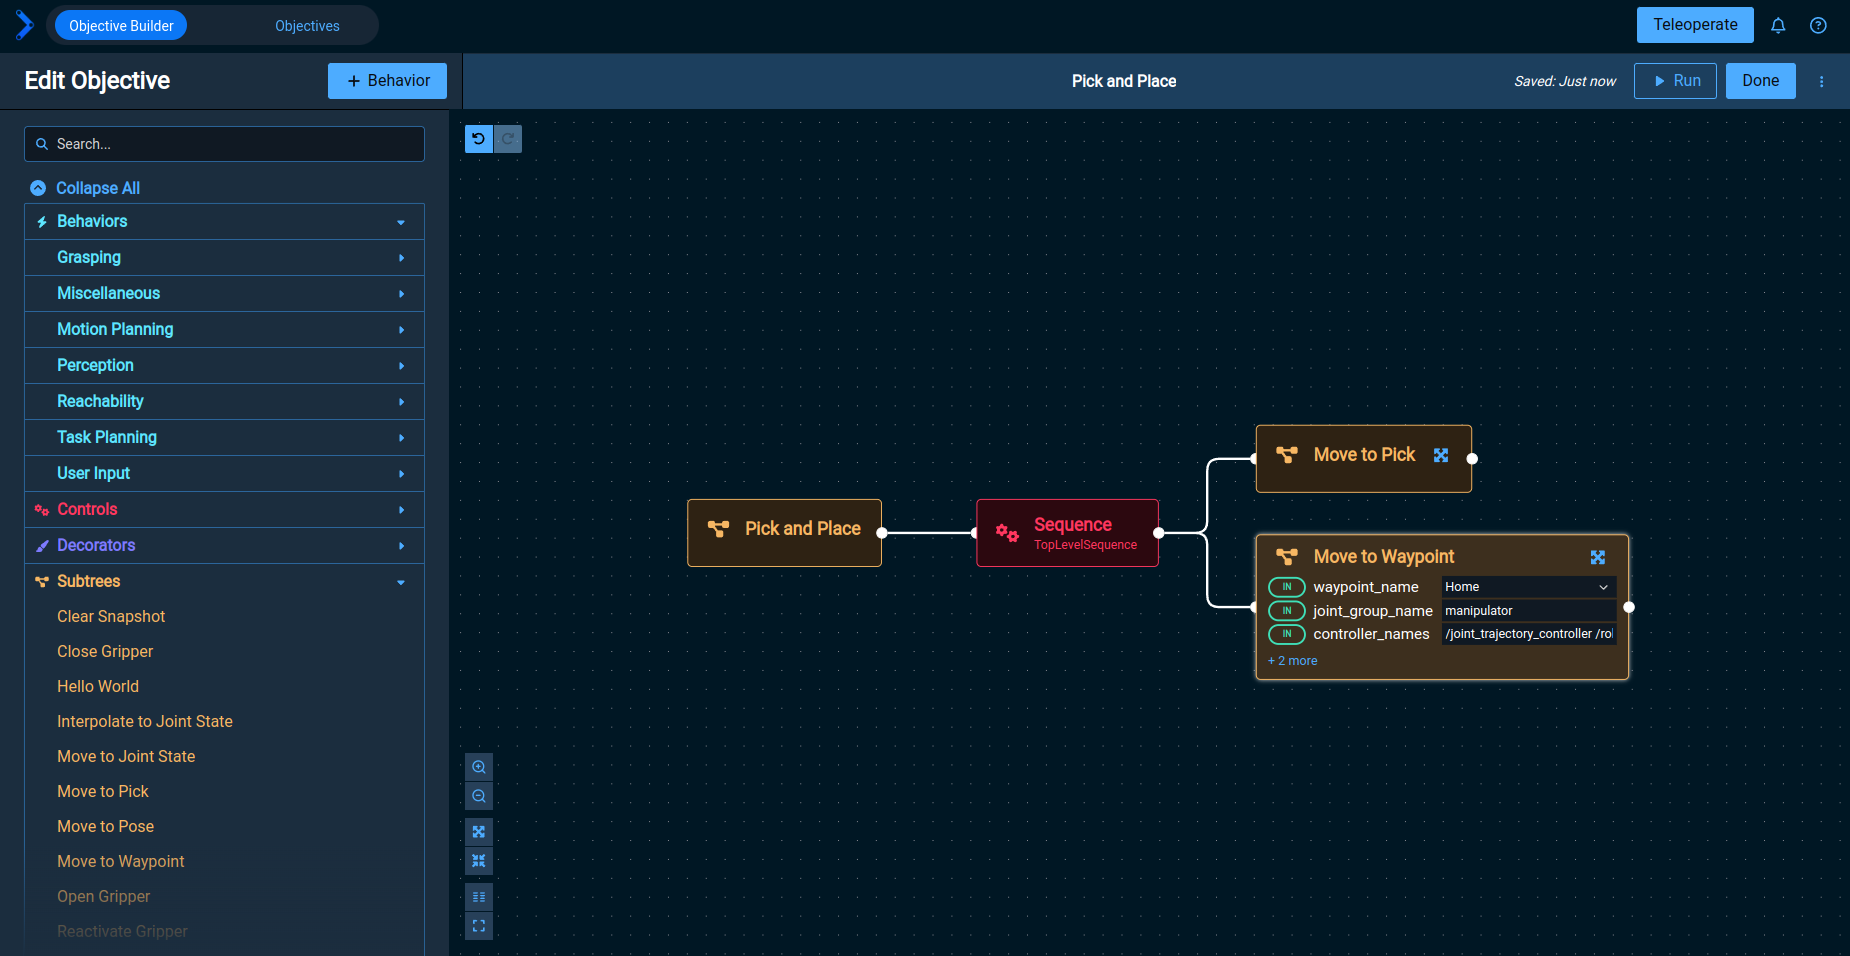
In the example workspace an Above Place Cube waypoint has already been saved.
Select it from the dropdown menu of the Move to Waypoint Subtree.
When you run this Objective it will complete a single pick and place action. Note that we are simulating a simple pick-and-place motion in space above the center block, so this motion won't actually pick up or move the block. Next we will modify the objective to continue running until a failure occurs.
Delete the connection between the Pick and Place and Sequence nodes.
From the Behavior pane on the left, add the Decorator node called Keep Running Until Failure and add it to your behavior tree so it looks like the one below.
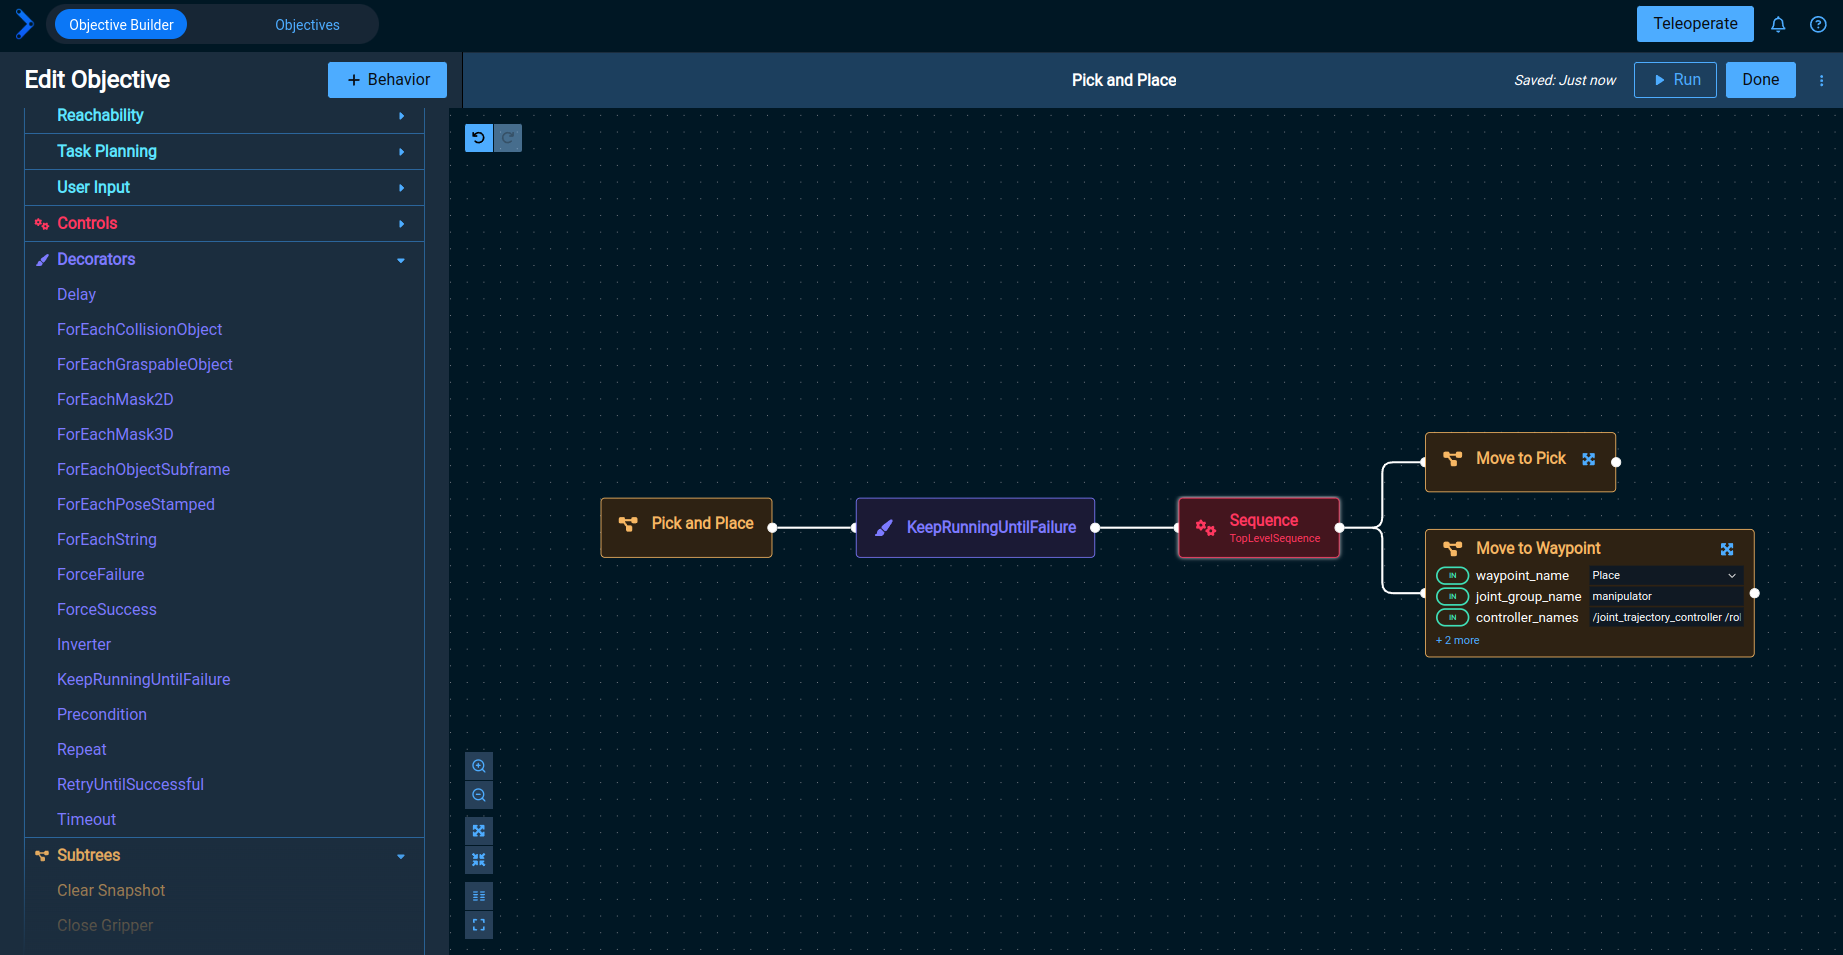
Behaviors (blue) and subtrees (yellow) are robot skills. Control nodes (red) dictate which behaviors and subtrees to execute and when to do so. Decorators (purple) are used to modify the execution of your behavior tree.
Your pick and place behavior will now repeat until there is a failure or the objective is stopped.
Using the Open Gripper and Close Gripper subtrees, can you make the pick and place behavior more realistic?
For an interactive demonstration, explore the 3 Waypoints Pick and Place objective.
5. Next Steps
Now that you have your robot performing a pick and place action, lets make our behavior tree more robust. In the next tutorial, Adding Failure Recovery to your Behavior Tree, we will introduce fallbacks with human-in-the-loop failure recovery.